Recently I came across a piece of code which is nearly 50 lines long, plus several global variables, a state machine, all it does is to debounce two buttons. Button debounce does not to be this complicate, in this article I will show you probably the simplest button debounce solution.
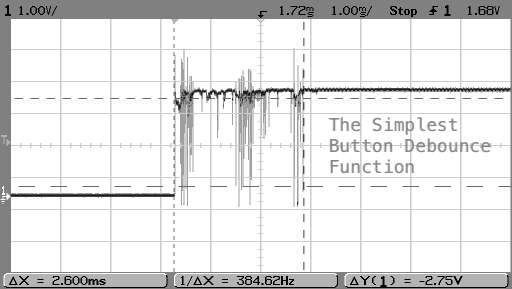
The needs for debouncing a button is a well-understood problem in the embedded development world. Buttons (A.K.A. Pushbuttons, or switches) often generate spurious open/close transitions when pressed, causing by its mechanical design and material it used. These transitions may be read by an MCU as multiple presses and therefore need to be "debounced" either with some extra hardware or some software solution.
The idea of button debouncing is simple, when a button is pressed, you will wait for it to reach a stable state and only then take the button input as the ultimate state, whether it is an ON or an OFF.
Debounce shouldn't be this complicate
Recently I saw this piece of code when I working on a project which requires me to port some code from one MCU platform to another platform.
switch (debounceState)
{
  case DEBOUNCE_STATE_IDLE:
    // No valid switch press
    switchStatus = SWITCH_NONE;

    switchValue = readSwitch();

    // If either switch is pressed
    if (switchValue != SWITCH_NONE)
    {
      // Keep track of the pressed switch
      switchMask = switchValue;
      // Intialize debounce counter
      lastDebounceTime = millis();
      // Proceed to check validity of button press
      debounceState = DEBOUNCE_STATE_CHECK;
    }
    break;

  case DEBOUNCE_STATE_CHECK:
    switchValue = readSwitch();
    if (switchValue == switchMask)
    {
      // If minimum debounce period is completed
      if ((millis() - lastDebounceTime) > DEBOUNCE_INTERVAL)
      {
        // Valid switch press
        switchStatus = switchMask;
        // Proceed to wait for button release
        debounceState = DEBOUNCE_STATE_RELEASE;
      }
    }
    // False trigger
    else
    {
      // Reinitialize button debounce state machine
      debounceState = DEBOUNCE_STATE_IDLE;
    }
    break;

  case DEBOUNCE_STATE_RELEASE:
    switchValue = readSwitch();
    if (switchValue == SWITCH_NONE)
    {
      // Reinitialize button debounce state machine
      debounceState = DEBOUNCE_STATE_IDLE;
    }
    break;
}
This nearly 50 lines of code uses a state machine to determine the state of two buttons, it is heavily commented because without those comments, it getting difficult to know what exactly is going on with the logic. It requires a few global variables and some set up to make it work.
typedef enum SWITCH
{
  SWITCH_NONE,
  SWITCH_START_STOP,
  SWITCH_LF_RF
} switch_t;
switch_t switchStatus;
switch_t switchValue;
switch_t switchMask;

typedef enum DEBOUNCE_STATE
{
  DEBOUNCE_STATE_IDLE,
  DEBOUNCE_STATE_CHECK,
  DEBOUNCE_STATE_RELEASE
} debounceState_t;
debounceState_t debounceState;
I don't like what I saw, how can someone write such complicate software for a simple task of button debouncing? I decided to replace it with a much much simpler solution. But before doing so, I was also curious of what is the "best practise" type of the code used in the Arduino community for button debouncing? So I found this code from Arduino.cc tutorials website, this code has been around for quite sometime, was written by some David Mellis in 2006, and later been modified/enhanced multiple times, one of the person who modified the code is Lady Ada (Limor Fried - the founder/owner of Adafruit). So this code is consider the best practise of code for debouncing and well circulated and quote in various Arduino tutorials.
/*
  Debounce

  Each time the input pin goes from LOW to HIGH (e.g. because of a push-button
  press), the output pin is toggled from LOW to HIGH or HIGH to LOW. There's a
  minimum delay between toggles to debounce the circuit (i.e. to ignore noise).

  The circuit:
  - LED attached from pin 13 to ground through 220 ohm resistor
  - pushbutton attached from pin 2 to +5V
  - 10 kilohm resistor attached from pin 2 to ground

  - Note: On most Arduino boards, there is already an LED on the board connected
    to pin 13, so you don't need any extra components for this example.

  created 21 Nov 2006
  by David A. Mellis
  modified 30 Aug 2011
  by Limor Fried
  modified 28 Dec 2012
  by Mike Walters
  modified 30 Aug 2016
  by Arturo Guadalupi

  This example code is in the public domain.

  https://www.arduino.cc/en/Tutorial/BuiltInExamples/Debounce
*/

// constants won't change. They're used here to set pin numbers:
const int buttonPin = 2;    // the number of the pushbutton pin
const int ledPin = 13;      // the number of the LED pin

// Variables will change:
int ledState = HIGH;         // the current state of the output pin
int buttonState;             // the current reading from the input pin
int lastButtonState = LOW;   // the previous reading from the input pin

// the following variables are unsigned longs because the time, measured in
// milliseconds, will quickly become a bigger number than can be stored in an int.
unsigned long lastDebounceTime = 0;  // the last time the output pin was toggled
unsigned long debounceDelay = 50;    // the debounce time; increase if the output flickers

void setup() {
  pinMode(buttonPin, INPUT);
  pinMode(ledPin, OUTPUT);

  // set initial LED state
  digitalWrite(ledPin, ledState);
}

void loop() {
  // read the state of the switch into a local variable:
  int reading = digitalRead(buttonPin);

  // check to see if you just pressed the button
  // (i.e. the input went from LOW to HIGH), and you've waited long enough
  // since the last press to ignore any noise:

  // If the switch changed, due to noise or pressing:
  if (reading != lastButtonState) {
    // reset the debouncing timer
    lastDebounceTime = millis();
  }

  if ((millis() - lastDebounceTime) > debounceDelay) {
    // whatever the reading is at, it's been there for longer than the debounce
    // delay, so take it as the actual current state:

    // if the button state has changed:
    if (reading != buttonState) {
      buttonState = reading;

      // only toggle the LED if the new button state is HIGH
      if (buttonState == HIGH) {
        ledState = !ledState;
      }
    }
  }

  // set the LED:
  digitalWrite(ledPin, ledState);

  // save the reading. Next time through the loop, it'll be the lastButtonState:
  lastButtonState = reading;
}
This code is much simpler, easier to understand compare to the previous one. With some effort, it could be re-factor into a function and change some of the global variables into static scope to create a self-contained, re-usable debounce() function. But it is still not as simple as it should be.
The simplest debounce function
The simplest button debounce function that I came across many years ago (and use it ever since in my projects) is the one written by Jack Ganssle in his part 2 of the "A guide to debouncing" article. My version is slight different from Ganssle's original code, I made it works for Arduino, further simplify the code a little bit, and uses a different value for determine the debounced state.
bool debounce() {
  static uint16_t state = 0;
  state = (state<<1) | digitalRead(btn) | 0xfe00;
  return (state == 0xff00);
}
All you need is a button connect between a GPIO pin and ground. There is no other component required, you will need to setup the GPIO pin with internal resistor to INPUT_PULLUP so the GPIO pin remain HIGH when the button is not been pressed. We write a simple sketch to test the debounce function by toggling the on-board LED every time the button is pressed:
#define btn 2  //assuming we use D2 on Arduino

void setup() {
  pinMode(btn, INPUT_PULLUP);
  pinMode(LED_BUILTIN, OUTPUT);
}

void loop() {
  if (debounce()) {
    digitalWrite(LED_BUILTIN, !digitalRead(LED_BUILTIN));
  }
}
When the button is pressed, the button pull the GPIO pin to ground and produce a 0. The value is added into the state through OR | operator, and shift up through shift << operator each time the button pin is read, the 0xfe00 is a bit mask that mask-out the higher byte, and sort of means that we only care if the lower byte produce a consecutive stream of 0.
When you think of the bouncing problem, the button is in an unstable mode for the initial a few microseconds when it is pressed, and could produce a stream of either 0 or 1 during that few microseconds. If our little function could detect a pattern consists of a stream of 0 after 8 times of reading the button pin, the state | 0xff00 would produce a true, in another word, the button has reached to a stable state and no longer bouncing around.
This debounce code is easy to understand if you are coming from hardware background or you had experience of using shift-register before. That is because if you think of each read of GPIO pin as a digital clocking signal, the lower 4-bit of the state as a 4-bit serial-in, parrallel-out shift-register, the output value of true can be produced with an NOR gate as shown below. Of course no one will use this elaborated hardware for debouncing purpose, but the circuit illustrated the algorithm used in our debounce() function to achieve button debouncing.

This is a simple and elegant debounce function. Just 5 lines of code, easy to understand and self-contain. But it can only handle one button.
Handling multiple buttons
It is not difficult to convert this function to support multiple buttons. I create a simple Arduino library by wrapping the function, the state variable and button setup in a C++ class.
button.h
#ifndef button_h
#define button_h

#include "Arduino.h"

class Button
{
  private:
    uint8_t btn;
    uint16_t state;
  public:
    void begin(uint8_t button) {
      btn = button;
      state = 0;
      pinMode(btn, INPUT_PULLUP);
    }
    bool debounce() {
      state = (state<<1) | digitalRead(btn) | 0xfe00;
      return (state == 0xff00);
    }
};
#endif
The code can be downloaded as an Arduino Library from https://github.com/e-tinkers/button.
You can test the library by adding one more button to Arduino and connect it to D3, and we will write a sketch to using the switch connected to D2 to turn on the built-in LED, and the switch connected to D3 to turn off the LED.
#include "button.h"

Button btn1;
Button btn2;

void setup() {
  btn1.begin(2);
  btn2.begin(3);
  pinMode(LED_BUILTIN, OUTPUT);
}

void loop() {
  if (btn1.debounce()) {
    digitalWrite(LED_BUILTIN, HIGH);
  }
  if (btn2.debounce()) {
    digitalWrite(LED_BUILTIN, LOW);
  }
}
Summary
Button debounce is a well-understood problem in embedded development, and debouncing function has been around since the early day of MCU. Some of the debouncing techniques that widely circulated around the Internet as "best practise" are not necessary the best or simplest button debounce solution. I hope this article will show you the simplest button debounce function that you could use in your Arduino program. For those who are new to Arduino or embedded programming, I would highly recommend to read "A guide to debouncing".
For switch debouncing, sampling at about 10 to 20 times per second is enough.
You need to look for edges so you need to take the differential. dButton/dt !
I read the uP port and xor it with the last read. This can read multiple buttons.
For touch sensors that read analogue levels, I found fricton works.
Instead of the differential, only update the last read if it is significantly different to the last read!
http://www.dougrice.plus.com/hp/Theory/Index.htm has some notes
I had a project using 3 pushbuttons.
Using your library I was able to successfully get it to work, and it was so much better than any of the other debounce programs I spent hours trying to get to work.
#include “button.h”
Button onPin; // the name of the On pushbutton pin
Button resetPin; // the name of the Reset pushbutton pin
Button disconPin; // the name of the Disconnect pushbutton pin
Much thanks.
Hi,
I was wondering if u wrore this incorrectly, or my undertanding is bad.
https://imgur.com/a/g3lcTjq
(Also ur source of this code wrote it swapped, as it doesnt make sense the way u wrote it, imo.)
Good catch. The button.h in the later part of the article and the version on github are using the correct mask of
0xfe00. I had made the correction.What a nice method to implement debounce. I just need to add an argument and ‘if’ to make it compatible for “pulled down” input. Thanks.
Any chance you can post your code for how you did that?
Sorry, I am confused. First, I appreciate your ideas and the clever ways to debounce. Jack Ganssle whom you site above says in his “Guide to Debouncing” article — (after testing 16 switches) “Although some of the switches ceased bouncing in less than 1 ms, the average was 1.6 ms, and the maximum was 6.2 ms.” Stated above “If our little function could detect a pattern consists of a stream of 0 after 8 times of reading the button pin….”. For an Arduino repeatedly calling debounce() 8 times would be < 30 uSec total duration. This is not sufficient to debounce a switch that glitches for ~6 ms. If we call debounce() every 1 ms, then it would seem to work… What am I missing?
“What am I missing”?
No matter what kind of speed of the MCU is running, we are looking for a consecutive consistent pattern, higher speed of MCU does not means that a consecutive consistent state will be achieved earlier, if the switch is noisy and take take 6.2ms to be stablized, a debounced state won’t happen earlier just because of you had a higher speed of MCU.
Given the comments from multiple questions, I encourage you to give it a try, personally I’m using it not just for Arduino Nano running on 16MHz clock, I’m using it for ESP32 running at 160MHz as well. Having said that, if your system is noisier (such as some bad ESP32 boards) or if you had a poor quality switch that has noisy bouncing behaviour, a 0.1uF capacity in parallel with the switch would also improve the debouncing stability.
Thanks for that, I looked at the “best” examples and thought there must be a better way, and indeed there was
Thankyou again.
This looks like an incredible solution, but I’m getting erratic behavior from my switches still. In my test I’m putting a counter inside of the debounce function and it counts anywhere between 1 and 3 presses (sometimes counting on release as well.
I am using an STM32F401 Black Pill. Would the values inside the debounce function be different because of the different hardware? Thank you!
the values will probably be different based on the speed of the processor in your hardware. you might try putting a 1ms delay somewhere or lengthen the required # of 0s to be considered a press (use uint32 or uint64?)
Any simple ideas on how to detect a long press using this method?
Ive been able to detect long presses using this method with a 32 or 64 bit unsigned integer as the state variable, but differentiating the two (long vs short) has been problematic so far. i can detect both, or short, but not long by itself.
Ill give it some more thought, but if anyone has any ideas, post them up!
my solution so far: debounce is true for presses with between 4 and 58 button pressed signals in a row (pulled low by the button), longpress is true for presses with greater than 58 button pressed signals in a row. might need some tuning for the low end for better debounce.
code:
bool debounce() { state = (state<<1) | digitalRead(btn) | 0xf000000000000000; return (state 0xf800000000000001 & bitRead(state,0)==1); } bool longpress() { longstate = (longstate<<1) | digitalRead(btn) | 0xf000000000000000; return (longstate == 0xf800000000000000); }Just want to say a big thank you! Have wasted the past 2 weeks trying to get a simple millis() multi-tasking program that is triggered by buttons to work. Was using the other standard debounce ways and it turns out they were too bouncy!
I very very rarely comment on anything, so thank you!
Thanks for this interesting debounce code.
Back to the shift registerHW approach: I think in order to detect a series of 0´s clocked into the registers from D to Q, it should be a NOR gate rather than a NAND Gate – which output goes high if none of the inputs are 1 anymore. In other words only all 0 in will give a high output.
Oh yes, you are right. Thanks for pointing that out. I will make the changes when I have time.
Thanks for an excellent blog. What are you thoughts on implementing a solely hardware debouncing?
You can read the section on “An RC debouncer” in Jack Ganssle’s “A guide to debouncing” article (link available in my blog). In modern day’s MCU, a hardware debounce can be done with a resistor and capacitor, the Schmitt Trigger is usually included in the GPIO design and is enabled when a GPIO is declared as an “input”.
Great tutorial i was just wondering if in the simple solution the button should be pulled up or down in the tutorial you say it’s pulled up right ?
That means that the led will only change if the button state is 0 correct?
So how the last debounce will be 1 followed by zeros shouldn’t it be a 0 followed by 1 if it’s pulled up ?
I am new to embedded so sorry for any inconveniences
Please read the second paragraph under the section “The simplest debounce function” on button configuration, the function is not returning the 0 but the `state == 0xff00`.
Any way to implement this with hardware interrupts?
I don’t think polling a pushbutton in the loop all the time is a good thing, although this is called “the simplest button debounce solution”.
Thank you for this simple solution. I wonder if is it applicable to rotary encoders.
could you explain the function “debounce” return, why the “debounce” function return the 0xff00, i see this function always return it. Thank you!
Have you try the code? It does not return
0xff00, it return(state == 0xff00), that is, 0 or 1, it return 1 if it detect 8-bit of consecutive 0 (i.e. no more bouncing), or 0 if the state is not equal to 0xff00. For more details, it is explained in the section of “The simplest debounce function”.Thank you so much sir! I misunderstood the principle of operation, i am so sory, thank you to explain it. the article is very good for me leaning. (I come from Vietnam)
Hi Henry, great idea to debounce. Just one thing is missing: the software equivalent to the shift register clock. That’s why I now implemented a minimal fully interrupt and timer controlled sketch for ESP32. Enjoy!
* sp4rkie/esp-debounce https://github.com/sp4rkie/esp-debounce
well done 🙂 I was trying to use the arduino code and thought it looked cumbersome and long winded just to debounce a button – your solution worked beautifully, now I can get on with the rest of my code – many thanks
I would love to use this on an analog pin. I have several buttons hooked up to an analog pin using a resistor ladder. Would that work?
One remark, in the code you use: if (debounced), but the function is without the “d” at the end. I assume that is a typo?
Yes, it should works. However giving how Successive Approximation (SAR) ADC works and the fact that resistor ladder is based on a range selection, I never found that I need to do extra debouncing. One needs a software debouncing when hardware debouncing is not an option (e.g. don’t want to add extra hardware components to the existing circuitry), but when implementing a resistor ladder switch array, you already doing hardware implementation, so it is easy to just add a small capacitor in parallel to the lowest ladder ladder if needed.
Yes, that is a typo, should be
if(debounce()).A brilliant solution, I have the same question as Willem…but extend it to ask if we should debounce all switches and buttons (either single, array or resistance ladder)?
Thank you so much for this guide.
However, could you please refer me to some resources to understand the following line:
state = (state<<1) | digitalRead(btn) | 0xfe00;
How can I rewrite it in multi-steps
1st: “< 11111111
* 2 bytes = 2×8bits = 00000000 00000000 –> 11111111 11111111
* Use your calculator and convert 11111111 from BINary to HEXadecimal…. You see “ff”. In DECimal you would see 255.
* Convert 0xfe00 from HEX to BIN: fe = 11111110
* converting 00 to BIN is very boring because it’s 00000000
* 0xfe00 == BINary 11111110 00000000
————–
state = (state<<1) | digitalRead(btn) | 0xfe00;
state = itself bit-shifted <= that way by "1" position, then
OR it with the result from digitalRead(btn) which will either be a 0 or a 1, then
OR that with 0xfe00, which in binary is 11111110 00000000
uint8_t btn; // btn is an unsigned, one byte variable.
uint16_t state; // state is an unsigned integer, 2 bytes. The 16 is the 2 lots of 8 bits. cool, huh?
state = state<<1;
state = state | digitalRead(btn);
state = state | 0xfe00;