Recently I got two STM32 LoRa Discovery boards(B-L072Z-LRWAN1) for my LoRa project, and I need to install STM32CubeIDE and an STM32 Expansion Package i-cube-lrwan in order to use the board. It took me a while to figure out everything and I thought it would be good to share how I set everything up.
What is STM32CubeIDE?
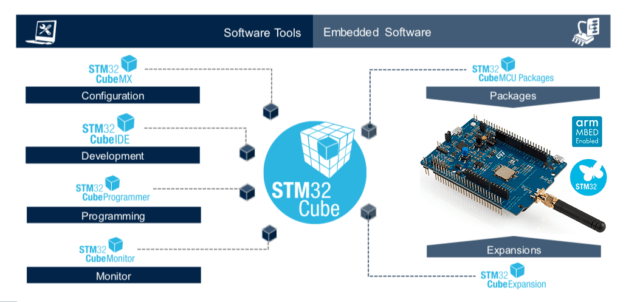
STM32CubeIDE is an all-in-one development environment, which is part of the STM32Cube software ecosystem, the idea of the STM32Cube ecosystm is that it consists of multiple "Cubes", such as peripheral configuration, code generation, code compilation, and debug, etc., to form a bigger cube, if you know how each cube works, then you would have a power development environment at your disposal. This is assumed that you know each part well, but if you are new to the ST's toolchain and development environment, you might end up having a mess-up Rubik cube and you don't know where to start to solve the Rubik cube.
In the nutshell, STM32CubeIDE is relatively new and is based on the Eclipse and its CDT(C/C++ Development Tools) framework, plus GCC toolchains, and GDB for the debugging. STM32CubeIDE integrates STM32 configuration and project creation functionalities from previously known as STM32CubeMX, and the editor environment from formerly Eclipse-based Atollic TrueStudio (something similar to System Workbench) that ST acquired in 2018.
Before 2019, if you are dealing with STM32 development, ST uses all kind of development environments and setup, you will find that they sometime uses mbed, Keil, System Workbench, or Atollic TrueStudio in its official tutorials, so the Internet is full of old tutorials or setup walk-through but nothing much based on STM32CubeIDE environement.
Install STM32CubeIDE
Alghouth the STM32CubeIDE is free, ST want you to go to their website, registered with your email to get it. Goto https://www.st.com/en/development-tools/stm32cubeide.html, register and download the package based on your OS environment. Many documentations are also require registration and login in order to get it.
STM32CubeIDE is basically a Java-based application package (like Eclipse), so it can be runned on Windows, MacOS and Linux platforms. I'm on MacOS, so the installation procedures that I discussed here are based on MacOS (and should be similar to Linux as well).
For Mac, it come as an disk image file, st-stm32cubeide_1.5.0_8698_20201117_1050_x86_64.dmg as the current version. The disk image consists of two-step installation.
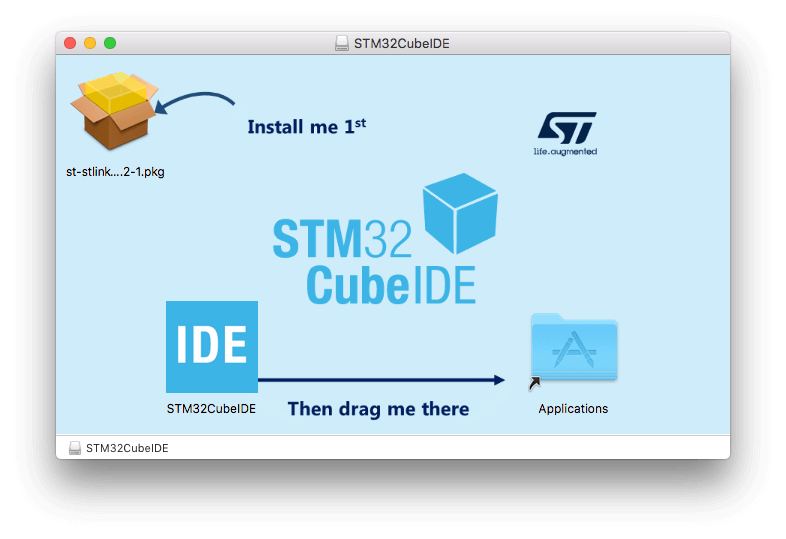
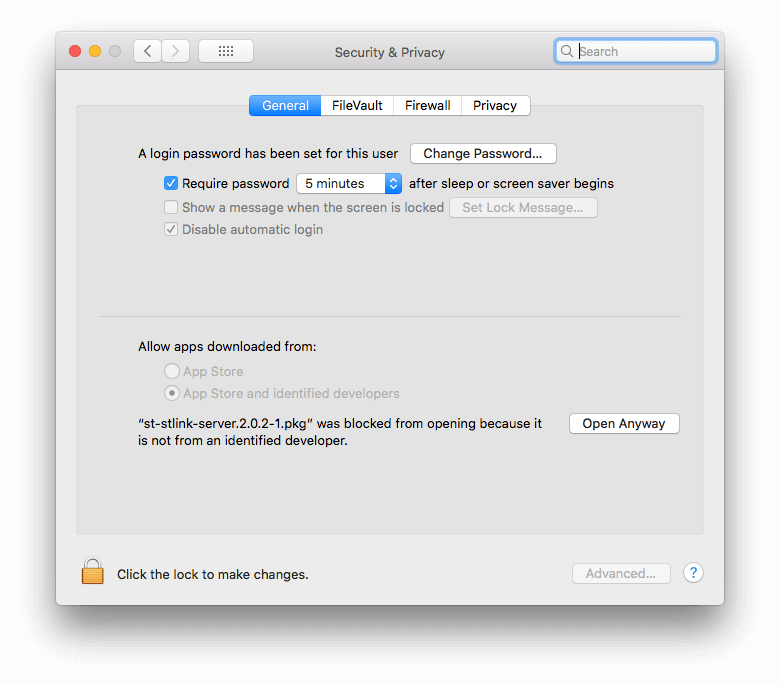
The first step is the installation of "ST-link Server", if you click on the "st-stlink-server" icon on the installation tool, you might get an error message as MacOS has blocked the "st-stlink-server" from opening because it was not download through Apple App Store.
Open System Preferences -> Security& Privacy, click on padlock icon to allow st-stlink-server to be open for installation.
Step two is installing the STM32CubeIDE, simply drag and drop the IDE icon into Application folder to complete the installation of STM32CubeIDE. If you run the STM32CubeIDE now, you will get an error saying that the STM32CubeIDE is damaged and can't be opened. There are actually nothing wrong with the STM32CubeIDE, it just that MacOS put the app into quarantine, again because the app was download from the Internet instead of going through Apple App Store.
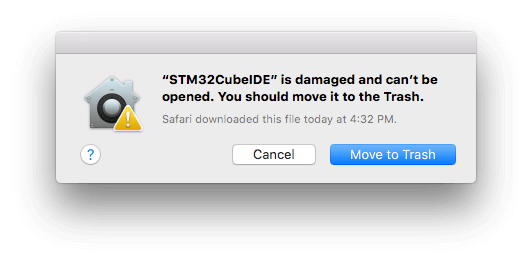
Launch Terminal, and run the following command to bring the app out of quarantine:
sudo xattr -dr com.apple.quarantine /Applications/STM32CubeIDE.app/
When STM32CubeIDE is running the first time, it asks for creating a workspace, by default it is suggest workspace to be created at ~/STM32CubeIDE/workspace_1.x.x, it is also create a STM32Cube directory that took up 300MB+ memory to store all the ST's MCU firmware, middleware and libraries that you will need for the STM32 development. You generally do not need to touch anything or interact with STM32Cube directory, but I would suggest you navigate through the directories and read the pdf in the Documentation about the "Getting started with STM32Cube IDE".
If you are familiar with Eclipse development environment, you will find STM32CubeIDE familiar and easier to use. If you are new to Eclipse-based development envrionment, it might take some time to get used to it and there will be some learning curve.
There is a UM2609 STM32CubeIDE User Manual available, but ST has a YouTube series on STM33CubeIDE basics that is easier and worth to watch although the voice of the video is low with an non-native English speaker, I found it helpful for me to get started with using ST's HAL library and the Peripheral Configuration tool.
Under normal circumstnces, what described above would be sufficient for you to get started and give you what you need for the STM32 development. However there will be time where the MCU or board (e.g. ST's Discovery boards, or Nucleo boards) that you are working with would requires some middleware or expansion package, then you will need to install or import those expansion package. This is what happened to me when I using the STM32 LoRa Discovery kit.
Update May 2022: See A better way to setup STM32CubeIDE for further configuration.
Import STM32 i-cube-lrwan Expansion package
This is the part where I couldn't find any information, maybe this is an Eclipse thing where I'm not familiar, but this is the way that I figuring out that is work for me, even though I don't quite sure this is the correct way of using the Expansion package.
The i-cube-lrwan expansion package can be downloaded from https://www.st.com/en/embedded-software/i-cube-lrwan.html. I would suggest to move the downloaded files into ~/STM32CubeIDE/ where your workspace located but not inside the workspace directory. The file inside your download package will eventually get modified so if you want to keep an original copy, I would suggest to duplicate it and store it away somewhere on your hard disk.
Launch STM32CubeIDE, click on "Import Projects" (or from File => Imports... dropdown menu) and chose "Import Atollic TrueSTUDIO Project" and navigate to expansion package that you’ve just downloaded.
Which application to import is depend on what you’d like to develop. The expansion package came with 3 Lora application examples:
- AT_Slave - For a host MCU to communicate with Lora Board as a modem via AT commands
- End_node - Use the Lora board as a Lora Endnode interfacing with a LoRaWAN network
- PingPong - A peer-to-peer communication between two LoRa boards without a gateway
Click on "OK" to allow the conversion from SW4STM32/TrueSTUDIO app into STM32CubeIDE structure.
For example, if you want to import the End_node application example, you will need to navigate to STM32CubeIDE/STM32CubeExpansion_LRWAN_V1.3.1/Projects/B-L072Z-LRWAN1/Applications/LoRa/End_Node/SW4STM32/mlm32l07x01, click "Finish", this will create a project named mlm32l07x01.
This works for one app, however, if I want to import another app (e.g. AT_Slave), the importation will try to create another project with the same name "mlm32l07x01", and STM32CubeIDE won't allow me to do so. Renaming the proejct would caused the lost of the source code or some compilation error. If anyone know a better way, I would like to know how, leave a comment below.
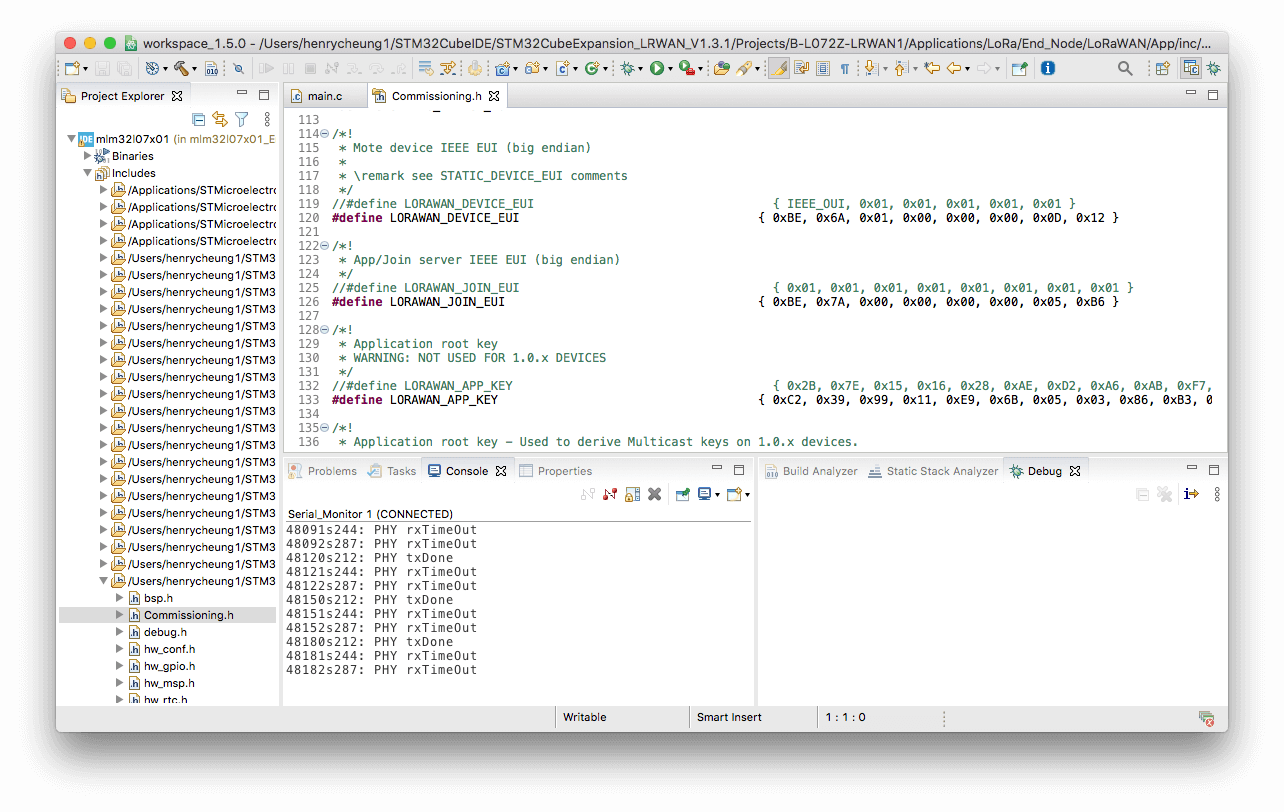
Another issue that I'm facing is that the importation doesn't import the Commissioning.h into the project as a local copy specifically for the particular project. It instead requires you to modified the source file that can be found by clicking on Includes on the left side of the menu bar of your STM32CubeIDE, and navigate to /STM32CubeIDE/STM32CubeExpansion_LRWAN_V1.3.1/Projects/B-L072Z-LRWAN1/Applications/LoRa/End_Node/LoRaWAN/App/inc/Commissioning.h to directly modified the file from the downloaded package. This doesn't seem to be a good software development practise and I tend to think that I probably not installing the expansion package correctly.
How to use i-cube-lrwan expansion package
There are a few things that need to be configured before you can compile and run the LoRa application that came with i-cude-lrwan expansion package.
Configure LoRa region
The regional configuration for i-cube-lrwan is a compiler preprocssor setting instead of an in-code define statement. First thing to do upon import the expansion package mentioned above, is to right click on the project folder on the left side bar of STM32CubeIDE, and go to "Properties",
then click on "C/C++ Build", and click on "Settings".
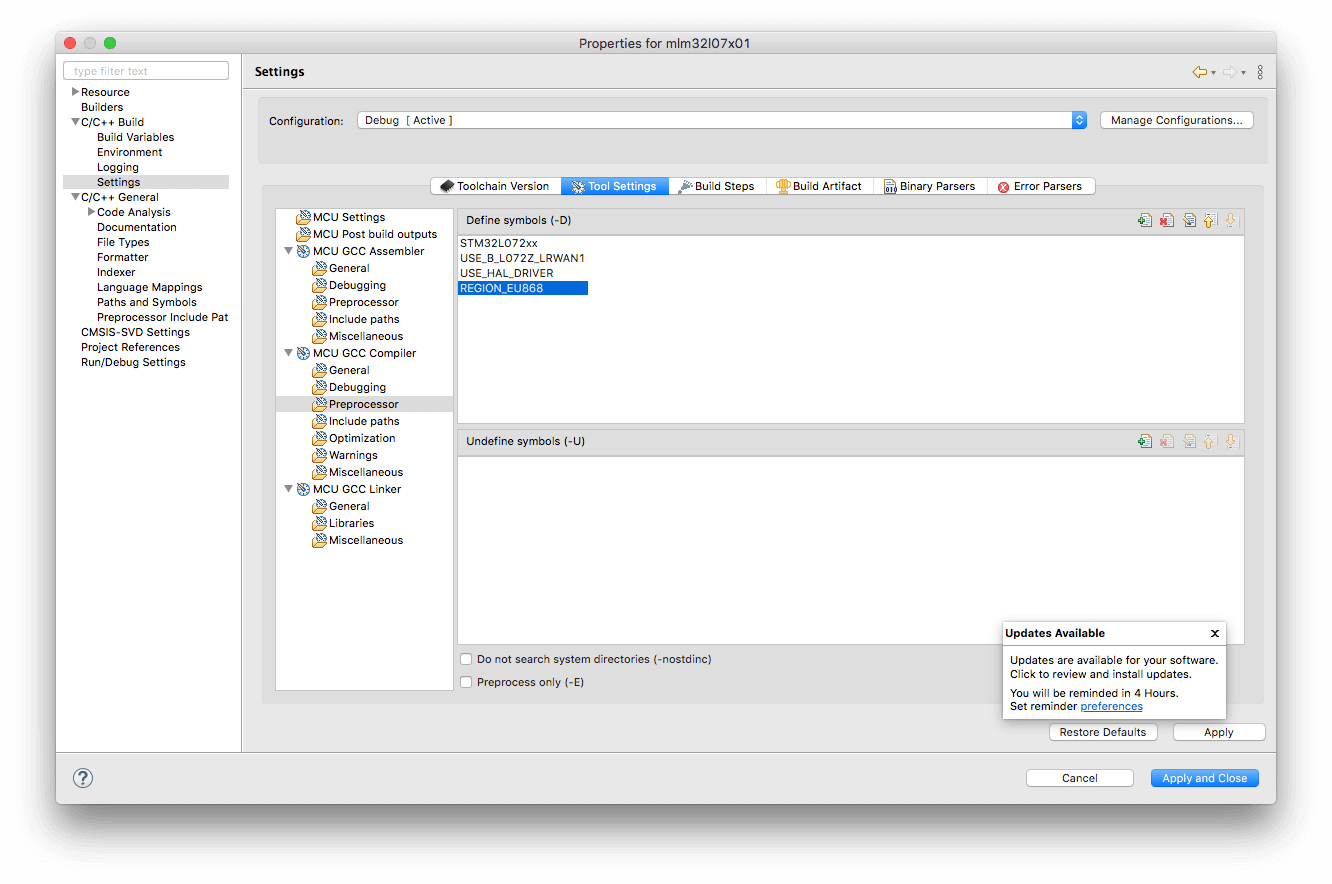
Click on "Tool Settings", then click on the "Preprocessor" under the "MCU GCC Compiler" on the left, and double click on the default REGION_EU868 to change it to your region, the following Region are valid input:
REGION_AS923
REGION_AU915
REGION_CN470
REGION_CN779
REGION_EU433
REGION_EU868
REGION_KR920
REGION_IN865
REGION_US915
REGION_RU864
Click on "Apply and Close" once you've done with the change.
How to setup LoRa End Node with i-cube-lrwan
In order to setup Lora End Node with STM32 board such as STM Discovery Board B-L072Z-LRWAN1 board, the settings in the Commissioning.h file need to set correctly based on LoRa operation mode, the Commissioning.h is located in /STM32CubeIDE/STM32CubeExpansion_LRWAN_V1.3.1/Projects/B-L072Z-LRWAN1/Applications/LoRa/End_Node/LoRaWAN/App/inc/Commissioning.h which can be founded under the Includes directory on the left side bar on the STM32CubeIDE.
What parameters need to be changed depend on the LoRa end node operation mode, Over-The-Air_Activation (OTAA) mode or Activation By Personalization (ABP) mode when communicating with a LoRaWan network server. OTAA tends to be simpler with less configuration parameters needed to be setup than ABP.
| Operation Mode | Parameter in Commissioning.h | Description |
|---|---|---|
| Both OTAA/ABP | OVER_THE_AIR_ACTIVATION | 1 = OTAA mode 0 = ABP mode |
| LORAWAN_JOIN_EUI | AppEUI(JoinEUI) from LoraWAN Server | |
| OTAA | STATIC_DEVICE_EUI | 1 = Using Static DevEUI 0 = Based on hardware Unique ID |
| LORAWAN_DEVICE_EUI | DevEUI from LoRaWAN Server | |
| LORAWAN_APP_KEY LORAWAN_NWK_KEY |
AppKey from LoraWAN Server | |
| ABP | STATIC_DEVICE_ADDRESS | 1 = Using Static DevAddr 0 = Based on Hardware Unique ID |
| LORAWAN_DEVICE_ADDRESS | DevAddr | |
| LORAWAN_NETWORK_ID | NetID from LoraWAN Server | |
| LORAWAN_F_NWK_S_INT_KEY LORAWAN_S_NWK_S_INT_KEY LORAWAN_NWK_S_ENC_KEY |
NetSKEY | |
| LORAWAN_APP_S_KEY | AppSKey |
The naming convention for LoRaWAN parameters evolved in the past a couple of years, for example, what used to be known as AppEUI now is called JoinEUI, the AppKey is now as NwkKey. Some LoRaWan network provider used name as AppEUI, others could be using Application EUI. Setting up LoRa gateway as well as LoRaWAN network (such as TheThings Network(TTN)) is out of the scope of this article.
Once those parameters are set, you can compile and run the code, and test the LoRa node with LoRaWAN network.
Useful documentations from ST
User Manual - UM2609 STM32CubeIDE User Manual
User Manual - UM2073 STM32 LoRa Expansion Package for STM32Cube
User Manual - UM2115 Discovery kit for LoRaWAN, Sigfox, and LPWAN protocols with STM32L0
Application Note - AN4967 Examples of AT commands on I-CUBE-LRWAN
Note: All ST's documentations require register of a free account and login to download/view it.
First of all, thank you for the information that you published ,
Actually ,I ‘m working in project using two module of b_L072z_LoRaWAN1 , I need a peer to peer communication between them , but I need to configure one as transmitter (will transmit the information of the sensors) and one as a receiver (receive the information measured) , can you help me
Among the application examples that came with LoRa Expansion Package, the application “Ping-Pong” is a peer-to-peer application.
Thanks … this helped a lot !