You bought your Raspberry Pi, and managed to create a python script to turn on/off an LED via GPIO. Then you are wonder "How can I control the GPIO via a web page"? This is a common questions been asked repeatedly on Raspberry Pi StackExchange and Raspberry Pi user groups. Some would say you need Flask web framework, other would suggest to install LAMP (Linux, Apache, PHP and MySQL), very few aware that you can run a simple HTTP web server using python's build-in http.server library, without installation of Flask web framework or LAMP stacks.
Getting data from Raspberry Pi and control Raspberry Pi GPIO
Before we discuss http.server, let's assumed that we have a little python script simple_gpio.py that read Raspberry Pi's GPU temperature from the Raspberry Pi, and it also control an LED connected to the Raspberry Pi. Just like every new Raspberry Pi user has experienced when they got their Raspberry Pi the fist time.
Reading GPU temperature is used to demonstrate of getting some data from Raspberry Pi, I choose to read the GPU temperature because it is kind of unique to Raspberry Pi and is available on all versions of Raspberry Pi, whether it is early version of the Raspberry Pi or the latest Raspberry Pi zero W. Raspberry Pi's GPU temperature can be read using a bash shell command:
/opt/vc/bin/vcgencmd measure_temp
temp=41.5'C
We will use python os.popen function to execute the shell system command within the python environment and display the result. The data return from the shell command is a string in the form of temp=41.5'C, and we are only interested in the actual numeric value of temperature reading, so we will use python slicing to get extract the value.
We will ask user to input either 1 or 0 to turn On or Off the LED that is connected to Raspberry Pi GPIO 18 (Raspberry Pi header P1 pin 12).
simple_gpio.py
import RPi.GPIO as GPIO
import os

# Read data from Raspberry Pi (specifically read GPU temperature)
temp = os.popen("/opt/vc/bin/vcgencmd measure_temp").read()
print("GPU temperature is {}".format(temp[5:]))

# GPIO setup
GPIO.setmode(GPIO.BCM)
GPIO.setwarnings(False)
GPIO.setup(18,GPIO.OUT)

# Turn on/off LED based on user input
try:
    while True:
        user_input = input("Turn LED On or Off with 1 or 0 (Ctrl-C to exit): ")
        if user_input is "1":
            GPIO.output(18,GPIO.HIGH)
            print("LED is on")
        elif user_input is "0":
            GPIO.output(18,GPIO.LOW)
            print("LED is off")
except KeyboardInterrupt:
    GPIO.cleanup()
    print("")
Control Raspberry Pi GPIO using python http.server library
The python http.server library creates and listens at the HTTP socket, dispatching the requests to a handler. This allows user to create a simple web server without installing LAMP. Although http.server is not designed for handling heavy traffic in production environment, but it is sometime the only lightweight choice for IOT applications and hardware, such as micropython pyboard or ESP8266 Wifi microcontroller where memory and cpu power is very limited for large web framework or LAMP implementation. For many Raspberry Pi users, this is a simple, easy-to-implement and effective solution for serving a web page before the needs for installing full LAMP stacks.
An HTTPServer instance can be created using the following code:
if __name__ == '__main__':
    http_server = HTTPServer((host_name, host_port), MyServer)
    print("Server Starts - %s:%s" % (host_name, host_port))

    try:
        http_server.serve_forever()
    except KeyboardInterrupt:
        http_server.server_close()
The http.server allows user to create its own http request handler for handling the GET, POST requests through the implementation of BaseHTTPRequestHandler class. In our example, MyServer class is our HTTP request handler which inherits from BaseHTTPRequestHandler, and we we will need to implement our own GET and POST requests handler for serving up a web page.The do_GET() and do_POST() methods are where we integrate our GPU temperature reading and GPIO control interface codes.
simple_webserver.py
import RPi.GPIO as GPIO
import os
from http.server import BaseHTTPRequestHandler, HTTPServer
host_name = '192.168.0.114' # Change this to your Raspberry Pi IP address
host_port = 8000
class MyServer(BaseHTTPRequestHandler):
""" A special implementation of BaseHTTPRequestHander for reading data from
and control GPIO of a Raspberry Pi
"""
def do_HEAD(self):
""" do_HEAD() can be tested use curl command
'curl -I http://server-ip-address:port'
"""
self.send_response(200)
self.send_header('Content-type', 'text/html')
self.end_headers()
def _redirect(self, path):
self.send_response(303)
self.send_header('Content-type', 'text/html')
self.send_header('Location', path)
self.end_headers()
def do_GET(self):
""" do_GET() can be tested using curl command
'curl http://server-ip-address:port'
"""
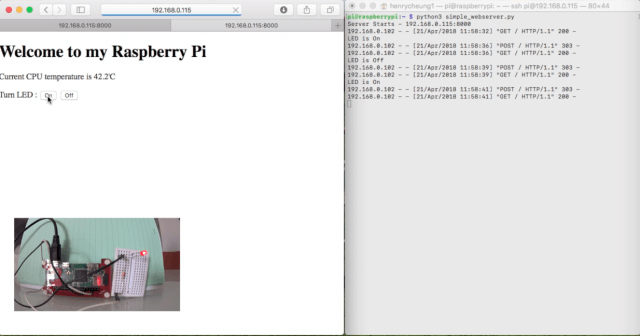
html = '''
<html>
<body style="width:960px; margin: 20px auto;">
<h1>Welcome to my Raspberry Pi</h1>
<p>Current GPU temperature is {}</p>
<form action="/" method="POST">
Turn LED :
<input type="submit" name="submit" value="On">
<input type="submit" name="submit" value="Off">
</form>
</body>
</html>
'''
temp = os.popen("/opt/vc/bin/vcgencmd measure_temp").read()
self.do_HEAD()
self.wfile.write(html.format(temp[5:]).encode("utf-8"))
def do_POST(self):
""" do_POST() can be tested using curl command
'curl -d "submit=On" http://server-ip-address:port'
"""
content_length = int(self.headers['Content-Length']) # Get the size of data
post_data = self.rfile.read(content_length).decode("utf-8") # Get the data
post_data = post_data.split("=")[1] # Only keep the value
# GPIO setup
GPIO.setmode(GPIO.BCM)
GPIO.setwarnings(False)
GPIO.setup(18,GPIO.OUT)
if post_data == 'On':
GPIO.output(18, GPIO.HIGH)
else:
GPIO.output(18, GPIO.LOW)
print("LED is {}".format(post_data))
self._redirect('/') # Redirect back to the root url
Implement do_GET() to handle GET request
The do_GET() method create a simple HTML template and a HTML form to display the GPU temperature and for user to click either "On" or "Off" button. whenever the user points the browser to the server's (i.e. Raspberry Pi) IP address with a GET request, The HTML will be served, when user click on the "On" or "Off" buttons, the form data (i.e. the user input used to control the GPIO in this example) will be sent as a POST request by the browser to the server.
Implement do_POST() to handle POST request
The post request will be processed by do_POST() method on the server side, which will set the GPIO pin 18 according to user's input. Once it is done of setting the GPIO output, the private method _redirect() will be called, which generates a 303 See Other http header and redirect back to the root URL '/'.
Data transmit over http.server by default are in binary, it is therefore need to be encoded for sending and be decoded for receiving from a python string using str.encode("utf-8") and str.decode("utf-8") methods.
Run the python script with the following command:
python3 simple_webserver.py
Launch your browser and point the URL to the IP address and port of your Raspberry Pi, and you should see the web page, click on On/Off buttons to control the LED that connected to your Raspberry Pi.
If you don't know your Raspberry Pi's IP address, run the following command to find out:
ip -4 address|grep inet
Handling multiple GET requests
The example we discussed above demonstrates how to use do_GET() and do_POST() to handle GET and POST requests. But for our simple LED control application, there is no indication on the web page whether the LED is currently on or off.
For example, we could use different URL endpoints as the GET requests to control the LED:
http://192.168.0.114:8000/       # Display the webpage without LED status
http://192.168.0.114:8000/on     # Turn on the LED and display LED is On
http://192.168.0.114:8000/off    # Turn off the LED and display LED is off
With this approach, we may not need do_POST() to handle POST request, and what we need is for do_GET() to handle multiple GET requests based on URL endpoints. We also no longer need the _redirect() method.
We replace the HTML form and the on/off buttons with two links. In order to display the LED status, we use a little bit JavaScript code to inject the LED status based on URL endpoints to the HTML page. Our new code is a little bit simpler without do_POST() method.
simple_webserver2.py
import RPi.GPIO as GPIO
import os
from http.server import BaseHTTPRequestHandler, HTTPServer


host_name = '192.168.0.114'    # Change this to your Raspberry Pi IP address
host_port = 8000


class MyServer(BaseHTTPRequestHandler):
    """ A special implementation of BaseHTTPRequestHander for reading data from
        and control GPIO of a Raspberry Pi
    """

    def do_HEAD(self):
        """ do_HEAD() can be tested use curl command
            'curl -I http://server-ip-address:port'
        """
        self.send_response(200)
        self.send_header('Content-type', 'text/html')
        self.end_headers()

    def do_GET(self):
        """ do_GET() can be tested using curl command
            'curl http://server-ip-address:port'
        """
        html = '''
            <html>
            <body style="width:960px; margin: 20px auto;">
            <h1>Welcome to my Raspberry Pi</h1>
            <p>Current GPU temperature is {}</p>
            <p>Turn LED: <a href="/on">On</a> <a href="/off">Off</a></p>
            <div id="led-status"></div>
            <script>
                document.getElementById("led-status").innerHTML="{}";
            </script>
            </body>
            </html>
        '''
        temp = os.popen("/opt/vc/bin/vcgencmd measure_temp").read()
        self.do_HEAD()
                status = ''
        if self.path=='/':
            GPIO.setmode(GPIO.BCM)
            GPIO.setwarnings(False)
            GPIO.setup(18, GPIO.OUT)
        elif self.path=='/on':
            GPIO.output(18, GPIO.HIGH)
            status='LED is On'
        elif self.path=='/off':
            GPIO.output(18, GPIO.LOW)
            status='LED is Off'
        self.wfile.write(html.format(temp[5:], status).encode("utf-8"))
Summary
As you can see, it is quite easy to use http.server to create a simple web server and integrate your plain Raspberry Pi code with the http.server implementation. Our customised BaseHTTPRequestHandler implementation MyServer class can be easily modified to integrate whatever GET or POST requests that you need to get information from Raspberry Pi, or control GPIO via a web site based on your Raspberry Pi project. No Flask web framework is required and no installation of LAMP is required, at least, not for simple IoT project like this one.
The complete codes two python examples available at my github.
Alternative - Using Node-RED
[Update - Feb, 2019]: When I wrote this almost a year ago, I never expect this article became one of the most popular posts. The reason that I wrote this post was to demonstrate that you probably don't need to install a web framework and a full feature web server for simple project like control an LED. But this may probably not scalable for complex GPIO project, for that, you probably need a proper web framework, or alternatively, for those came from hardware background or new to programming, you should look into how to control Raspberry Pi GPIO using node-RED which achieves the same result with almost no programming required.
Hi,
Thanks for this. I copied the code from your github and changed the server address as required. I then started with python3 ….. and the server came up. However, when I try to connect via a web browser I get ‘connection refused’
I am running Raspian Jesse. As a noob to pi do I need to change a permission somewhere?
Changed permissions to execute on the python file as well as added the port number to the URL
Answered my own question! I changed the permissions on the python as well as adding the port number 8000 to the URL. All works perfectly. Thanks again.
I’m pretty new to all of this, and was wondering how would I need to alter this if I wanted to control multiple LED’s independently?
In the last bit of code (the elifs) where it is looking for /on or /off, copy that if block and change those to something else, such as on2 off2, then change the gpio number (18 in the code) to where you connect the second led to the gpio. When sending the web request, /on will control one and /on2 will control the second.
Sorry, not the entire if block, just the elifs for copying… Autocorrect got me
Hello!
First I changed the host_name to my Raspberry Pi IP address in this sentence:
host_name = ‘192.168.0.114’ # Change this to your Raspberry Pi IP address
But when I Run the python script in the terminal with the following command:
python3 simple_webserver.py, nothing happens.
What could be the problem? Thank you!!!
Problem solved! I copied the code from your github (https://github.com/e-tinkers/simple_httpserver/blob/master/simple_webserver.py) and now it works!! Thank you.
tengkyu
This is a great little tutorial, very helpful for understanding the rpi and http stuff.
Im thinking of adding a read GPIO.input(pin) function and displaying it in that same html page.
Would it much of a leap to do that?
Im quite new to the world of programming and http so possibly straight-forward things seem quite difficult to me.
Thanks,
Rhys
For reading a GPIO, it should not be difficult to implement, you will need to have a new route (path) such as
/readin addition to the/onand/offroutes, and using the GPIO.input to get the data and send it back to client.Alternatively, if you are new to programming, you should take a look at Control Raspberry Pi using Node-RED which is like lego programming with drag and drop widgets.
Thanks for sharing this tutorial. It’s working fine and just what I was looking for. Very useful.
I was wondering if I could use this example to control the GPIO from anywhere in the world, not just in mi WLAN
Yes, provided you setup your server to allow external traffic to come in. You might want to read https://www.e-tinkers.com/2016/11/hosting-wordpress-on-raspberry-pi-part-5-dedicated-ip-domain-name-and-dns/ to get some idea on how to do that.
Hi! Thanks so much for this. I’ve almost made it work, buuuut…not at all.
I’m using a Raspberry Pi Zero W, followed all steps, I changed pin to number 17. When I run the code, the local web works fine, but when I click over the buttons, this error appears:
"Exception happened during processing of request from ('192.168.1.102', 54387)
Traceback (most recent call last):
  File "/usr/lib/python3.7/socketserver.py", line 316, in _handle_request_noblock
    self.process_request(request, client_address)
  File "/usr/lib/python3.7/socketserver.py", line 347, in process_request
    self.finish_request(request, client_address)
  File "/usr/lib/python3.7/socketserver.py", line 360, in finish_request
    self.RequestHandlerClass(request, client_address, self)
  File "/usr/lib/python3.7/socketserver.py", line 720, in __init__
    self.handle()
  File "/usr/lib/python3.7/http/server.py", line 426, in handle
    self.handle_one_request()
  File "/usr/lib/python3.7/http/server.py", line 414, in handle_one_request
    method()
  File "simple3.py", line 66, in do_POST
   GPIO.output(17, GPIO.LOW)
RuntimeError: The GPIO channel has not been set up as an OUTPUT"
Do you have an idea of what must be happening? Thanks a lot!
Did you forgot to change the line:
to pin 17?
@_@ Oh! I’m so ashamed. This is what happens when you try to do something simple very tired in the night. Thanks Henry, it is working perfect!
Thank you very much for this tutorial it’s very helpful really. I had a small question …. how can I control more than one pin with the same code?? I already made the html code with the required number of buttons but I recon that I need to change the code a little bit. I already identified the extra pins needed for my code as outputs.
also how can I change this code and use it to control the pi camera
Scroll up to Comment 3 where reader @Tutoro offers a simple solution to the question. Better way is to design the uri scheme as `device/number/action`, something like `led/1/on` or `led/2/off`, and add the codes on both html and backend server to parse the data and control the device accordingly. This will increase the complexity in parsing the uri into different parts, but it allows you to control as many devices as possible.
Please I need more explanation on how to run the web page. Thanks, its a lovely work.
Is there a simple method to add a login/password requirement to this web server?
Thanks!
The purpose of this article is to understand how the http works and how to get the sensor data and control the sensor via a web page. It take much more to build a login system (handling the security, redirect of pages, user database, etc.), it will be better to build with a web framework such as node.js or python flask.
can you help me how i can read data every 50ms and display on webpage?
Mr. Henry Cheung, thank you very much for this tutorial it’s very helpful in my projects becaused I don’t know about servers to IoT but I love this technology. Thanks.
Is there a way to make python code and html for more then (on/off),and then run chose from the comand i put from anywhere in the world.
Mr. Henry Cheung,
Thank you for your examples.. I have trouble in this step.. How I can resolve it?
Exception happened during processing of request from ('10.0.0.242', 54318) Traceback (most recent call last): File "/usr/lib/python3.7/socketserver.py", line 316, in _handle_request_noblock self.process_request(request, client_address) File "/usr/lib/python3.7/socketserver.py", line 347, in process_request self.finish_request(request, client_address) File "/usr/lib/python3.7/socketserver.py", line 360, in finish_request self.RequestHandlerClass(request, client_address, self) File "/usr/lib/python3.7/socketserver.py", line 720, in __init__ self.handle() File "/usr/lib/python3.7/http/server.py", line 426, in handle self.handle_one_request() File "/usr/lib/python3.7/http/server.py", line 414, in handle_one_request method() File "/home/pi/Desktop/webappblink/SimpleHttpServer2.py", line 46, in do_GET GPIO.setmode(GPIO.BCM) NameError: name 'GPIO' is not definedDo you missing the line
import RPi.GPIO as GPIOat the beginning of your code?hi
Great work, but I am getting this error when running the script :
Traceback (most recent call last):
  File "web.py", line 72, in
    http_server = HTTPServer((host_name, host_port), MyServer)
  File "/usr/lib/python3.7/socketserver.py", line 452, in __init__
    self.server_bind()
  File "/usr/lib/python3.7/http/server.py", line 137, in server_bind
    socketserver.TCPServer.server_bind(self)
  File "/usr/lib/python3.7/socketserver.py", line 466, in server_bind
    self.socket.bind(self.server_address)
socket.gaierror: [Errno -2] Name or service not known
pi@flair-pi-sa:~ $
Any ideas?
Ignore me! I had an extra ‘ in the IP address by mistake
Great script – been trying to do this all day – this is spot on! Thank you
You control with local network but control in any network it’s possible
Yes, see my reply to comment 8 for the things that you need to setup. Basically in order to do that, you will need either a domain name, or a fixed IP (or IP address with a Dynamic DNS configuration).
How can I put more read data in new line?
For example:
GPU temp: 40
read from file: “something here”
Read the Python OS library to understand how the
popen()andread()functions work. In the nutshell, it shell out to the Linux system and execute whatever Linux command you are asking it to execute and read back the result. For example, this piece of code will give you the content of a README.md file:import os readme_content = os.popen("cat README.md").read()Is there a possibility to create drop down menu in Website and send selected option to Rpi as input?
Like Select the Led:
1: LED1
2: LED2
Once the drop down option is selected and we have a submit button below the drop down, can we send the selected option to Rpi python program as input to glow the respective LED? If yes please guide me how! Would love to see this even using NodeRED, please use any of the approach you feel easy to teach. Thanks in advance
Server Starts – 192.168.0.117:8000
/bin/sh: 1: /opt/vc/bin/vcgencmd: not found
192.168.0.108 – – [23/Dec/2022 07:51:39] “GET / HTTP/1.1” 200 –
/bin/sh: 1: /opt/vc/bin/vcgencmd: not found
192.168.0.108 – – [23/Dec/2022 07:51:39] “GET /favicon.ico HTTP/1.1” 200 –
I have this error ……
What is your Raspberry Pi operating system? vcgencmd is installed by default if you are using Raspbian OS. If you have other os, see https://pypi.org/project/vcgencmd/ for installation.