Before installing WordPress, we will need to setup a web server for our Raspberry Pi. We will use Nginx as the web server itself, MariaDB as a database management system, and PHP for dynamic script processing. We choose Nginx, PHP-FPM and MariaDB for its performance and lightweight that are both important factors for Raspberry Pi.
Nginx is a popular lightweight web server application available for Raspberry Pi. PHP-FPM (FastCGI Process Manager) is an alternative PHP FastCGI implementation with some additional features useful for sites of any size, especially busier sites. MariaDB is one of the most popular database servers in the world. It's made by the original developers of MySQL and guaranteed to stay open source.
This article has been updated on 5 Jan 2018 based on Raspbian Stretch
This article has been further updated on 4 Jul 2020 based on Raspbian Buster and PHP7.3
Install Nginx
Like Apache, NGINX (pronounced engine x) can serve HTML files over HTTP, and with additional modules can serve dynamic web pages using scripting languages such as PHP. First install the nginx package by typing the following command in to the Terminal:
sudo apt-get install nginx
and start the server with:
sudo service nginx start
Test the web server
By default, Ngnix puts a test HTML page in the web folder. This default web page is served when accessing the Raspberry Pi via web browser (in my case, the Raspberry Pi’s IP address is http://192.168.1.101). When nginx is up and running, the webpage will shown as:
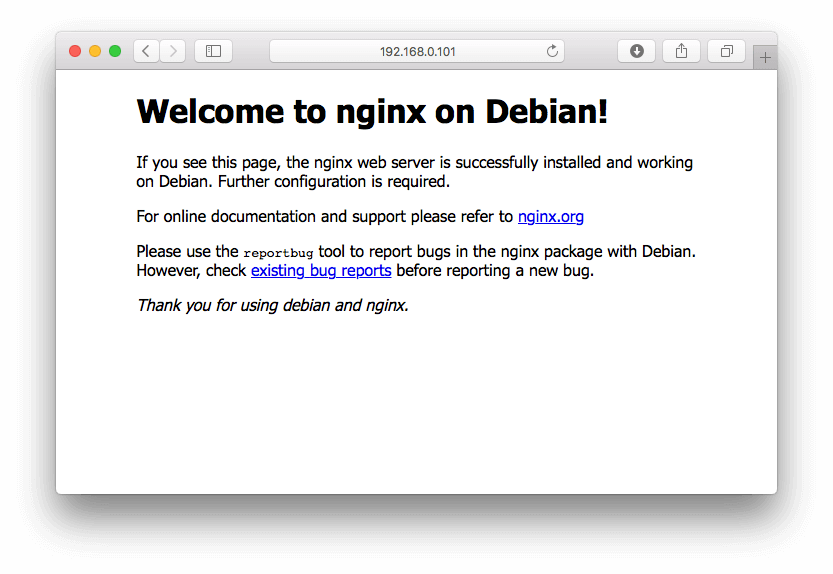
The default webpage is served from the directory /var/www/html.
Customize nginx
Now that Nginx has successfully installed it’s time to perform some basic configuration. Out of the box Nginx is pretty well optimized, however there are a few basic adjustments to make for better performance by altering the settings in nginx.conf:
sudo nano /etc/nginx/nginx.conf
Make the following changes for improving potential performance:
1) Uncommented the multi_accept directive and set to on, which informs each worker_process to accept all new connections at a time, opposed to accepting one new connection at a time.
2) Change the keepalive_timeout from default 65 to 10. The keepalive_timeout determines how many seconds a connection to the client should be kept open before it’s closed by Nginx. This directive should be lowered so that idle connections can be closed earlier at 10 seconds instead of 65 seconds.
3) Uncomment the server_tokens directive and ensure it is set to off. This will disable emitting the Nginx version number in error messages and response headers.
4) Following the server_tokens, add the client_max_body_size directive and set this to 16m.
5) Uncomment the gzip_vary on, this tell proxies to cache both the gzipped and regular version of a resource where a non-gzip capable client would not display gibberish due to the gzipped files.
6) Uncomment the gzip_proxied directive and set it to any, which will ensure all proxied request responses are gzipped.
7) Uncomment the gzip_comp_level and change the value to 5. Level 5 provides approximate 75% reduction in any ASCII type of files to achieve almost same result as level 9 but not have significant impact on CPU usage as level 9.
8) Uncomment gzip_http_version 1.1;, this will enable compression both for HTTP/1.0 and HTTP/1.1.
9) Add a line gzip_min_length 256; right before gzip_types directive, this will ensure that the file smaller than 256 bytes would not be gzipped, the default value was set at 20 bytes which are too small and could cause the gzipped file even bigger due to the overhead.
10) Replace the gzip_types directive with the following MIME types to avoid the complains from Google PageSpeed test on certain files types that were not included in the default MIME types provided.
    gzip_types
       application/atom+xml
       application/javascript
       application/json
       application/rss+xml
       application/vnd.ms-fontobject
       application/x-font-ttf
       application/x-web-app-manifest+json
       application/xhtml+xml
       application/xml
       font/opentype
       image/svg+xml
       image/x-icon
       text/css
       text/plain
       text/x-component
       text/javascript
       text/xml;
This will ensure that JavaScript, CSS and even SVG file types are gzipped in addition to the HTML file type.
Save the changes by pressing Control-X follow by Y on the Terminal. Test the configuration file to ensure no errors with the following command:
sudo nginx -t
If everything looks ok, go ahead and restart Nginx:
sudo service nginx restart
Install php7.3-fpm
Type the following command to install the php7.3-fpm:
sudo apt-get install php7.3-fpm php7.3-mysql php7.3-xmlrpc php7.3-curl php7.3-gd php-imagick php7.3-imap -y
Enable php in nginx
Type the following command to make the changes of nginx settings:
sudo nano /etc/nginx/sites-available/default
Find the line
index index.html index.htm index.nginx-debian.html;
Add index.php after index to look like this:
index index.php index.html index.htm;
Scroll down until you find a section with the following content:
# pass the PHP scripts to FastCGI server listening on 127.0.0.1:9000
#
# location ~ \.php$ {
Edit the section by removing the # characters so that it looks like this:
# pass PHP scripts to FastCGI server
#
location ~ \.php$ {
        include snippets/fastcgi-php.conf;

#       # With php-fpm (or other unix sockets):
        fastcgi_pass unix:/var/run/php/php7.3-fpm.sock;
        fastcgi_split_path_info ^(.+\.php)(/.+)$;
#       # With php-cgi (or other tcp sockets):
#       fastcgi_pass 127.0.0.1:9000;
}
Save the file and reload the configuration file with the following command:
sudo service nginx reload
Test PHP
Create an index.php file with:
sudo nano /var/www/html/index.php
Add some dynamic PHP content by replacing the current content:
<?php echo phpinfo(); ?>
Save and refresh the browser (or type the url as http://192.168.0.101). A page with the PHP version, logo and current configuration settings will be displayed.
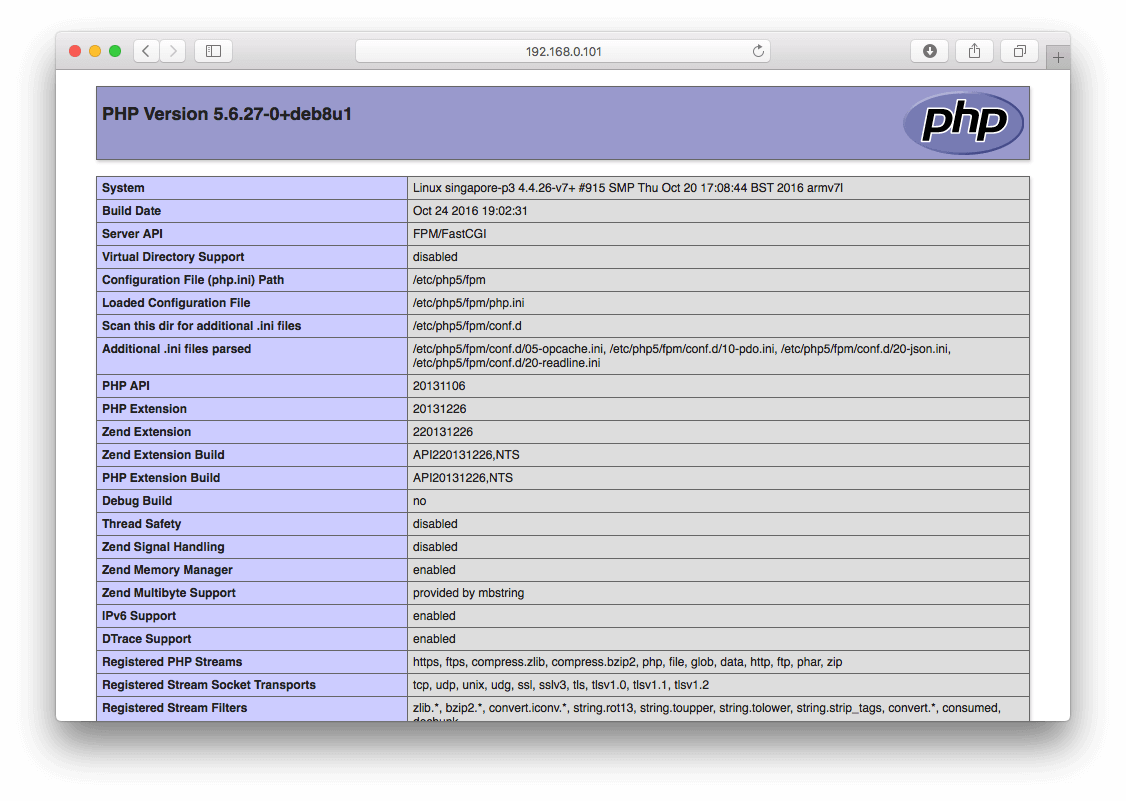
The image was based on php5 installation on Raspbian Jessie, it didn't get updated to php7.3 for Raspbian Stretch
Change php.ini settings
There is not much to change at least for now on the php.ini settings, except probably two, first is the upload_max_filesize need to be increased to be the same as client_max_body_size directive within Nginx. Open the php.ini file which is stored at /etc/php/7.0/fpm. :
sudo nano /etc/php/7.0/fpm/php.ini
Search the following line and change the value of upload_max_filesize value to match the value we previously assigned to the client_max_body_size directive when configuring Nginx:
upload_max_filesize = 16m
Search for the cgi.fix_pathinfo parameter. We need to uncomment the line and change the value from "1' to "0":
cgi.fix_pathinfo=0
This tells PHP not to try to execute a similar named script if the requested file name cannot be found. This prevents potential attacker to craft a specially designed request to try to trick PHP into executing code that it should not.
Hit Control-X and Y to save the configuration.
Install MariaDB
if you are familiar with MySQL, you will find that MariaDB installation looks almost identical:
sudo apt-get install mariadb-server mariadb-client
Once installation is completed, we can login using the root account
sudo mysql
It is not a good idea to use root account for daily operation. So we want to create a super user with all the privileges as root for administration purpose, and disable the remote access of root account later.
CREATE USER 'username'@'localhost' IDENTIFIED BY 'password';
Please replace the username with the name of your choice and the password should be the real password that you’d want to use for login into the system. Next, we will grant all the privileges this newly create user.
GRANT ALL PRIVILEGES ON *.* TO 'username'@'localhost';
FLUSH PRIVILEGES;
exit
Quit the mariaDB and login with the newly created username and password and check if the user has all the privileges settings correctly.
We now need to tighten the security of mariaDB access.
sudo mysql_secure_installation
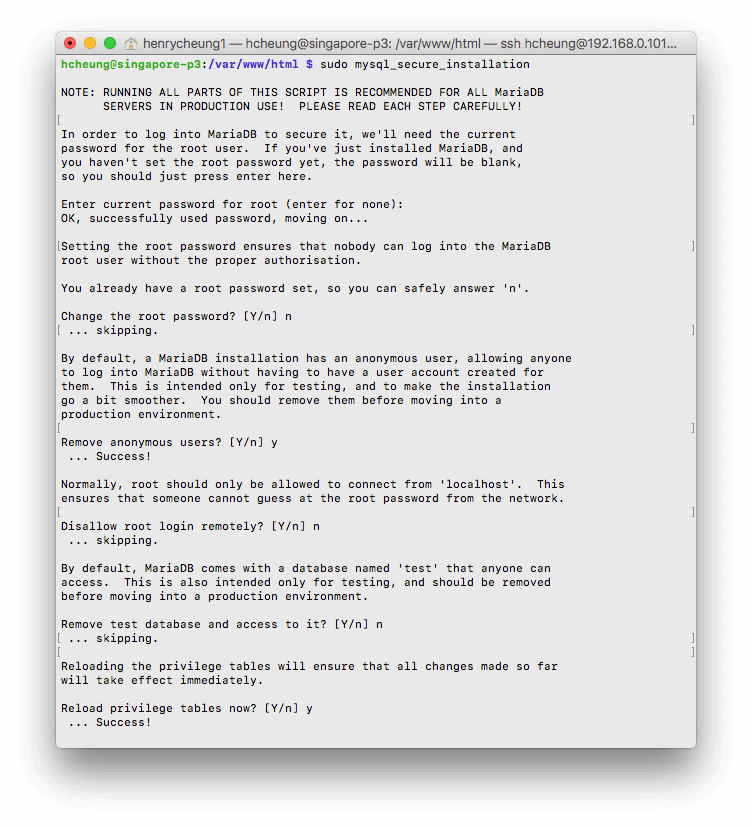
We already setup the password during the installation of mariaDB, therefore We will skip the “change root password” question. We answer with ‘y’ on the question of “remove anonymous users”. We answer ’y’ for the question of “disallow root login remotely” since we now have an newly created user with all the privileges as ‘root’ user. As far as we know, unlike mysql, there is no ‘test’ database pre-installed, so we answer the question “remove test database” with ’n’. And agreed to “reload privilege tables”.
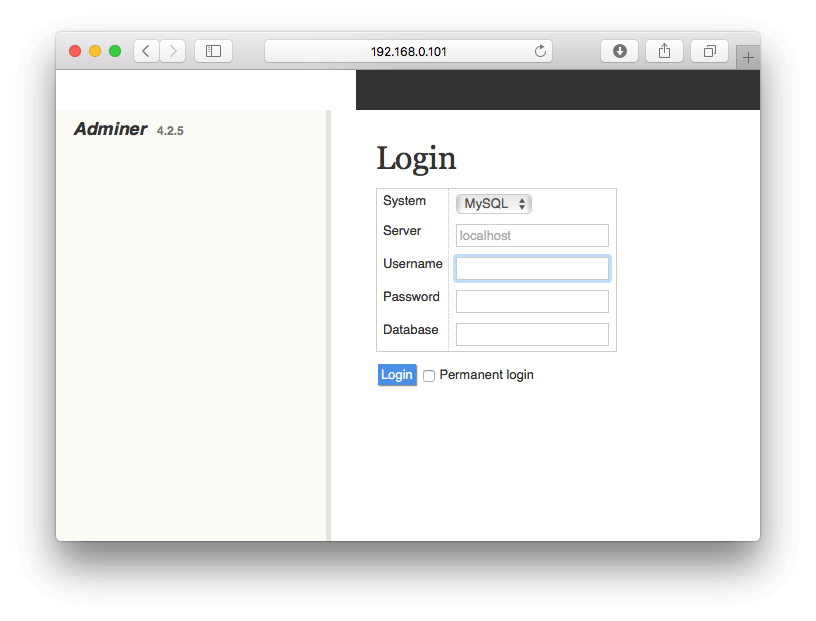
Database management using Adminer
In order to be able to manage the database table easily via web interface, we install Adminer as it is much cleaner and simpler to use than phpmyadmin. Setup Adminer is very straightforward.
sudo mkdir /var/www/html/admin
cd /var/www/html/admin
sudo wget https://www.adminer.org/latest-mysql-en.php
Rename the file to adminer.php for easier access.
sudo mv adminer-*.php adminer.php
To use the Adminer, run the browser with http:192.168.0.101/admin/adminer.php
An alternative UI skin (basically a css file) can be downloaded from Adminer website.
Protect the admin directory
As we just created an /admin directory under /var/www/html/ for us to access the Adminer through web interface which is very convenient but it is also accessible by anyone via web browser if someone know the directory exists. We don't want others to access the directory without permission, it would be good to only allow for accessing via internal IP but block access from public IP.
To do that, we need to configure the nginx for the /admin directory access:
sudo nano /etc/nginx/sites-available/default
Insert the following section within the server section, before the rest of location directives:
    # Only allow access of /admin/*.* via internal IP
    location ^~ /admin/.*\.php$ {
        return 444;
        allow 192.168.0.0/24;
        include snippets/fastcgi-php.conf;
        fastcgi_pass unix:/var/run/php/php7.3-fpm.sock;
        fastcgi_split_path_info ^(.+\.php)(/.+)$;
    }
Once the file is saved, we need to restart the server for the new setting to take effect, but would be good to test the setting prior restart.
sudo nginx -t
sudo service nginx restart
Now when we access the /admin directory from external IP (you might need to flush the browser cache first if you access the directory prior the setup of password protection), a Nginx 403 error page will be shown. However, the access will be passed through when accessing via internal network with an IP address between 192.168.0.0 to 192.168.0.255.
That’s all for now, we have a web server up and running and ready for installing WordPress.
Hi! I love your guide, but I was wondering if you could help me… I followed your guide to a tee – however when I try and access my wordpress using an external connection it is EXTREMELY slow and then loads index.php with no CSS at all…
When accessing locally WP loads instantly, so I don’t understand…
Creating a PHP test page works locally AND publicly. So does test HTML pages. So it’s something to do with WordPress/Database and the public version of the site… What do you suggest the problem is? It’s weird it half loads publicly, if there was an error in my settings i’d expect it to not load at all!
Please help! Your guide is ace! Will recommend to everyone 😀
Joe, Thanks for your comment, I also got your FB messenger messages said that you have solved the problem. If you are still have the problem, let me know and I will try to help to troubleshoot as much as possible.
Thanks for such an amazing, detailed, up-to-date (for Raspbian Stretch) post for Installing WordPress using Nginx.
I need your little help, after installing WP on Raspberry Pi, my website is literally very fast on local network and my site address is 192.168.0.10. But my plan was to serve my website through Hotspot, so I followed this tutorial https://github.com/quangthanh010290/RPI3_HOTSPOTS and I modified his script so it uses 192.168.0.10 as router gateway instead of 192.168.42.1 .
This worked well but my website’s response is too slow on hotspot as compared to on local network. Thanks in advance ☺️
I do tried on using wlan0 and experienced similar speed as eth0 (my wifi router is 600Mbps capable), I never have experience on hotspot though, therefore hard for me to comment. But if your RPi IP is 192.168.0.10, your gateway setting should likely be 192.168.0.1 (you can check with your router).
Singapore Power! I am proud that a Singaporean is doing this tutorial!
Hello,
Great Tutorial ! Thanks.
I have only one problem.
After I am putting :
    # Only allow access of /admin and wp-admin via internal IP
    location ~ /admin/.*\.php$ {
       allow 192.168.0.0/24;
       deny all;
       include snippets/fastcgi-php.conf;
       fastcgi_pass unix:/var/run/php7.0-fpm.sock;
       fastcgi_split_path_info ^(.+\.php)(/.+)$;
    }
into default
I got
502 BAD GATEAWAYerror on http://192.168.0.*/admin/adminer.phpPlease could You help me resolve this problem.
Thank You
The setting looks correct. Try to empty the cache of your browser and try again. Also for testing purpose, try to comment out(by adding ‘#’ in front of the line)
allow 192.168.0.0/24;anddeny all;to see if it works? Thelocation ~/admin/.*\.php$directive is basically the same aslocation ~ \.php$directive setting except that it only allows a specific local IP range 192.168.0.xxx to come through.Thank You for fast response, You’re great.
I tried on 3 different devices connected to my wifi with IP 192.168.0.xxx, but it’s not working. It’s working without this code, but that’s obvious, because then everybody can log in.
I understand the code and tried to comment out some lines, but still the same error and ofc I was reloading nginx after every change.
EDT.
During writing this post I figured it out.
At the end of the file I added :
    location ~ /admin/.*\.php$ {
       allow 192.168.0.0/24;
       deny all;
       include snippets/fastcgi-php.conf;
       fastcgi_pass unix:/var/run/php7.0-fpm.sock;
       fastcgi_split_path_info ^(.+\.php)(/.+)$;
    }
I only hope that It will work in every case someone outside the local ip will try to log in.
Thank You I owe You a coffee in the USA or Singapore (maybe some day I will come there I heard many great things about this place) . Have an amazing weekend.
Henry, I’ve only read up to part 2 so far, but this is an amazing post. You’ve helped me so much and I’m very grateful. Keep up the good work brother.
Andrew
First – great guide Henry, probably the best walk-through for RPI web servers on the web. I am however having the same problem as ADmin_gateaway. I have inserted the location block exactly as stated but it does nothing, even after clearing out my browser cache. I have experimented with just using deny all and commenting out my local network – #allow 192.168.2.0/24 – but I have the same problem, and adminer remains open to the world. Any further suggestions?
I think your case is different from ADmin_gateway who experienced a 502 error. While your case seems that the location directive for /admin/ is not working at all. What is your root directory and `root` directive setting? And how the /admin/ directory correspond to the root directory?
My root directive is:
root /var/www/html
I have 2 other location directives— / and /blog (my wordpress site) – everything configured and working fine with them.
My adminer.php is in /var/www/html/admin/adminer.php
So my adminer.php is not located within the WordPress (/blog) directory.
Thanks for getting back to me so quickly, and sorry for my late reply!
It seems that somehow your try_files redirect and the .php wildcard location directive get executed before it hit the /admin/ location directive. Try to move the location directive for /admin/ up right after the location / directive and before the location ~ \.php$ block, as shown here:
server {
    listen 80;
    listen [::]:80;

    root /var/www/html;
    index index.php index.html;

    location /blog {
        try_files $uri $uri/ /blog/index.php?args;
    }

    location ~ /admin/.*\.php$ {
        # allow 192.168.0.0/24;    #uncomment this after testing
        deny all;
        include snippets/fastcgi-php.conf;
        fastcgi_pass unix:/var/run/php/php7.0-fpm.sock;
        fastcgi_split_path_info ^(.+\.php)(/.+)$;
    }

    location ~ \.php$ {
        include snippets/fastcgi-php.conf;
        fastcgi_pass unix:/var/run/php/php7.0-fpm.sock;
        fastcgi_split_path_info ^(.+\.php)(/.+)$;
    }
}
If this is still not working, pm me your configuration file and we will take a look together.
Hi Henry, Thanks a ton for the tutorial! Noob here trying to solve this issue for a few days now. I am having a similar problem as Muppet, but unfortunately his solution doesn’t work for me.
In my case, like Muppets case, The “location” directive you show stops external IP’s from getting to /admin directory (results in “forbidden…” message which is what I expect) BUT if the external IP enters the url with /admin/adminer.php at the end, the adminer page loads.
To Fix this, I have moved my location directive to the middle, and up to the top location directive, trying every spot for the location directive with each spot effectively blocking access to /admin/adminer, for the Wide area network (internet), but also for the local area network. Essentially any of the mentioned solutions either get my admin pages completely on (Lan/Wan) or completely off (Lan/Wan). I can not find a middle ground and am not able to separate the lan rules from the wide are network rules. Could you please help me troubleshoot and figure out a solution here? So much appreciated!
Can you try change it to
location ^~ /admin? Remember to reload the nginx config once you change it. Sorry I can’t test it now as I’m traveling overseas.I’ve modified the blocking of admin directory slightly from
location ~ /admin/.*\.php$tolocation ^~ /admin/to block all access within the directory except for local IP. This now needs to be placed before the rest of location directives. I’ve since updated my post content to reflect the changes.Hi,
First, thanks for this tutorial. On other tutorials always something is missing. I installed it on a RPI2 which runs quite good till now.
First a hint from me, maybe I missed it. But if you want to use the WordPress APP to connect to a self hosted WordPress you also have to install php7.0-xml and php-xml. Probably you didnt mention it due to security reasons
I had also problems to upload files larger than 8MB. I looked again and again, finally… (dumb me)
phpinfo:
Check if it points to the right config file: /etc/php/7.0/fpm/php.ini
But for me i had also to change this:
Thanks for your message.
My PHP installation shown as on my post
sudo apt-get install php7.0-fpm php7.0-mysqlnd php7.0-xmlrpc php7.0-curl php7.0-gd php7.0-imagick php7.0-imap -ywhich does not explicitly install php7.0-xml, and works fine in my case. The needs ofphp7.0-xmlmight be required by specific theme or plugin that you are using.As mentioned in the blog, I set both
upload_max_filesizein php.ini andclient_max_body_sizeunder the Nginxhttpdirective to 16M, which is sufficient for my case, but should be adjusted based on each individual’s application requirements. Theupload_max_filesizeis the limit of any single file. Thepost_max_sizeis the limit of the entire body of the request, which could include multiple files.Malte, I just run
php -mon a test unit which has the same configuration and WordPress running, and confirmed that php7.0-xml is not installed and works fine with my theme and plugins.Hi. Thanks for the very useful tutorial.
I have found that the “location” directive you show stops external IP’s from getting to /admin directory (results in “forbidden…” message which is what I expect) BUT if the external IP enters the url with /admin/adminer.php at the end, the adminer page loads. Do you have any idea how to fix this behaviour? Thanks.
Actually…I found the answer. Solution was to move the location declaration block to the TOP of the section so that the check is done before the others. It seems to work ok now.
Couldn’t get past instal php7, errors on my PI 4:
This article was updated and tested on Raspbian Stretch where PHP7.0 was supported and available in Stretch distro package. For Raspbian Buster (which is based on Debian Buster), the php version in the distro package is php7.3 (see https://packages.debian.org/buster/php/ for all the php packages), and php7.0 is deprecated. Replace all the file name with php7.0-xxx with php7.3-xxx should work, however, personally I have not test it on Raspberry Pi 4 yet.
Hi,
Please be very proud of your post, it is extremely helpful and clear, and I enjoyed reading it!
I have a question about the creation of the admin user in the section called “Install Mariadb”.
I am adding a new user with the following:
CREATE USER ‘username’@’localhost’ IDENTIFIED BY ‘password’;
I have specified a new unique username and password. My question is this: should the text ‘localhost’ be replaced with the ip of the raspberry pi? Or is it to be left as it is?
Thank you and I look forward to your next post!
What about the emails? This installation method does not send emails from the wordpress or wordpress contact forms. Do you have to install postfix…?
Right now I have multiple domains hosted in my raspberry pi but none of the domains are sending email in wordpress.
Thanks in advance
sudo apt install -y sendmail
try that out ! )
I have a contact form that has to be submited. Once submitted I should get an email.
Any help???
Not sure if you had setup the WordPress email yet, I just wrote an article on Simple steps to setup WordPress SMTP email without a plugin that might be what you are looking for.
What is my PI IP is 192.168.1.80? How can I restrict access to the /admin folder?
Change the line
allow 192.168.0.0/24;toallow 192.168.1.0/24;orallow 192.168.0.0/23;. This will allow you to access the /admin folder within the internal network, but deny the access when in public IP.I must be doing something wrong, ’cause it doesn’t work. Whatever I use, it restricts access from my local network (I’m not sure about outside yet). I’m trying to set it up from my laptop, and both the pi and the laptop are on the same wifi (?!)
Thanks for the advice.