Before connecting the Raspberry Pi to the Internet, it is important to tighten the security by changing the default password and restricting SSH access of the the Raspberry Pi first.
This article has been updated on 5 Jan 2018 based on Raspbian Stretch
First boot
I’m not going to cover the creation of a bootable Raspbian Jessie here as it is well documented in Raspberry Official Website. Once the Raspberry Pi is booted, we can login by using ssh command from Terminal app (from now on, I would refer the process simply as “login”):
ssh pi@192.168.0.101
The 192.168.0.101 is my local IP address where my Raspberry Pi connected, please replace it with your own local IP address.
It is important to ensure we are using the latest software by bring the system up-to-date with those commands.
sudo apt-get update
sudo apt-get upgrade
Rename default ‘pi’ user account
By default all Raspberry Pi devices come with an account pi with the password raspberry. For security reasons first thing to do is to change the password and better off, not using the user name pi. I found the easiest way is to rename the user name from pi to a new user name because apparently user pi tied with quite some processes that running on the server.
Create a temporary user account
In order to change the username pi we will have to log in as another user temporarily since it's not possible to rename account pi while you are logged into as pi. So first thing we do is to create a temporary account temp and also add the temp user to the super user group:
sudo adduser temp
sudo adduser temp sudo
sudo reboot
Choose a secure password for the temp user even though we are going to delete it or lock it down from the login access later. Once it is done, reboot the system.
Replace ‘pi’ with a newly created account
Login into the system using the ‘temp’ user account. Now we can rename the the default ‘pi’ user name to a ‘newname’. Type the command:
sudo usermod -l newname pi
Now the user name has been changed, the pi's home directory /home/pi should also be changed to reflect the new login name:
sudo usermod -m -d /home/newname newname
Do a reboot for the new settings to take effect and login again as newname.
ssh newname@192.168.0.101
Change default ‘raspberry’ password
You can change the default password from raspberry to something more secure by typing following command and entering a new password when prompted:
passwd
sudo reboot
Generating a SSH Key Pair
At this point our new user is ready to use, however for enhanced security we are going to add public key authentication. To do so, open a new Terminal window on Mac (i.e. on the local machine. Not the window that currently login into the raspberry pi), enter the following command on the local machine:
ssh-keygen
Just hit return to accept the default location. Hit return when prompted to enter a passphrase, but if a passphrase is chosen, which will require you to enter a password every time you login with this key pair.
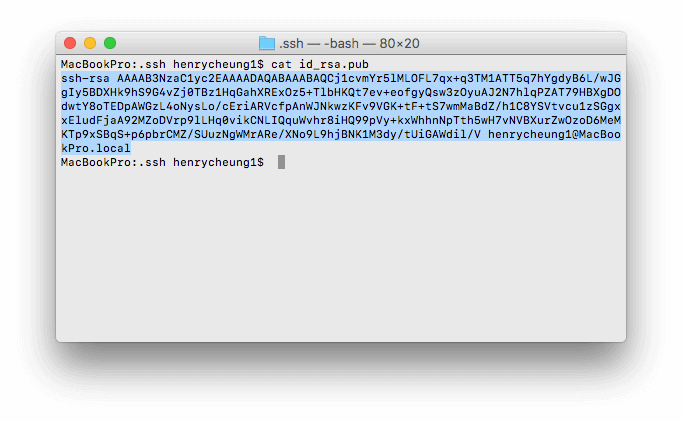
Now that we have our SSH key pair, we need to copy the public key to the raspberry pi. To copy the public key:
cat ~/.ssh/id_rsa.pub
Select the entire outputted string and copy it to your clipboard:
With the public key copied to the clipboard, switch back to the SSH Terminal window and ensure we are still logged in with the newly created user. We can then create the .ssh directory on the Raspberry Pi and set the correct permissions:
mkdir ~/.ssh
Create a new file called authorized_keys to keep the the public key we copied in the clipboard:
nano ~/.ssh/authorized_keys
Press Coomand-V (Mac's clipboard paste shortcut) to paste the public key, and save the file using Control-X and then Y to confirm. Finally, set the correct permissions on the direction and the file:
sudo chmod 700 ~/.ssh
sudo chmod 600 ~/.ssh/authorized_keys
Do not close the Raspberry Pi SSH connection, and launch another terminal session from the computer where the id_rsa.key is created, and run an ssh command to connect to Raspberry Pi. By doing so, in case there is some incorrect setting that prevent you from login into the system using newly configure ssh configuration, you still be able to fix it through your original ssh terminal session. Once it is confirmed that you could login into the Raspberry Pi without entering user password, you can then close the original ssh connection.
Tighten SSH access security
We’d also want to tighten the security of SSH access. The SSH main configuration file provided some basic settings for SSH access, we simply need to modify it to enhance the security requirements. Open the SSH main configuration file using editor:
sudo nano /etc/ssh/sshd_config
Always use Protocol 2
SSH Protocol 1 is very insecure, allows man-in-the-middle attacks and has a lot of known vulnerabilities. Find the line where Protocol is specified, and modify the line (uncomment by removing the # in front of the line or delete protocol 1 if it is included in the line so that the line look like this:
This will prevent brute force attacks against the default SSH port.
Protocol 2
Raspbian Stretch by default using SSH Protocol 2, this step is therefore no longer required.
Disable root login
Direct root logins are insecure by default, even more if the root password is weak. Since we have setup a newuser previously, we should disable the root login access and only allow the newuser as the primary user to log in via SSH.
Add the following lines if AllowUsers and DenyUsers directives can't be found in the sshd_config file:
AllowUsers newuser
DenyUsers root
Remember to replace the name newuser to the actual user name you setup previously.
Disable login with null passwords
Disable logging into accounts with null passwords by changing the PermitEmptyPasswords to no:
PermitEmptyPasswords no
Use public_keys instead of passwords
We’ve setup the SSH key for login into an SSH server using public keys instead of passwords before. We now can disable password authentication and solely use public key access:
PasswordAuthentication no
After making configuration file changes, reload the ssh configuration using the command:
sudo service ssh reload
Clean up
Remember that we created a temporary user ‘temp’, we now no longer need it and can therefore delete the user ‘temp’ and remove its home directory:
sudo deluser temp
sudo rm -R /home/temp
We now have done some settings to secure the raspberry pi from unauthorised access, and the raspberry pi now have a good basic settings to be used as a host. The next step would be setting up web server with Nginx, PHP-FPM and MariaDB.
Note: Please noted that these are the basic settings to make the Raspberry Pi more secure for any internet-facing server, there will be more security need to be tighten once the Nginx, PHP7 and WordPress are installed, which I will covered in the subsequent articles.
Tried all of this and now I cannot SSH in to my Raspberry Pi anymore
Sorry to hear that, when creating the
authorized_key, as I mentioned in the post, “Do not close the Raspberry Pi SSH connection, and launch another terminal session from the computer where theid_rsa.keyis created”, i.e. try to login using ssh from a new terminal session while keeping the initial ssh connection open, by doing this way, in case you have some problem in your setting, you are still be able to fix it from your initial ssh connection.sudo raspi-config