I have been using STM32CubeIDE for my STM32 development for past a couple of years, and there are things that I like about the IDE but there are also things that I don't like about it. In this blog I'd like to discuss how I setup the IDE to overcome some of the things that I don't like about the IDE.
By the way, this is not a tutorial on how to install STM32CubeIDE or how to use STM32CubeIDE, for that, please see the first part of How to install STM32CubeIDE about the tricks and steps of installing the IDE.
Things that I like about the STM32CubeIDE
There is no suprise that the STM32CubeMX (which is the code generator part of the STM32CubeIDE) that as part of the STM32CubeIDE makes it really easy to configure the hardware peripherials, modern MCU has became more and more complicated that it will take quite a while to manually configure the device peripherials and it could be an error-prone process without the tool like STM32CubeMX. This is one of the main reason and one of the key things that I like about STM32CubeIDe.
Another reason that I like about the STM32CubeIDE is the ability to click on a function, or right-click on a function to bring up the function definition in the soruce code for a quick peek on how the function is implemented. This capability might just part of the Eclipse functionality (I never use Eclipse IDE prior using STM32CubeIDE) but nevertheless this is a really helpful feature for software development as compare to coding using an code editor.
Things that I don't like about the STM32CubeIDE
The STM32CubeMx auto code generator is one the the reasons that not just me but many developers like about the IDE, but the STM32CubeMX auto code generator generates all codes in the main.c, and to make this worst is that it add a lot of comment lines with the restrictions to where you should put your variables, declarations, and codes within the main.c file, this is not only clutter the file, making it not only difficult to read, but also difficult for code sharing and distribution. A few line of code could easily filled with lines of boiler plate code and comments. If you are not puttuing the code in the designated section of the file, next time when you re-generate the code using the STM32CubeMX, your code might be wiped out when the IDE regenerate the code. This happens to me a few times in the past.
ST Microelectronics offers 3 libraries within the IDEs that you could use, CMSIS (technically, it is not a library, but a list of defintions and symbols that mapping with the ARM Core), a Low-Layer Library (LL) and Hardware Abstraction Library (HAL). Both LL and HAL utilizes part of CMSIS implementations, interestingly HAL library is not build on top of the LL library but it should, this might be because of the historical reason as the entire ST Microelectronics development platform is the result of a serious of acquisitions and in-house developments. Personally, I don't quite like the HAL library for both performance and the way it is structured, I often feel that the things that I need to go through to setup a structure for using certain functions, I must well just uses the LL library instead. For this reason, I most of the time uses LL library.
Using LL Library
The STM32CubeMX code generator by default would generates the code based on HAL lirbary. In order to uses LL Library, it need to tell the code generator to generate code based on LL library.
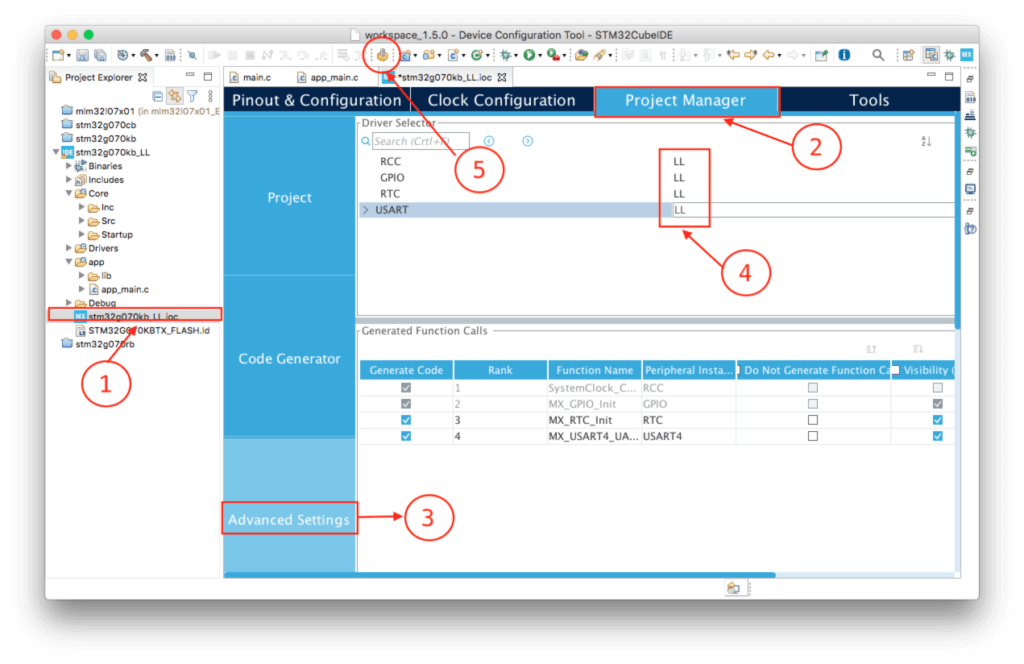
Here are the steps for setting up STM32CubeIDE to use the LL Library in a project. Open STM32CubeIDE, create a project and generate the code as usual.
-
double-click your-project.ioc to bring up the STM32CubeMX code generator from the side menu;
-
Click on Project Manager tab;
-
Click on Advaned Settings;
-
On the Driver Selector section, click on each driver and change the "HAL" to "LL";
-
Click on the Device Configuation Tool Code Generator icon to generate the code.
That is, now I can use the LL library for the project.
A Better Way to Setup STM32CubeIDE
Instead of using the default generated main.c, I usually create a separate folder called app with a file app_main.c so that in the case when I need to share my project as an open source project or back up it to github, I don't have to distribute the entire project with the main.c that is full of boiler plate code created by auto code generator, I only need to share the app folder.
In orde to do what I want, first create a project as usual, either use the LL lirbary as mentioend before or use the HAL library.
Then following the follow steps:
Step 1:
Right-click on the project folder on the left sidebar and click on New -> Source Folder to create an app folder. Right-click on the newly created app folder, click on New -> Source File to create a file and name it app_main.c.
Step 2:
Click on Core -> Src -> main.c to open the file to add "hooks" to use the newly created folder and the app_main.c that we just created. Add the following function declaration void app_main(void); and the call to app_main() function within the USER CODE BEGIN2 section.
    :
/* USER CODE BEGIN PFP */
void app_main(void);
/* USER CODE END PFP */
    :
int main(void)
{
    :
  /* USER CODE BEGIN 2 */
  app_main();
  /* USER CODE END 2 */
    :
With this configuration, we most of time will no longer need to touch the main.c other occasionally we might still need to add our custom configuration into the auto-generated function.
Step 3:
The app_main.c mainly consists of two parts, all the setup codes required by your app (in this example, there is none), and a super-loop that that should never go out of the loop, so in a way the app_main() function behave very much like the loop() in the Arduino framework.
#include "main.h"

// declare `extern` variables generated by CubeMX here

void app_main() {
  // put any of your setup code here

  // your super-loop started here
    while(1) {
        LL_GPIO_TogglePin(LED_GPIO_Port, LED_Pin);
        LL_mDelay(500);
    }

}
If the STM32CubeMX generates any global variable, it should declare as extern variable before the app_main() function. For example, if you are using a Nucleo board from ST, UART port might already created by default and declared in the main.c as:
/* Private variables ---------------------------------------------------------*/
UART_HandleTypeDef uart2;
If you need to use the uart2 in the app_main(), the uart2 need to be declared in the app_main() as extern variable.
#include "main.h"

// // declare `extern` variables generated by CubeMX here
extern UART_HandleTypeDef uart2;

void app_main() {
  ...
}
This is much cleaner and I no longer need to worry that my code would get wiped off due to the code generator as the all the code in the main.c seldom change through out the project development. It is also make it easier for code sharing and version control in github.
Until STM32CubeIDE improves its way of generating code in the main.c, this is the best way that I could think of to workaround the things that I don't like about the STM32CubeIDE!
Hi,
Using this method, how do you access the auto generated variables that are placed in the main.c within your app_main.c ?
The `main.c` is still there, for the first time after you generate the code, add the two lines shown in step 4, and you don’t need to touch `main.c` any more, and future code generations will not affect it.
I think you should do as usually in C: declare each autogenerated variable declared in main.c you need, as extern in main.h. Main.h is already included in app_main.c, as showed in the example in the article.
I can’t understand: in which way manually adding folders is different to right click on the project and choose add c files (placed in subfolders, obviously)?
Thank you for sharing