Getting started with STM32 development isn’t as smooth as setting up an Arduino or ESP32 for me for various reasons, and I hope my experience in setting it up, and the things you need to be aware of will help any one interested with this article.
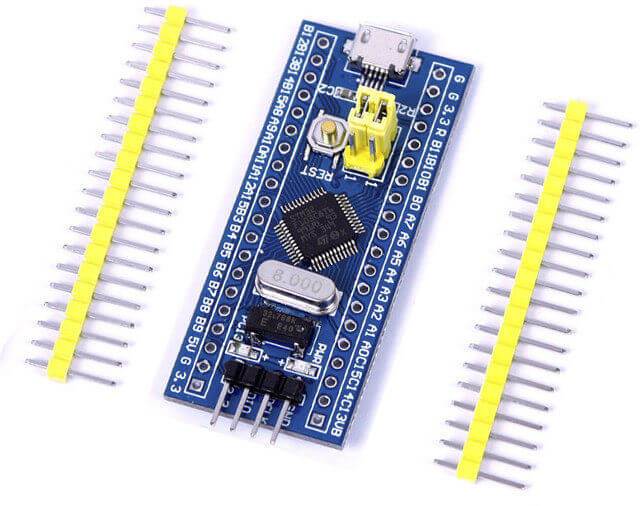
STM32 Blue Pill
Whenever I was in Hong Kong, I often cross the board to Shenzhen (to Hua Qian Bei Road to be exact) to search for interesting hardware. On a recent trip there, I bought a STM32-based development board that is commonly referred as STM32 Blue Pill for CNY15 (slightly over than USD2).
STMicroelectronics (a.k.a. ST for short) offers a wide range of general-purpose microcontrollers for both 8-bit MCU (STM8) and 32-bit ARM Cortex-M based microcontrollers (STM32). Specifically STM32 Blue Pill in the market is based on STM32F103C8T6 which has a Cortex-M3 ARM CPU that runs at 72 MHz, with 20 kB of RAM and 64kB of flash memory. The microcontroller has one USB port (without extra chip support), three UART ports, 16-bit PWM pins plus more. It is a 3.3V microcontroller, but some of its pins are 5V tolerant.
| Specs/Board | Arduino Uno | STM32F103C8T6 | ESP8266 | ESP32 |
|---|---|---|---|---|
| CPU | ATmega328P | ARM Cortex-M3 | Xtensa L106 | Xtensa LX6 |
| CPU Core | 1 | 1 | 1 | 2* |
| Architecture | 8 bits | 32 bits | 32 bits | 32 bits |
| CPU Frequency | 16 MHz | 72 MHz | 80 MHz | 160 MHz |
| Connectivity | No | No | WiFi | WiFi, Bluetooth |
| RAM | 2 KB | 20 KB | 160 KB | 512 KB |
| Flash | 32 KB | 64 KB | 16 MB | 16 MB |
| GPIO Pins | 14 | 37 | 17 | 36 |
| SPI/I2C/I2S | 1/1/0 | 2/2/0 | 2/1/2 | 4/2/2 |
| UART/CAN | 1/0 | 3/1 | 2/0 | 2/1 |
| ADC Res/Chs | 10-bit/6 ch | 12-bit/10 ch | 10-bit/1 ch | 12-bit/18 ch |
| DAC Pins | 0 | 0 | 0 | 2 |
Why the development board is called Blue Pill is obviously refering to its signature blue PCB board. A much more fun reason is that once upon a time there was a similar product with red PCB, to deferentiate it, the development community has name the one with the blue PCB as Blue Pill and the one with the red PCB as Red Pill, referring to the movie The Matrix, where Neo is offered the choice between a red pill and a blue pill by Morpheus. The red pill represents an uncertain future, and the blue pill represents a simulated reality of the Matrix with confined conform living.
In the movie, Neo chooses the red pill. But in our verion of “reality”, blue pill seems to be winning the game, as I can only glance at how the STM32 Red Pill looks like from an achieve web page at achieve.org, it seems that the STM32 Red Pill is totally disappeared from the market.
1. STM32F103 versus fake STM32F103
If you bought your STM32 Blue Pill online, take a closer look at the STM32 chip. There are many sites talking about fake STM32F103C8T6 or fake Blue Pill, what they means fake was that a few years ago, there are some STM32 blue pill (and other products) from China come with a chip marked as GD32F103C8T6, produced by a Beijing-based company GigaDevice, it is a direct drop in replacement of STM32 but claims to be able to run even faster speed. According to this article published in Nov 2015 that ST claims “it’s a pure piracy: no agreements of any kind between ST and Giga Device, no license… nothing. ST legal people are in charge of this problem”. At the end of the article, the author said: "I think the lawyers would not help in this case. They may shut down Giga Devices legally, but illegally the cloned STM32 design can be produced at many places secretly and sold as STM32 original parts even after the GigaDevices closure!".
As at the begining of 2020 now, GigaDevice is still around, and it still not distributed or listed at any online compoent e-commerce platforms that operated outside of China but its GD32F103C8T6 is certainly listed on LCSC (A Shenzhen-based e-commerce platform for components) for $1.6 for quantity of 1 and $0.88 for quantity of 1000+ (for comparison, STM32F103C8T6 is priced at LCSC at $1.76 for quantity of 1 and $1.01 for quantity of 1000+). One thing to notice is that even the STM32F103C8T6 price at LCSC is significantly lower than what you find from DigiKey, Mouser, Arrow or any other international component e-commerce platform. It is unclean whether ST purposely price its products lower within China in order to compete with GigaDevice or it paid lower licensing rate to ARM for China market, or as predicted by the article, that those marked as STM32F103C8T6 in China are not even from ST?!
By the way, the board that I bought from China came with STM32F103C8T8, but I will probably never know whether it is a fake STM32 or a real one after knowing all these information. Next time you buy a STM32 Blue Pill (or any STM32 products), take a closer look…
Update 2 Arp 2020: On my recent online purchase from diymore.cc, despite the product image on diymore.cc website clear show it's using STM32F103C8T6, the STM32 Blue Pill that I received comes with a chip marked as CKS32F103C8T6. So GigaDevice is not the only one that produces fake STM32F103C8T6 in China.
2. STM32 Blue Pill Design Faults
No one know who design the STM32 Blue Pill, but it is commonly acknowleged that it is based on Maple Mini from Leaflabs. One of the differences between Maple Mini and Blue Pill is that the +5V pins on Blue Pill is directly connected to the +5V pin of the USB connector. There is no protection in place. What this means is that DO NOT POWER THE BOARD THROUGH USB AND AN EXTERNAL POWER SUPPLY VIA 5v PIN AT THE SAME TIME. This could happened when you power your board via USB and at the same time your connect to your programmer which also provide the power source at the same time.
Another design fault is also related to USB, although it only affect data communication via USB port which will not happen unless you have manually installed the USB bootloader. Apparently some of the early boards have a wrong value of R10 resistor (on the back of the Blue Pill board) on the USB D+ pin. Some of the boards has 10kΩ and some has 4.7kΩ, but the correct value should be 1.5kΩ resistor. The board that I bought has the 1.5kΩ resistor. Lucky me!
3. There are many broken links out there
This is the first frustration that I encountered. Many web sites about STM32 refering to a website pointed to stm32duino.com that seems no longer exist. Until very recently (probably till March/May 2019 based on the information that I found from achieve.org), this site has been taken down. To get the STM32duino, you have to get it from ST's github https://github.com/stm32duino, instead of many sites told you to get it from STM32duino.com. This caused broken links on many websites about STM32! This is very confusing and frustrating for someone is new to STM32 development!
The stm32duino.com - a community forum has been re-activated after being down for a few months.
4. There are two Arduino cores for STM32 microcontrollers
Since STM32 is an ARM-based microcontroller, therefore you can develop STM32 using ARM’s official development platforms such as Keil MDK5 (Windows-base only) and MBed if you are serious in ARM programming. ST offers its own IDE for STM32 called STM32CubeIDE, judge from the introduction video from ST and some of the youtube videos that using the STM32CubeIDE, it seems to be a very powerful IDE but a little complicated to setup and configure various board settings.
If you are interested on ARM programming or want to do programming using STM native C libraries, you can refer to my post How to install STM32CubeIDE on Mac.
I just want to have something that I’m familiar and easy to use, and run on Mac. That’s where the Arduino Core for STM32 fit in, but this is also one of the first thing that confused me…
Apparently there are two Arduino Core implementations for STM32, one is called Arduino STM32 by Roger Clark, and there is another one called STM32Duino that is hosted at ST’s official github.
Because the long history of Arduino STM32 developed by Roger Clark, most of the online tutorials are based on this implementation, what make things worst and further confusing is that some of the websites refering Roger Clark’s Arduino STM32 as STM32duino!
Arduino STM32 was the one I first installed. It works until later on when I try to test the STM32 deep sleep that I need to install a library, I then realized the library doesn’t work (with error during compilation), it took me a very long time to debug and eventually I discover that the library work perfectly with STM32duino.
It turns out there are some libraries works for both implementations, but some works only for Arduino STM32, and some only works for STM32duino. So which one to use, my suggestion is to use STM32duino as it seems now officially backed by ST, and it try to fully compliant with Arduino’s APIs.
5. Installation
Install STM32CubeProgrammer
You can either using Arduino IDE or PlatformIO as your IDE environemnt for writing your STM32 program. In either case, you will need to install STM32CubeProgrammer from ST. STM32CubeProgrammer provides the communication between your IDE environment with STM32 board. ST’s website requires you go through a registration and email verification process before you could download the STM32CubeProgrammer, I have difficulty in email verification process as it doesn’t work well on Safari (or with the ad blocker) and eventually I have to use Firefox to download STM32CubeProgrammer.
The downloaded zipped file contains 3 installer files, one each for Windows (.exe), Linux(.linux) and Mac (.app). However, the app is probably never properly registered with Apple and not distributed through Apple App Store, so if you double click on the Mac installer application to run the app, it won’t work because the app is under quarantined by MacOS on my Mac running macOS High Sierra. Right click on the app, and select “Show Package Contents”, then navigate through the directory Contents/MacOs, and double click on “SetupSTM32CubeProgrammer-x_x_x_macos” to launch the installer, and follow the instruction.
STM32CubeProgrammer for Linux and Mac essentially is a Java application. So depend on your computer, you might need to install Java engine if your computer doesn’t have it yet or running an older version that is not compatible with STM32CubeProgrammer.
Install STM32duino on Arduino IDE
STM32duino wiki provided detail “Getting Started” guide on how to setup the Arduino IDE for STM32duino programming.
Install STM32duino on PlatformIO
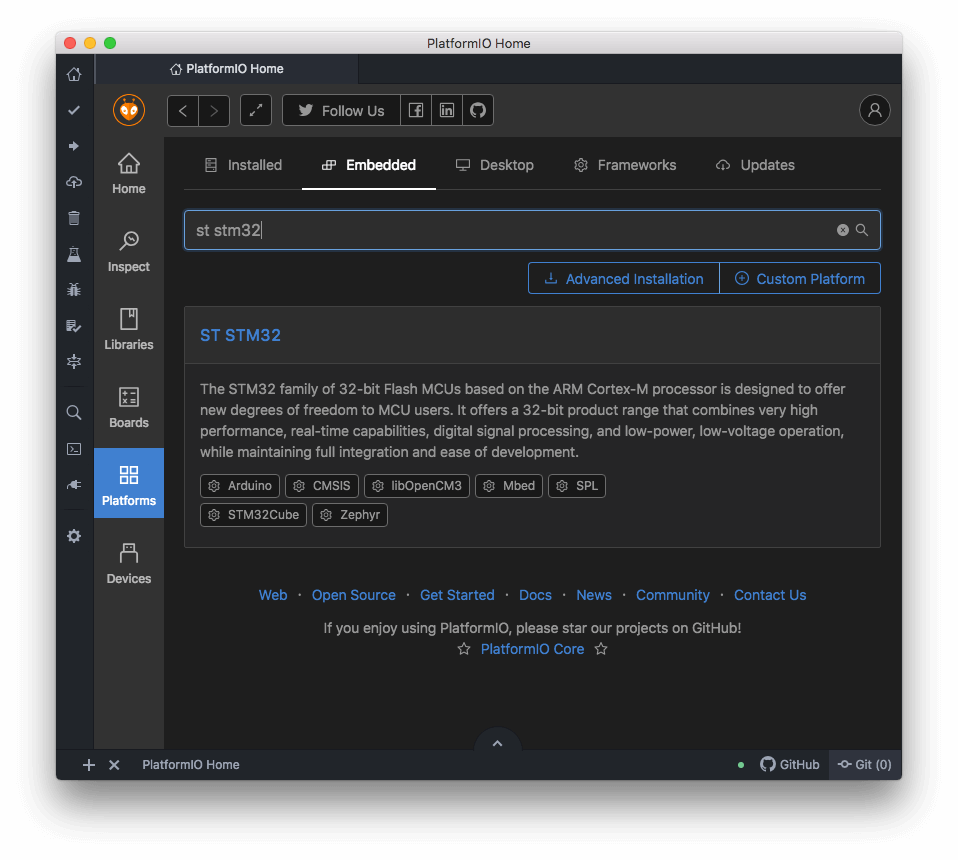
I nowadays seldom use Arduino IDE, PlatformIO is a much better IDE for Aruidno/ESP32 and also STM32 programming. If you never use PlatformIO for Arduino programming, the following two videos from Robin Reiter on YouTube provides a quick installation guide for setup PlatformIO.
PlatformIO provide a very comprehensive documentation on how to use PlatformIO for programming STM32 with Arduino Core. PlatformIO supports both Roger Clark’s Arduino STM32 and ST’s STM32duino, PlatformIO refer to those implementation as “platforms”, and naming convention for PlatformIO to install the platform is neither Arduino STM32 nor STM32duino (this is another confusing part for new beginner), it actually is 'ST STM32' (On Arduino IDE, it is called 'STM32 Cores' for STM32duino). Launch PlatformIO, and click on PlatformIO home icon and click on 'Platforms' and search for 'ST STM32' as shown in the photo to install the STM32duino core.
By default, PlatfromIO uses official STM32Duino core, and the platformio.ini file set the platform as platform = ststm32, this means STM32duino. If you use PlatformIO to create a new project, it will generate the platformio.ini configuration that looks like this for STM32 Blue Pill using the STM32duino(ST STM32) core:
[env:bluepill_f103c8]
platform = ststm32
board = bluepill_f103c8
framework = arduino
If for some reason you would like to use Roger Clark’s Arduino STM32 implementation, you will need to add the board_build.core = maple into the platformio.ini to manually override the default Arduino Core platform. The board naming convention is also different under the different platform selection. The platformio.ini for STM32 Blue Pill using Arduino STM32(Maple) platfrom will looks like this:
[env:genericSTM32F103C8]
platform = ststm32
board = genericSTM32F103C8
framework = arduino
board_build.core = maple
6. Bootloader and programming tools
For someone new to STM32 Blue Pill, it is easy to assumed that you can program the STM32 Blue Pill via USB, just like Arduino (or ESP32). However, this is not the case for STM32 Blue Pill, the build-in USB port is more or less for providing power only because by default it does not come with the boatloader for programming via USB port.
ST-Link V2 SWD Programmer
For ARM-based embedded system development, ARM created an alternative debug interface called SWD (Serial Wire Debug) that only uses two signals (SWDCLK and SWDIO). So obviously for STM32 Blue Pill the default bootloader assumed you will interface with STM32 via SWD signaling by default. ST provides its own debugger/programmer called ST-LINK/V2, the one that ST called ST-link/V2 looks quite different from those that you can find in Amazon and eBay. There are basically the same thing.
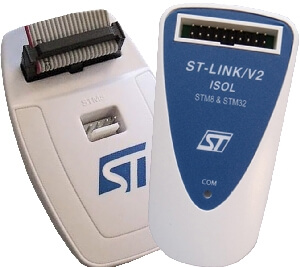
Since almost all the tutorial and setup guide say you will need one of those ST-Link programmers in order to program the STM32 Blue Pill, and STM32 Blue Pill is designed with dedicated header pins for interfacing with ST-Link, so I bought mines from China, but unlucky me, it came as Dead-on-Arrival (DOA), both Windows and Mac computers can’t detect the ST-Link USB, so I eventually ship it back for refund.
Updated (May 2021): I recently purchased another new ST-Link from China, and the new one works fine.
Programming STM32 via UART
You don’t have to have an SWD programmer like ST-Link to program the STM32 Blue Pill, you can do so using UART interface, just like programming the Arduino Pro Mini (which does not have a USB port). I have a couple of those USB to TTL converter as a programmer with a CH340 chip (those with FTDI chip doesn’t work on my old MacBook Pro), but if you don’t have one, here is a link that provide a list of similar products.
| Programmer | STM32 |
|---|---|
| RxD | A9 |
| TxD | A10 |
| 5V* | 5V* |
| GND | GND |
Do not connect 5V between programmer and STM32 if you are supplying voltage via USB as STM32 Blue Pill does not have power protection circuitry and this will damage your STM32 Blue Pill.
Whether you use UART to program the STM32, you will need to move the jumper on the board that marked as Boot0 from 0 to 1, and maintain the Boot1 jumper as 0. Press the Reset button on the board prior uploading so that the board enters serial bootloader mode.
If the board is reset again while the Boot0 is still at 1, the code will be erased, so once development is complete, both Boot0 and Boot1 need to be set to 0 so that the code is run immediately after power on or restart.
If you are using PlatformIO for programming STM32 Blue Pill, you will need to configure the platformio.ini to use serial as the upload protocol.
[env:bluepill_f103c8]
platform = ststm32
board = bluepill_f103c8
framework = arduino
upload_protocol = serial
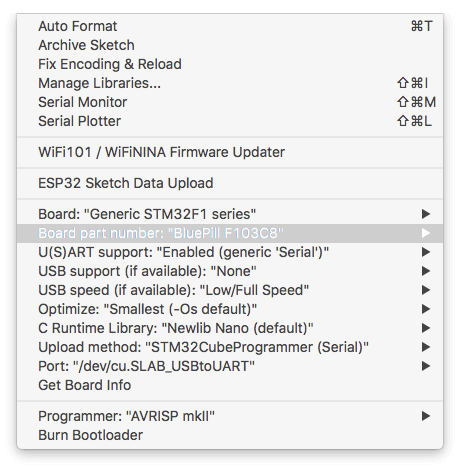
If you are using Arduino IDE instead of PlatformIO for programming STM32 Blue Pill, make sure all Board settings from “Tools” drop-down menu configured as shown below:
7. Finally My First Program on STM32 Blue Pill
It took me quite a few days to put all the pieces of the puzzle together and I’m finally ready to write my first STM32 program. Did I try the LED blinking sketch? Sure I did, but I added a couple tests in my first program.
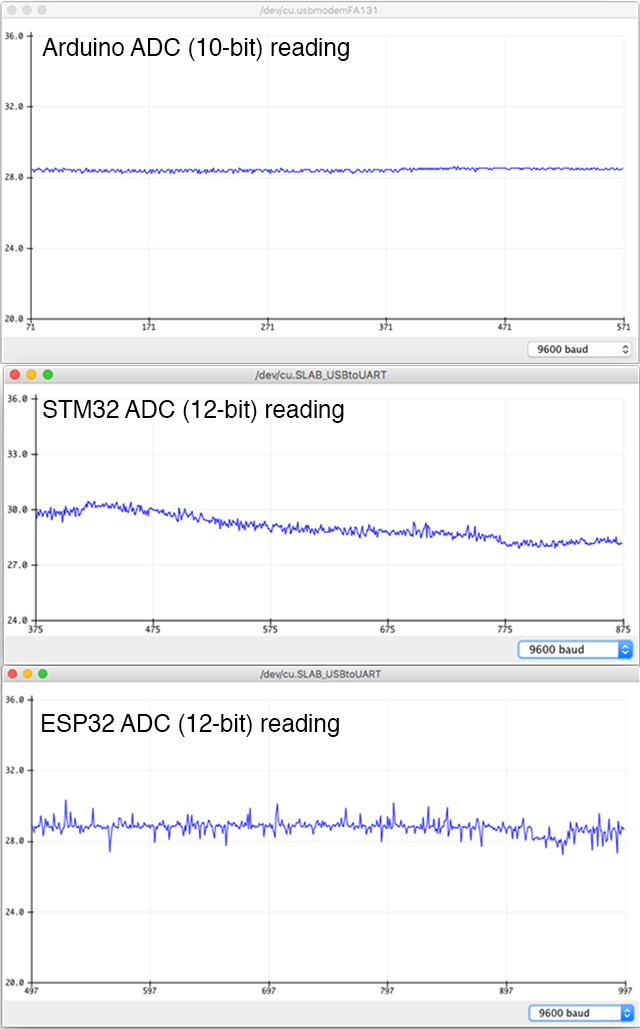
On a recent project, I was quite disappointed with ESP32’s ADC performanace. The thermistor that I used for running the ESP32 ADC test is still on my desk, so I’m interested to find out how STM32 ADC perform against Arduino and ESP32? How noise it is giving that it running at 72MHz clock frequency? So I quickly connect the thermistor between the STM32 A01 pin and GND, and add a 10k resistor between A01 and 3.3V to form a voltage divider, and this allows me to test the ADC performance quickly.
I’m also interested on how STM32 Blue Pill perform at deep sleep mode in term of power consumption. In order to test deep sleep, an external library called STM32 Low Power is required, so configure the lib_deps (library dependencies) on platformio.ini so that it will be installed as project-based dependency (one reason I like PlatformIO over Arduino is its dependency management).
[env:bluepill_f103c8]
platform = ststm32
board = bluepill_f103c8
framework = arduino
upload_protocol = serial
lib_deps =
  STM32duino Low Power
  STM32duino RTC
The program is quite simple and straigtforward, it first setup Pin C13 (PC13) as output for controling the LED, which pin is connected to the LED is usually marked on the silkscren of the STM32 Blue Pill. It then setup A0 (PA0) as analog input and set the analog resolution to 12-bit. LowPower.begin() prepare the STM32 for deep sleep.
// Testing STM32
#include <STM32LowPower.h>

void setup() {
  Serial.begin(9600);
  pinMode(PC13, OUTPUT);

  pinMode(PA0, INPUT_ANALOG);
  analogReadResolution(12);

  LowPower.begin();
}

void loop() {
  // blinking LED
  digitalWrite(PC13, LOW);  // turn the LED on
  delay(3000);
  digitalWrite(PC13, HIGH); // turn the LED off

  // Read thermistor value
  float v = analogRead(A0)*3.3/4096;
  float Rt = 10000.0 * v / (3.3 - v);
  float T = 1/(1/298.15 + log(Rt/10000)/3950.);    // Temperature in Kelvin
  float Tc = T - 273.15;                   // Convert to Celsius
  Serial.println(Tc);

  // Deep Sleep for 10s
  Serial.println("Going to deep sleep");
  delay(100);
  LowPower.deepSleep(10000);

}
Rather than blinking the LED, it is actaully turn on the LED for 3 seconds and then turn it off. The analog input value of the thermistor is then processed and converted to Celsius, you can read about my previous blog regarding the thermistor and the progrom.
STM32 ADC provides 12-bit resolution over 3.3v (i.e. 3.3/4096=0.805mV resolution), which is same as ESP32 ADC, and much better than Arduino Uno/Nano’s 10-bit over 5v (5/1024=4.88mV resolution). It is less noisy and much accurated (on linearity) than ESP32’s ADC. STM32 seems to offer a workable solution for ADC applications that I don’t need an external ADC as compare to Arduino (because it is not accurate enough) and ESP32 (because its non-linear ADC performance).
The delay(100) prior STM32 going into deep sleep is necessary for serial monitor to finish the printing before STM32 shutdown. The STM32 then go into deep sleep for 10 seconds so that I can measure the current consumption with my multimeter.
I powered my STM32 Blue Pill with 5v via the USB/TTL programmer. The STM32 Blue Pill consumed about 26.6mA on my measurement when the blinking LED (one that connected to the PC13) is ON and 24.2mA when the blinking LED is OFF. So this means the LED consumed about 26.6-24.2=2.4mA. Other than the LED that connected to the PC13 pin, there is a power indication LED that is constantly on even during the deep sleep. I assumed that the power-indication LED consumed the same current as the blinking LED. When STM32 go into deep sleep, I get a measurement of 2.5mA on my multimeter reading, if I minus the power-indicator LED consumption, it means the STM32 consumed about 0.1mA or less during deep sleep which is good enough for most of my projects.
Other Useful Resources
RM0008 STM32F10xxx Reference Manual, STMicrelectronics
AN2834 Application Note: How to get the best ADC accuracy in STM32 microcontrollers, STMicrelectronics
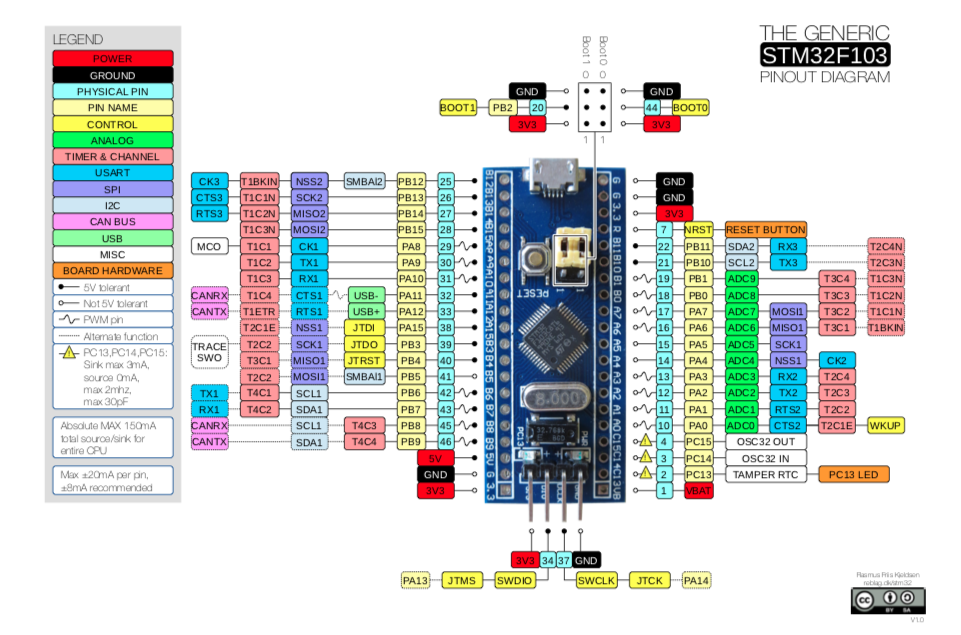
The Generic STM32F103 Pinout Diagram, Rasmus Friis Kjeldsen
STM32 Blue Pill Schematic Diagram (with a wrong R10 value of 4.7k), STM32-base
Summary
Despite the hiccup that I faced to set it up, the STM32 Blue Pill is an amazing microcontroller for a price of US$2. STM32duino project allows any one who are familiar with Arduino programming to use the MCU with wide selection of libraries form the Arduino community. It offers a well balance between Arduino and ESP32 on speed, memory and power consumption. Personally, I see myself would use it more and more for my projects. STM32 is a serious replacement of any Arduino boards.
Hi,
I just found your post because I connected the bluepill to USB and ST-Link at the same time and now it doesn’t work anymore :'(
I have this board STM32F103C8, I can use it fine, but if I restart it the code doesnot start, I need to connect the USB cable to pc and when open a serial termina the code starts.
your code is likely waiting for serial to start. there is probably a line like:
while(!Serial){delay(1);}
Hi
Have you any informations abaout encoder with the bluepill?
I know that BluePill has hardware for a quadrature encoder – I just don’t know how to use it.
Do you know a way or a page to do so?
Much more than reading an encoder in software I haven’t been able to do with the BluePill, unfortunately the speed is just enough to count, I don’t have the time for the rest of the program 🙂
thank you
Hi, thanks for your nice post. Can i program stm32 with arduino for commercial usage? (reliability and security)
Getting Blue Pill to work the first time is very painful, due to the confusion that you describe.
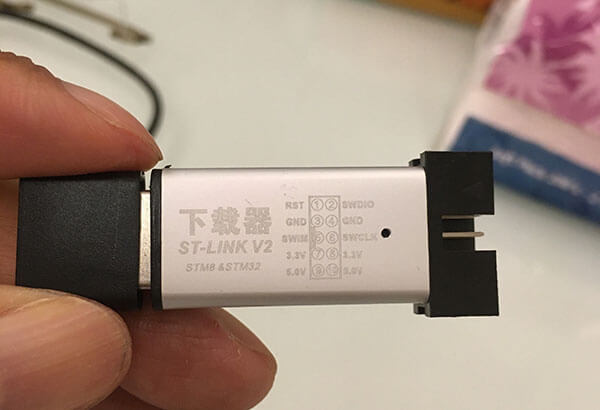
I bought a Chinese “ST-Link V2” programmer just like the one in your photo. The case was marked with the same pinout as your photo.. it did not work. When I removed the cover, I found the PCB was marked with a pinout that did not match the pinout on the case. When I connected it to match the PCB markings.. it worked perfectly.
I’m about to buy one Blue pill. So how are you supposed to program it and power it on. Just by plugging an USB to TTL lines through UART pins ? . IT said never plug through usb and flash at the same time, can you explain.
Just don’t supply the power via two sources at the same time! If you plug in the USB to TTL with power pin (5v or 3.3v) connected to the board, then don’t plug in USB. If you want to power the board via USB, then only connect the USB to TTL programmer with Tx, Rx and GND, and no power pin.
I tried to use STM32 BLUEPILL by connecting it to ESP8266 but it could not connect. What other program code should I use?