I wrote about how to control Raspberry Pi GPIO via web browser without using web framework or full blow web server about a year ago, today I'd like to introduce you an easier way to control Raspberry Pi GPIO via browser using node-RED.
When I published How to control Raspberry Pi GPIO via http web server in April 2018, I never expected it became number 2 of most popular post (see the "Most Popular Posts" sidebar on the right) a year later, my intention back to then was to demonstrate:
- how the socket communication work? and,
- how you could implement simple http over socket io?
- no web framework or web server required;
- with minimum dependency other than standard python library.
The implementation however may not be scalable if you need to control a lot of GPIO pins, or IoT sensors and devices, for that, you probably better to use a web framework such as Python Flask or Nodejs Express web framework. Although those frameworks are quite easy to implement or learn for those that already have some programming experiences, but for many Raspberry Pi users that came from hardware background or new to programming, it is still quite a steep learning curve. There is a better solution that not only easier to learn (you still need some JavaScript knowledge depending on the complexity of your project), but more importantly, easy to deploy by using Node-RED.
Node-RED and Installation
On Node-RED home page, it said Node-Red is a "flow-based programming for the internet of things" for wiring together hardware devices, APIs and online services using drag-and-drop pre-defined nodes via a browser-based editor, making it extremely easy for rapidly deploy a web-based application for controlling IoT devices and GPIO.
By default, Raspbian does not come with Node-RED installed. Node-RED is a nodejs application and therefore can be installed via npm package manager. However, if you install npm and nodejs via Raspbian linux package, you will noted that Raspbian will install a quite outdated nodejs version 8.11.1 (versus current latest nodejs version 10.15.1), npm is even older at version 1.4.21 (versus current latest npm of version 6.8.0). The best way to install Node-RED is to use the Node-RED installation script provided by Node-RED, the script not only install the Node-RED but also install or upgrade nodejs and npm to the latest version.
Simple GPIO Example
As this is not a Node-RED tutorial, I like to focus on how we could achieve same result as what I did in "How to control Raspberry Pi GPIO via http web server" using Node-RED.
simple_gpio.py
import RPi.GPIO as GPIO
import os

# Read data from Raspberry Pi (specifically read GPU temperature)
temp = os.popen("/opt/vc/bin/vcgencmd measure_temp").read()
print("GPU temperature is {}".format(temp[5:]))

# GPIO setup
GPIO.setmode(GPIO.BCM)
GPIO.setwarnings(False)
GPIO.setup(18,GPIO.OUT)

# Turn on/off LED based on user input
try:
    while True:
        user_input = input("Turn LED On or Off with 1 or 0 (Ctrl-C to exit): ")
        if user_input is "1":
            GPIO.output(18,GPIO.HIGH)
            print("LED is on")
        elif user_input is "0":
            GPIO.output(18,GPIO.LOW)
            print("LED is off")
except KeyboardInterrupt:
    GPIO.cleanup()
    print("")
The python script read Raspberry Pi's GPU temperature by executing a linux command, it also turn on and off an LED that connect to GPIO18 (Raspberry Pi header physical pin 12). I will implement the same logic as the simple_gpio.py using Node-RED to achieve the same outcome for controlling the GPIO.
Create Node-RED flow for controlling GPIO
First, run Node-RED from your Raspberry Pi terminal:
node-red
Wait for node-RED a minute until you see the following message:
24 Feb 09:55:16 - [info] Starting flows
24 Feb 09:55:17 - [info] Started flows
24 Feb 09:55:17 - [info] Server now running at http://127.0.0.1:1880/
Launch your browser and point browser url to http://192.168.xxx,xxx:1880, please noted that the IP address should be Raspberry Pi's IP address, if you are not sure the IP address of the Raspberry Pi, run the following command from terminal to find out:
hostname -I
What you see on the browser is Node-RED editor, you will see node palette on the left that consists of many pre-defined nodes by category, and info(the one with 'i' icon)/debug(the one with bug icon) side bar on the right. In the center is the canvas where we could create our flow.
Read Raspberry Pi GPU temperature
In order to read Raspberry Pi GPU temperature, as you remember from our reference code of simple_gpio.py, we will need to execute a linux command to get the result.
- Drag an "inject" node from the node palette to the flow, and open it by double clicking on it and uncheck the checkbox of "Inject once after 0.1 seconds, then" and click on Done button;
- Drag an "exec" node under the "advanced" category from the palette to the flow, and edit the settings as shown below. This will setup the node to execute a bash command as
/opt/vc/bin/vcgencmd measure_tempand return the output string asmsg.payload; Connect the two nodes we created by dragging from the "inject" node output circle to "exec" node input circle to create a connection;- To display the temperature, we will use a "debug" node to display the message payload. Go ahead drag a "debug" node to the flow and wire it to the "stdout" output of "exec" node.

We are done with the "programming" for displaying GPU temperature. Click on the debug icon on the right hand side sidebar, and click on the red Deploy button on the upper right corner of the browser. You should see the msg.payload output from the "Debug" node.
Control LED via GPIO
We will use two "inject" nodes to turn on and turn off LED.
- Drag an "inject" node and set the
Payloadproperty toNumberby clicking on the dropdown menu, and then set the value to1. Remember to uncheck the "inject once..." checkbox; - Drag another "inject" node and set the
Payloadproperty toNumberand set its value to0for this one; - Drag "rpi gpio" Output node (the one with a raspberry pi icon on the right is the output node) and set it to pin
12-GPIO18; - Connect both "inject" nodes to "rpi gpio".


The final flow should looks like the picture below.

Click on Deploy to run the flow. Click on the button on the left of each "inject" node will generate either 1 or 0 which will set the GPIO18 correspondently to turn on and off the LED.
We have achieved the same result as the simple_gpio.py did without writing a single line of code!
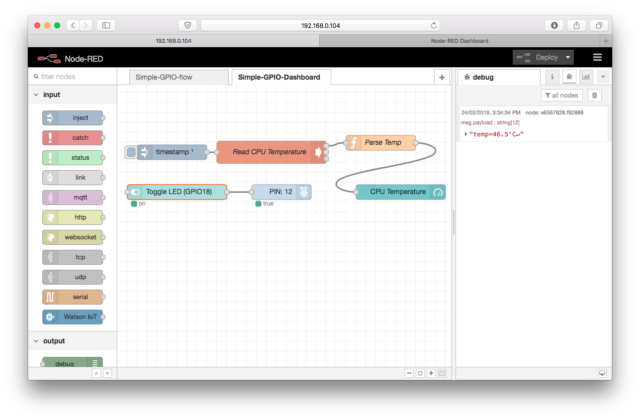
Control Raspberry Pi GPIO via Node-RED Dashboard
Although the node-RED flow that we created did achieved the result, but it is an editor page, it is not really a web page where user can use. Won't it be better to have a graphical UI like the one shown below? sure, let's do it.

What you seen requires Node-RED Dashboard, an add-on that you could installed via npm. To install it, navigate to the user node-red directory which is at ~/.node-red or /home/pi/.node-redif you are running Raspberry Pi as pi user.
cd ~/.node-red
npm install node-red-dashboard
Node-RED dashboard can be access via http://192.168.xxx.xxx:1880/ui, however the path /ui is disabled by default, we need to change the setting at settings.js. Use nano editor to make the change:
nano settings.js
Press ctrl-w or simple scrolling down to search for line with ui: { path: "ui" }and uncomment out the line by deleting the // in front of the line. Pressed ctrl-x to save the file.
If you had configured to run node-RED as a daemon service (i.e. auto-run at boot up), you will need to restart the node-red for the change to take on effect:
sudo systemctl restart node-red
But if you are running node-RED manually as we described in this article, you can ignore this restart command. Now let's create our dashboard.
You will noticed that there is an newly installed "Dashboard" category on the node palette, these are the UI widgets can be displayed on the Dashboard. First, let's create a new flow by clicking on the + icon on the right side of the flow tab.
- Drag a "gauge" dashboard node to the new flow that we just created, this will be used for displaying GPU Temperature;
- Double click on the gauge and click on the Edit (the little Pen icon) to "Add new ui_group", and give it a name (e.g. "MyDashboard"), also name the dashboard screen as "Dashboard", this will eventually displayed on the screen as page title;
- Set the temperature range, and other properties. In this example, we set minimum to 30 and maximum to 80, and set the Units as Degree C.
- Drag an "inject" node and an "exec" node into the flow, configure them and wire them together just like what we did previously;
- Drag a "switch" dashboard node to the flow and configure the UI_group to be same as the UI_group used by the gauge. The "switch" node will replaced the two "inject" nodes that we used to control the GPIO because the "switch" node can toggle between two statuses.
- Drag a "rpi gpio" output node and wire together with our new "switch" node.

As you may noticed from the previous example, the "exec" node return a string like temp:41.5'C as msg.payload. However the "gauge" is expecting a msg.value to be used as the temperature display for the gauge, not a string. So we will need to do some parsing between the "exec" node and the "gauge" display. We can do that with a "function" node, the "function" allows us to write a JavaScript function to parse the string and return the temperature data as msg.value for the gauge to consume.

The parse temp function in Javascript
const value = msg.payload.match(/(\d+|\d+\.\d+)'/)[1];
msg.value = value;
return msg;
Now we can insert the "function" node between the "wire" node and the "gauge" node and wire them up.
Point your browser to http://192.168.xxx.xxx:1880/ui, you should be able to see the Gauge and Toggle switch grouped within the same UI group. Click on the switch will toggle the LED on and off.
Final Words
Node-RED is a useful visual programming tool for application developer to quick create JavaScript application with minimum programming, this is particular useful for IoT applications and for those who are new to programming.
Node-RED flows can be imported and exported as an JSON document. You can find the flows that we created at my github page.
how i can use MQTT in this program to send data to node red and control led (on/off) from dashboard of node red
Your question is little bit too broad to answer here, and MQTT could be a lengthy tutorial by itself. But in the nutshell, Node-Red provides both MQTT Subscribe (input) and MQTT Publish (output) nodes on its node pallet for you create MQTT communication.
To send MQTT from node red, you use the MQTT Publish node to configure the server(MQTT broker) and the topic that you want to publish. To receive MQTT from the node red, you use the MQTT Subscribe node to configure the server and the topic you want to subscribe to, you can then further chain it with a function node to parse the received topic and use it to control an LED or GPIO as you wish.
Sir I want to display my gpio pin data in web server (xamp) how to do this.
I was wanting to learn how to control my Pi through a web interface and found your first article. I was like cool I think I can do this. Then I found this article. I know I can do this! Exactly what I was looking for! Now I have ideas for new projects. Thank you!
I was building a (Corona-)traffic light at our office entrance. Now I can operate it from our desk computer (Green: come in, Red: please wait outside). Thanx a lot!
I am running Node-RED in a container. “/opt/vc/bin/vcgencmd measure_temp” results in error message “/bin/bash: /opt/vc/bin/vcgencmd: No such file or directory”. Do you know of a way to make this work?
It likely that your container has a different Linux distribution than Raspberry Pi OS (Raspbian Buster). See https://discourse.nodered.org/t/use-vcgencmd-within-a-docker-node-red-container/23050/12. Personally, I never run Docker on my Raspberry Pi.
Hi Henry
I want to ask if that possible
I have idea to manage 5 lights on/off with movie
How can i sync timetrack file to make the lamps on/off in some moments in the movie
It is like a subtitle file
For example i set in the file:
00:01:54:00 on lamb1
00:01:55:50 off lamb1
00:02:05:35 on lamb2
00:02:06:00 on lamb1
00:02:07:00 off lamp2,off lamb1
Then I play the video and the lambs will take action with the commands on the lines at same time in the movie
Appreciate your help
start a counter when you start playing the video?
This guide is great and got me going but one odd thing was that I did not have the RPI GPIO options on the left hand pallet. I had to manually install node-red-node-pi-gpio for them to show.
Thanks for posting this article and linking to it from your Python article. After reading that one, I saw the update pointing to this article. Node-RED is exactly what I’m looking for. It’s going to fit my needs perfectly, and this little tutorial was a perfect stepping stone for me, especially with the dashboard/ui piece. Thanks!
Hi Henry, I am looking to have an analytic on an IP camera trigger an output on a raspberrypi. Would you know if this is possible and if so how would it be set up?