We had WordPress installed on the Raspberry Pi, we are going to look into how to implement various cache solutions to optimise WordPress without depending on plugins.
In the previous parts of the articles, we've covered how to setup the server and get the WordPress up and running with no considerations were made on how well the server would handle traffic. There are many cache plugins available, but we'd want to implement as much the cache at the system level as possible without depending on plugins.
This article has been updated on 5 Jan 2018 based on Raspbian Stretch
This article has been further updated on 4 Jul 2020 based on Raspbian Buster and PHP7.3
PHP OPcode
PHP is an interpreted language that the code written in PHP is parsed compiled into Opcode on every page request. This is quite inefficient as imaging that the WordPress web pages served rarely changes between page requests, therefore it’s unnecessary to re-compile it. As of PHP 5.5, there’s now a built-in opcode cache called OPcache. The OPcache stores the compiled PHP codes and serves it from memory, which vastly improves performance. OPcache is a core component built into php-fpm, so it does not require separate installation.
The default value in php.ini are good enough except that we’d want to disable the opcache from caching the /var/www/html/admin directory where we keep our administration utilities, to do so we need to create a blacklist file first:
cd /etc/php/7.0/fpm
sudo nano opcache-blacklist.conf
Add the directory /var/www/html/admin/* to the file
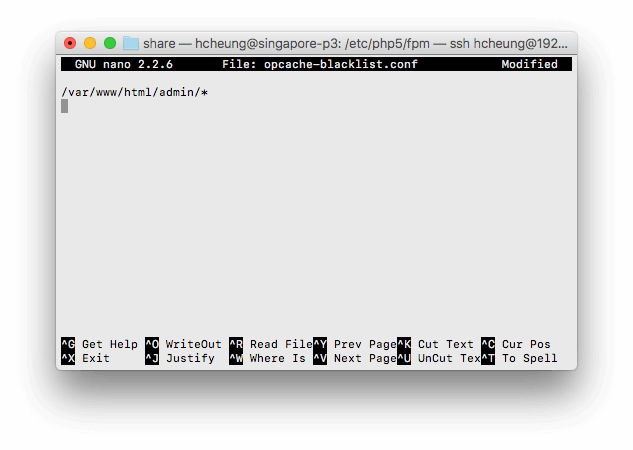
If there is more than one directory that we need to add to the blacklist, simply add the second line(for example, if we’d want to disable opcache for /var/www/html/wp-admin/*). Press Control-X to save and exit the editor.
Now we need to inform php.ini about the blacklist file.
sudo nano php.ini
Press Control-W to search for opcache.blacklist_filename, uncomment (remove the ; in front of the line, and add the directory name so that it looks like this:
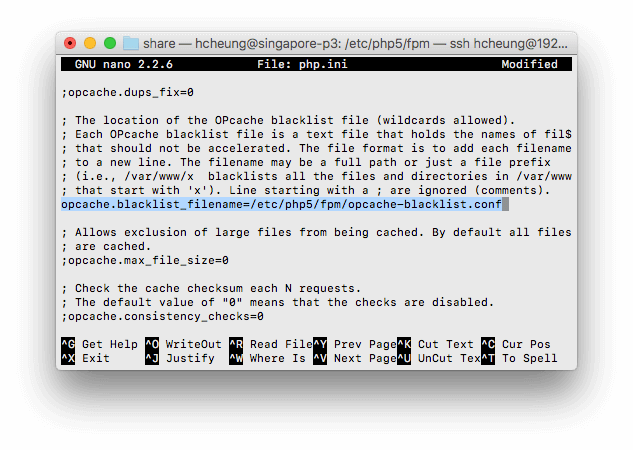
For Raspbian Buster with php7.3, please note the directory is different from php5
opcache.blacklist_filename=/etc/php/7.3/fpm/opcache-blacklist.conf
Remember to test the php.ini changes and then restart the php7.3-fpm:
sudo service php7.3-fpm restart
OPcache status monitor
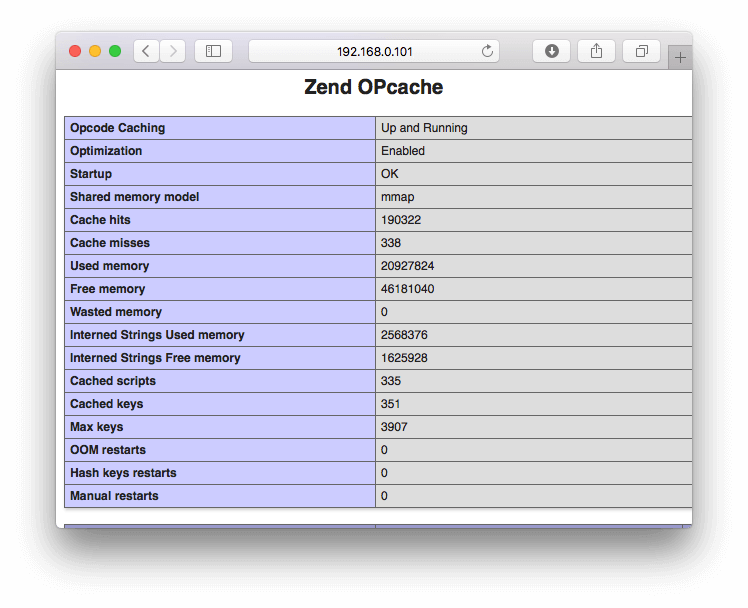
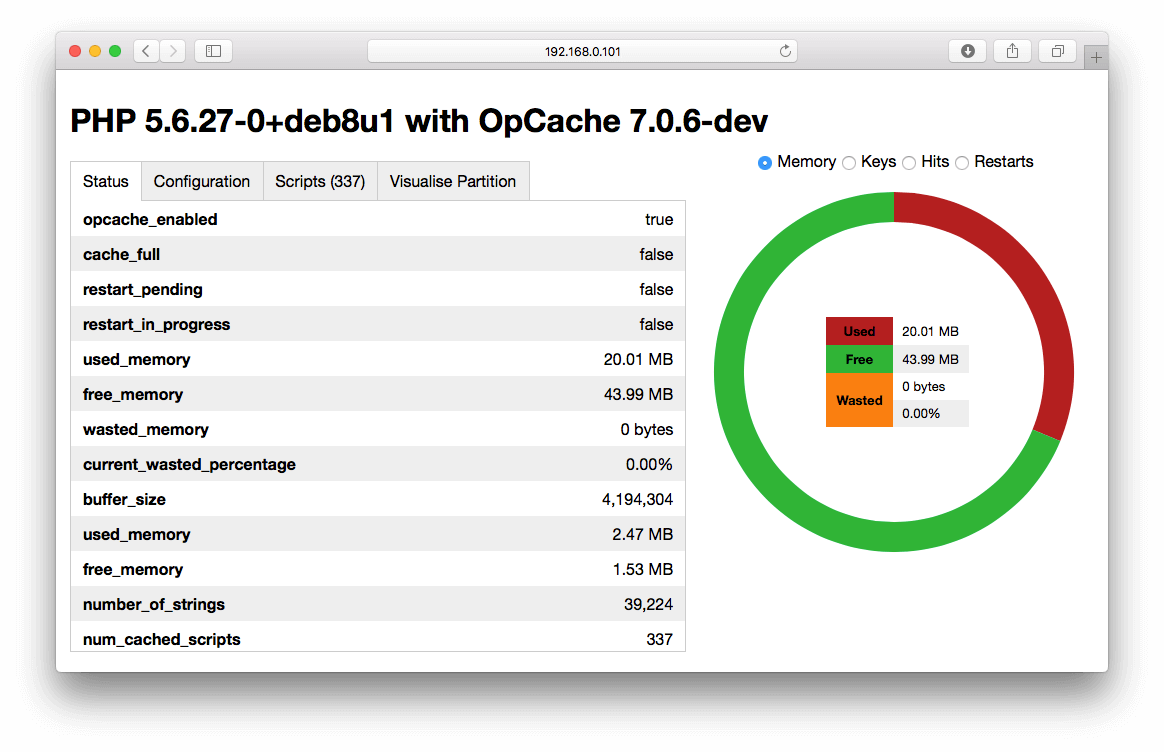
In order to monitor the status of OPcache, we will install a simple single-file php tool written by the original php language create Rasmus Lerdort called OPcache Status. To install the file:
cd /var/www/html/admin
sudo wget https://raw.githubusercontent.com/rlerdorf/opcache-status/master/opcache.php
To use the tool, simply run the browser and point the url to http://192.168.0.101/admin/opcache.php.
Query Monitor Plugin
Now the PHP is configured to cache PHP code, it’s time to take a look at database access, which can be a bottleneck to a WordPress website as every post and page are actually stored in database and retrieved by PHP to generate the page or post.
To find out the data query performance, we used a plugin called Query Minitor. Query Monitor is a plugin that provides a lots of information about a WordPress page. Among all the information it generated, it provides a detailed breakdown of how many queries happened on a page request, the execution time of each query, which functions spent most time on SQL queries, whether those queries came from plugins, theme or the WordPress core. For slow queries that is slower than 0.05s, Query Monitor displayed it as red text.
NOTE: Query Monitor is not required for running the WordPress site, we should considered to either deactivate it or even delete the plugin once we completed our configuration and testing at end of this article.
Query Cache
Connecting to MySQL on every page request is the biggest bottleneck within WordPress. One of the best ways to speed up WordPress web site is to enable query caching in the database. This is ideal for an application like WordPress blog that mostly does reads against the database.
MariaDB (and MySQL) actually has query caching support available and is likely enabled by default. This can be verified by running this SQL command from MySQL console, which will tell if query caching is enabled.
MariaDB [(none)]> USE MYSQL;
Reading table information for completion of table and column names
You can turn off this feature to get a quicker startup with -A

Database changed
MariaDB [(none)]> SHOW VARIABLES LIKE 'query%';
+------------------------------+----------+
| Variable_name                | Value    |
+------------------------------+----------+
| query_alloc_block_size       | 8192     |
| query_cache_limit            | 1048576  |
| query_cache_min_res_unit     | 4096     |
| query_cache_size             | 16777216 |
| query_cache_strip_comments   | OFF      |
| query_cache_type             | ON       |
| query_cache_wlock_invalidate | OFF      |
| query_prealloc_size          | 8192     |
+------------------------------+----------+
The query_cache_type shows that query cache is ON or enabled. The default cache memory query_cache_size is set at 16m which is more than sufficient for our WordPress site at this moment. We can then use the SHOW STATUS command to take a look at how it performs under the hood.
MariaDB [(none)]> SHOW STATUS LIKE 'Qc%';
+-------------------------+----------+
| Variable_name           | Value    |
+-------------------------+----------+
| Qcache_free_blocks      | 53       |
| Qcache_free_memory      | 16630976 |
| Qcache_hits             | 4789     |
| Qcache_inserts          | 1059     |
| Qcache_lowmem_prunes    | 0        |
| Qcache_not_cached       | 375      |
| Qcache_queries_in_cache | 84       |
| Qcache_total_blocks     | 233      |
+-------------------------+----------+
This proved that there are plenty of free memory left. This is good enough for now, but in the future when there is a need to change the settings, it can be done by modifying the /etc/mysql/my.cnf configuration file for MariaDB.
Object Cache
Query caching can significantly improve the speed of web application, especially if the application does mostly reads. If the application updates tables frequently, then the query cache will be constantly purged. For example, if the website is a community website or forum where users constantly post comments or postings, or if you are running certain plugins such as BuddyPress, or bbPress. In those cases, Object cache would have to be implemented other than query cache. An object cache stores potentially computationally expensive data such as database query results and serves them from memory.
Since the results from Query Monitor indicates that there is no additional needs for object cache, and since we are running a self-hosting server instead of a shared hosting (Query caching won’t work if you are running on shared hosting), there is no need to implemented object cache for now. We therefore won't cover the setup of object cache solution such as Redis server and Redis Object Cache plugin here.
Page Cache
Although we have configured opcode and query cache to improve our little WordPress site’s performance, for WordPress sites, content is rarely updated. Meaning each page or post is more or less like a static HTML page. WordPress generated the static HTML version of the request page by querying the database and build the desired page dynamically on every single request. Furthermore Raspberry Pi has a relatively slow SD Card as its main storage media.
With proper configuration, Nginx can automatically cache a static HTML version of a page using the FastCGI module. Then any subsequent calls to the requested page will receive the cached HTML version without ever hitting PHP or WordPress. A guide to caching with Nginx provide details on how to setup the cache.
Open the virtual server configuration file at:
sudo nano /etc/nginx/sites-available/default
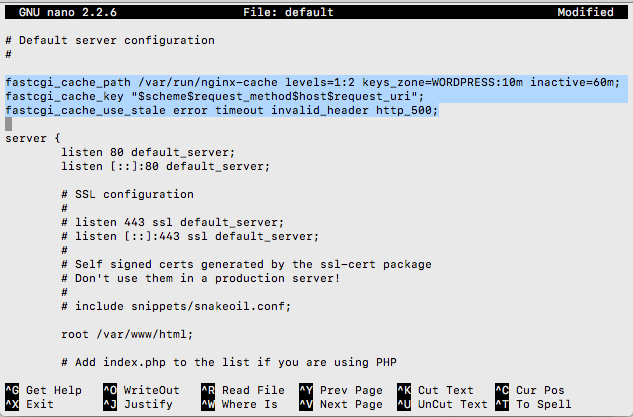
Add the following lines before the server block.
fastcgi_cache_path /var/run/nginx-cache levels=1:2 keys_zone=WORDPRESS:10m inactive=60m;
fastcgi_cache_key "$scheme$request_method$host$request_uri";
fastcgi_cache_use_stale error timeout invalid_header http_500;
The fastcgi_cache_path is the path where the cache will be stored, we will use /var/run as its mounted as tmpfs (that is, in RAM). To verify it and the size of tmpfs, run command:
df -h /var/run
You will see output like below:
Filesystem      Size  Used Avail Use% Mounted on
tmpfs           463M   18M  446M   4% /run
It looks there are sufficient space for the cache.
levels sets up a two‑level directory hierarchy under /var/run/nginx-cache/. If the levels parameter is not included, Nginx puts all files in the same directory which can slow down file access when having a large number of files.
keys_zone sets up a shared memory zone for storing the cache keys. A 10‑MB zone configured in the example can store data for about 80,000 keys.
inactive specifies how long an item can remain in the cache without being accessed. In this example, a file that has not been requested for 60 minutes is automatically deleted from the cache by the cache manager process, regardless of whether or not it has expired.
A powerful feature of Nginx content caching is the ability to deliver stale content from its cache when it can’t get fresh content from the origin servers. proxy_cache_use_stale enable Nginx to delivers the available stale file to the client when receiving an error, timeout, invalid headers or 500 errors from the origin server.
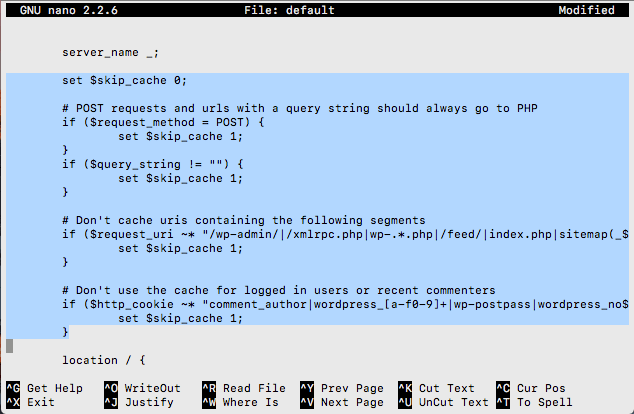
Next we need to instruct Nginx not to cache certain pages. The following will ensure wp-admin screens and user login pages are not cached, plus a few others. Add the following lines before the location directive within the server block.
	set $skip_cache 0;

	# POST requests and urls with a query string should always go to PHP
	if ($request_method = POST) {
		set $skip_cache 1;
	}
	if ($query_string != "") {
		set $skip_cache 1;
	}

	# Don't cache uris containing the following segments
	if ($request_uri ~* "/wp-admin/|/xmlrpc.php|wp-.*.php|/feed/|index.php|sitemap(_index)?.xml") {
		set $skip_cache 1;
	}

	# Don't use the cache for logged in users or recent commenters
	if ($http_cookie ~* "comment_author|wordpress_[a-f0-9]+|wp-postpass|wordpress_no_cache|wordpress_logged_in") {
		set $skip_cache 1;
	}
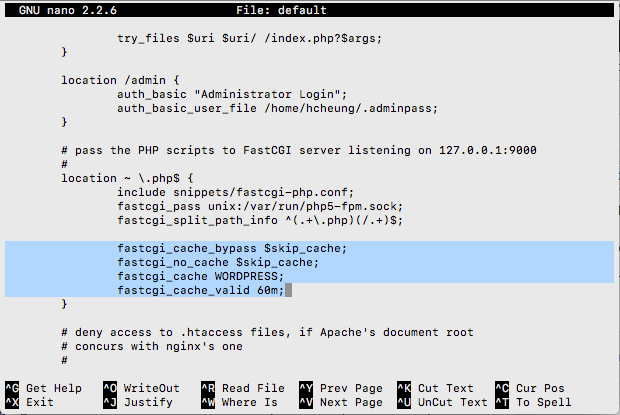
Within the PHP location block add the following directives near the end of the block.
    fastcgi_cache_bypass $skip_cache;
    fastcgi_no_cache $skip_cache;
    fastcgi_cache WORDPRESS;
    fastcgi_cache_valid 60m;
The follow step is not compulsory, but would be nice to add an extra http header response so that we can easily determine whether a request is being served from the cache. Open the nginx.conf file.
sudo nano /etc/nginx/nginx.conf
Add the following below the Gzip settings.
add_header Fastcgi-Cache $upstream_cache_status;
This can be either add to the /etc/nginx/nginx.conf file within the http directive, or add the the top of the virtual server /etc/nginx/sites-available/default file (i.e. before the server directive), personally I prefer to add it to the virtual server file, just in case in future that I have multiple servers setup and some of the server does not using fastcgi.
Save the configuration, test the configuration settings before reloading Nginx.
sudo nginx -t
sudo service nginx reload
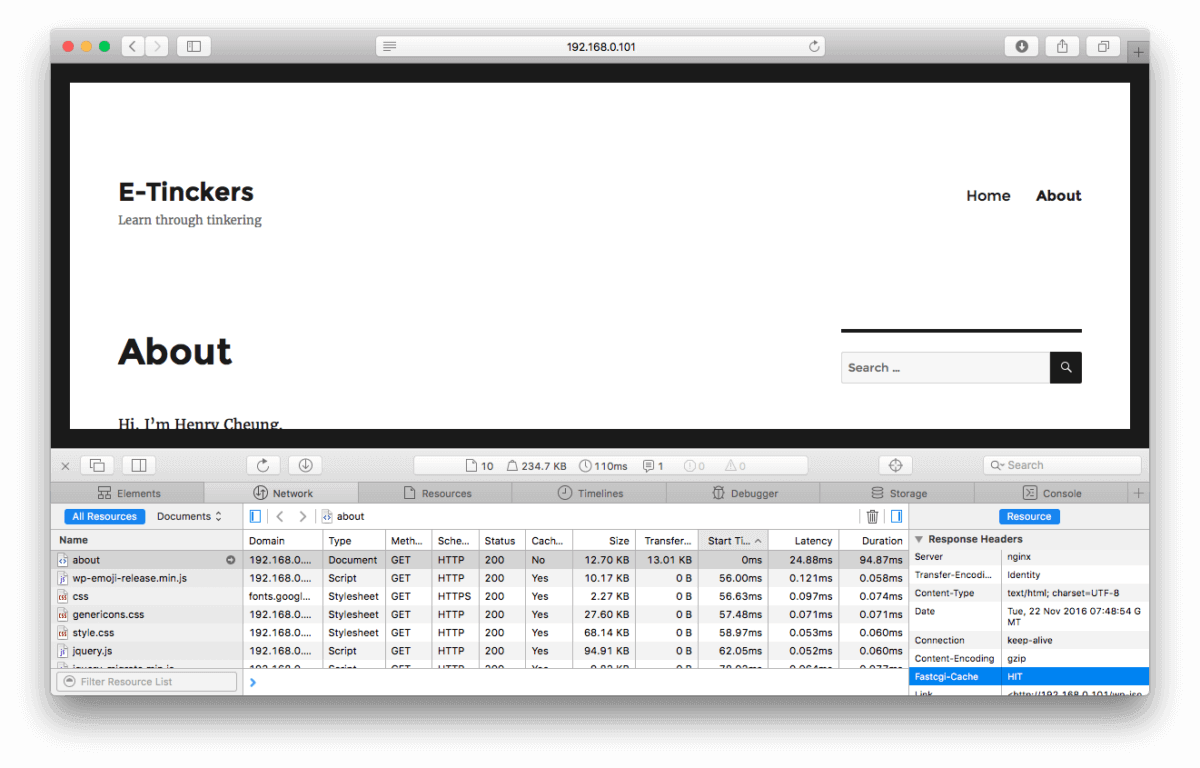
The extra fastcgi_cache response header can be view from the Developer Console as on the featured image of this article. Now when you visit the site and view the headers, you should see an extra parameter.
The possible return values are:
HIT – Page cached
MISS – Page not cached yet
BYPASS – Page cached but not served (e.g. admin screens or when logged in)
Nginx Helper plugin
Nginx has built-in support for fastcgi_cache but it doesn’t have mechanism to purge cached content. So we use a WordPress plugin Nginx Helper to purge the cache when a post/page is created or updated.
In order for cache purging to work from the dashboard, we must add the following constant to the wp-config.php file.
define('RT_WP_NGINX_HELPER_CACHE_PATH', '/var/run/nginx-cache');
Once Nginx Helper plugin is installed, navigate to the Settings > Nginx Helper page and configure the purge options.
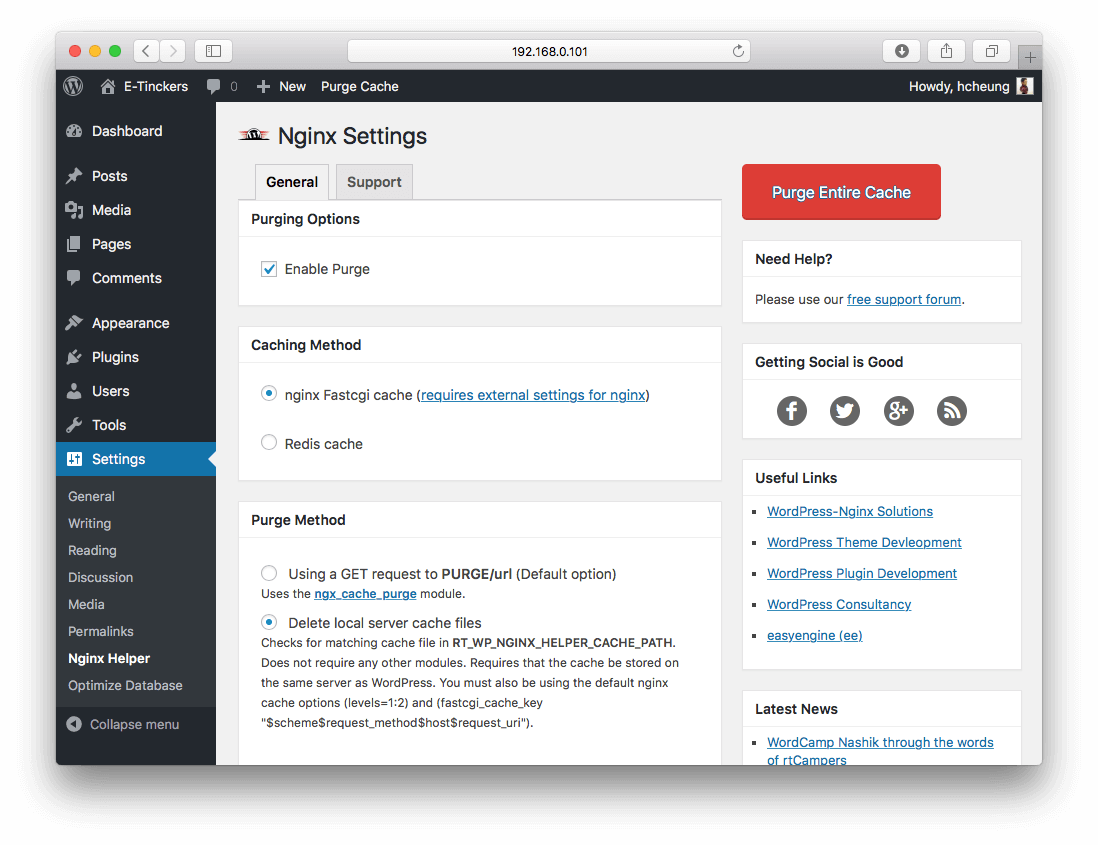
Under the Purge Method, choose "Delete local server cache files" since the version of Nginx we installed does not support "fastcgi_cache_purge".
Now we have a well-configurated WordPress server ready to take on real traffic. We will need a domain name for our web site, which will be covered on the next part of the series.
Not sure what I’m doing wrong because my site is not loading with the public ip address. I figured it would be somewhat slow, but when it takes more than two minutes for a wordpress site to load somethings must be awry.
Just to clarify, are you saying that you can’t access via public IP address? Have you setup the port forward on router? As for slow site loading, is this only happen on access via external IP or even on localhost? If this only happen on external IP access, possible candidates could be : DNS problems, a large back-end database query that’s filling cache for the first time, a timeout of some kind on some blocking codes (such as JavaScript, css, etc.), causing by some plugins, and the list goes on.
It works great with local network. I checked the query monitor, and runs fine. Will look into possible dns problems or hindering plugins. Thanks
Hi,
I have a small problem with my Installation. I wanted to increase the upload limit in wordpress. But nothing works. I am stuck with 2MB. Can you help me?
Hi Lukas, there are a couple of settings to be changed. As mentioned in the Part II, I set both upload_max_filesize in
/etc/php/7.0/fpm/php.iniand client_max_body_size under the Nginx http directive(/etc/nginx/nginx.conf) to 16M. Remember to restart the php and nginx services.Hi Henry, hey just a heads up – the Opcache downloads takes you to their github page when you enter http:192.168.0.101/admin/opcache.php.
Thanks a lot for the useful instructions! This is the second time that I’ve used it! You’re the man!
Eric
At the “OPcache status monitor” step, instead of:
sudo wget https://github.com/rlerdorf/opcache-status/blob/master/opcache.php
you might want to use:
sudo wget https://raw.githubusercontent.com/rlerdorf/opcache-status/master/opcache.php
to get the raw file and not the html page.
Thanks for pointing that out. I have corrected it.
In regards to query caching being enabled by default, according to the MariaDb Knowledge base https://mariadb.com/kb/en/query-cache/, query caching is no longer enabled by default:
“It does not scale well in environments with high throughput on multi-core machines, so it is disabled by default.” Just thought I would point it out since this is one of the few steps I had to research myself while working with a raspberry pi 4 using php7.3.
Another quote from the MariaDB knowledge base indicates that MariaDB stopped enabling it by default in version 10.1.7.
“To see if the cache is enabled, view the query_cache_type server variable. It is enabled by default in MariaDB versions up to 10.1.6, but disabled starting with MariaDB 10.1.7 – if needed enable it by setting query_cache_type to 1”
Thanks for sharing the link, it is true that query cache is kind of things in the old day as:
The query cache was fine in the days where machines had one core or two; or when the older database engine like MyISAM was used. But WordPress is not the environment with high throughput, I thought it still has some value but true is I never really did any benchmark to compare the site with or without query cache.
After noticing that MariaDB doesn’t enable query caching by default, I have looked all around and can’t find a direct answer as how to properly enable query caching on Mariadb. could you help me with this? Sorry for all the posts by the way.
I just did a quick query on my system, it looks like that mines is till ON. You could run the following command via Adminer (or other database admin application) to activate it:
To verify it:
Thank You Henry!
Hi Henry,
I’ve done all the above and I was curious whether or not you’d recommend – besides the above instruction – any other WP plugins, such as W3 Total Cache. Will using the W3 Total Cache plugin, for example, improve the WP speed? What do you think?
Regards.
Personally I’m not a friend of using plugin that I don’t really know how it works. This website does not use any third-party cache solution other my own implementation. If you are planning to use W3 Total Cache, try to understand what exactly they do behind the scene, they might did something similar already, there is no point to have two cache systems that might be doing the same things twice and waste your system memory.
fair enough.
How about browse caching the .php files for a little, let’s say 15 minutes? Won’t this improve speed for the visitor?
I imagine that more than 15 minutes might cause display issues, with the page not being updated to the latest version, but 15 should be fine probably. I’ve also noticed that you don’t cache the pages for your site, but only the static objects (img, js etc), as described in your tutorials.