For past 3 years this web site was running on a Raspberry Pi with a 16GB SD card. I have a couple of old hard disks with me, so I recently decided to replace the SD card of this web site's Raspberry Pi with a hard disk.
The hard disk that I have for this build is a 500GB Samsung hard disk that was previously used on my MacBook Pro. The additional hardware that I need is one of those USB to SATA adapter that can be found easily at local computer shop or online. If you are using the original power adapter from Raspberry Pi like me, it is sufficient to power the 2.5 inch hard disk with extra external power supply.
A quick check of the hard disk with fdisk command shows that it has two partitions with Apple HFS file system so it need to be re-format to Linux file system. If you have a new harddisk, you can skip this step and go to step 2:
sudo fdisk -l /dev/sda
Disk /dev/sda: 465.8 GiB, 500107859968 bytes, 976773164 sectors
Units: sectors of 1 * 512 = 512 bytes
Sector size (logical/physical): 512 bytes / 512 bytes
I/O size (minimum/optimal): 512 bytes / 512 bytes
Disklabel type: gpt
Disk identifier: 0181FEB3-0D2B-40D5-BC6E-09323C6E12AE

Device      Start       End   Sectors   Size Type
/dev/sda1      40    409639    409600   200M EFI System
/dev/sda2  409640 976510983 976101344 465.5G Apple HFS/HFS+
Step 1 - Erase the original partition
Fist, We need to erase the original partition and create a new partition. Run the following command to erase the old partition:
sudo dd if=/dev/zero of=/dev/sda bs=1M count=1
1+0 records in
1+0 records out
1048576 bytes (1.0 MB, 1.0 MiB) copied, 0.0462374 s, 22.7 MB/s
Step 2 - Create a new partition
Now we can create a new partition by running command:
sudo fdisk /dev/sda
Follow the following steps:
- Press "n" to make the new partition, and then press "Enter";
- Press "p" and "Enter" to create a primary partition;
- Press "1" and "Enter" to create the first partition;
- Enter the default for both the first and last cylinders when your computer asks for this information. This will make the partition cover the entire disk rather than just part of it;
- Press "t" to change the file system type followed by "Enter";
- Type "83" for "Linux" followed by "Enter";
- Press "w" to write the partition to the disk (this cannot be undone), and then press "Enter".
Run sudo fdisk -l to see the newly created partition.
Device     Boot Start       End   Sectors   Size Id Type
/dev/sda1        2048 976773163 976771116 465.8G 83 Linux
Step 3 - Format the partition
Run the following command to format the newly created partition with Linux ext4 file system:
sudo mkfs.ext4 /dev/sda1
mke2fs 1.43.4 (31-Jan-2017)
Creating filesystem with 122096389 4k blocks and 30531584 inodes
Filesystem UUID: 47a11735-63bc-41f7-b301-b931b6d60192
Superblock backups stored on blocks:
	32768, 98304, 163840, 229376, 294912, 819200, 884736, 1605632, 2654208,
	4096000, 7962624, 11239424, 20480000, 23887872, 71663616, 78675968,
	102400000

Allocating group tables: done
Writing inode tables: done
Creating journal (262144 blocks): done
Writing superblocks and filesystem accounting information: done
Step 4 - Create a directory for mounting the harddisk
sudo mkdir /mnt
sudo mount /dev/sda1 /mnt
This will create a directory named /mnt and mount the hard disk /dev/sda1 as the /mnt.
Step 5 - Copying SD card to hard disk
In order to copy the content of my current SD card to the new hard disk, we need to install a utility called rsync, rsync not only copy all the files from a source to destination, it will ensure all file permissions and ownership are intact when copy over to the new hard disk.
If rsync is not installed in your Raspberry Pi yet, run the install command.
sudo apt-get install rsync
Now we can copying the files to the hard disk which is mounted at /mnt. This command basically transfer all the files in current root file system to the newly mounted hard disk.
sudo rsync -axv / /mnt
Step 6 - Add the configuration to /etc/fstab
Edit the /etc/fstab:
sudo nano /etc/fstab
Comment out the line where it say:
PARTUUID=xxxxxxxx-02 / ext4 defaults,noatime 0 1
and add this line below the line that you just commented out:
/dev/sda1 / ext4 defaults,noatime 0 1
Save the file and verify the changes with cat /etc/fstab, it should looks like this:
proc                  /proc           proc    defaults          0       0
PARTUUID=xxxxxxxx-01  /boot           vfat    defaults          0       2
#PARTUUID=xxxxxxxx-02  /               ext4    defaults,noatime  0       1
/dev/sda1             /               ext4    defaults,noatime  0       1
# a swapfile is not a swap partition, no line here
#   use  dphys-swapfile swap[on|off]  for that
Notice that we still keep SD card as the /boot directory, and our new hard disk is mounted as Raspberry Pi's root directory /.
Step 7 - Confugure hard disk as Raspberry Pi's root file system
Edit /boot/cmdline.txt using nano editor to configure the hard disk as Rapsberry Pi's root / file system:
sudo nano /boot/cmdline.txt
- Change the root=/dev/mmcblk0p2 or root=PARTUUID=xxxxxxxx-02 to /dev/sda1;
- Add rootdelay=5 at the end of the command.
The result should look like this:
dwc_otg.lpm_enable=0 console=serial0,115200 console=tty1 root=/dev/sda1 rootfstype=ext4 elevator=deadline fsck.repair=yes rootwait rootdelay=5
Reboot the Raspberry Pi:
sudo reboot
To verify the configuraton after reboot, run:
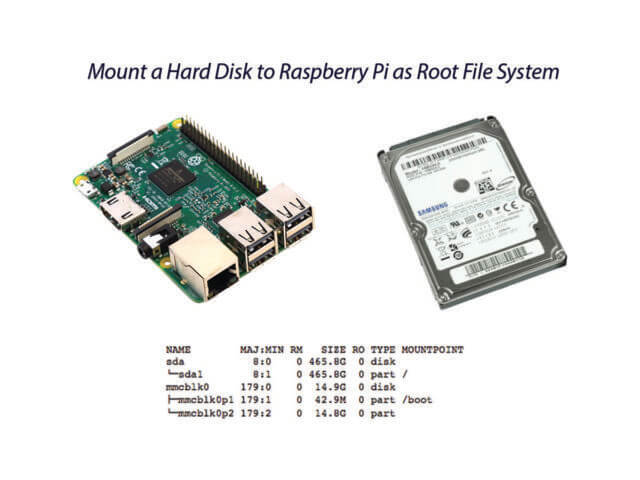
sudo lsblk
NAME        MAJ:MIN RM   SIZE RO TYPE MOUNTPOINT
sda           8:0    0 465.8G  0 disk
└─sda1        8:1    0 465.8G  0 part /
mmcblk0     179:0    0  14.9G  0 disk
├─mmcblk0p1 179:1    0  42.9M  0 part /boot
└─mmcblk0p2 179:2    0  14.8G  0 part
The Raspberry Pi is still using /boot for booting but use the hard disk as Raspberry Pi's file system. Personally I prefer this way because this give me the option to easily switch back to use SD card as the root file system with a simple modification of /boot/cmdline.txt file. But if you really want to boot completely from hard disk, you can refer to USB mass storage device boot on how to set the USB boot bit of OTP (one-time programmable) memory.

Finally, instead of finding a new housing to host both Raspberry Pi and the hard disk, I mounted my hard disk and Raspberry Pi on a wooden board that came from an old book shelf, and place it next to my broadband router, what you are reading now is serving from that Raspberry Pi and the hard disk! 😀
This indeed the best way, because it’s gives you flexibility. Gonna try this tomorrow.
Thank you so much. It worked. I also deleted the second partition from SD card because I will never use it.