My TV remote control is corroded by leaking battery and no longer working reliably, so I decided to build my own TV remote control with an ESP32 that running as a web server and IR remote control so that I can uses my iPhone to interactive with it via web browser.
ESP32 TV remote control via iPhone
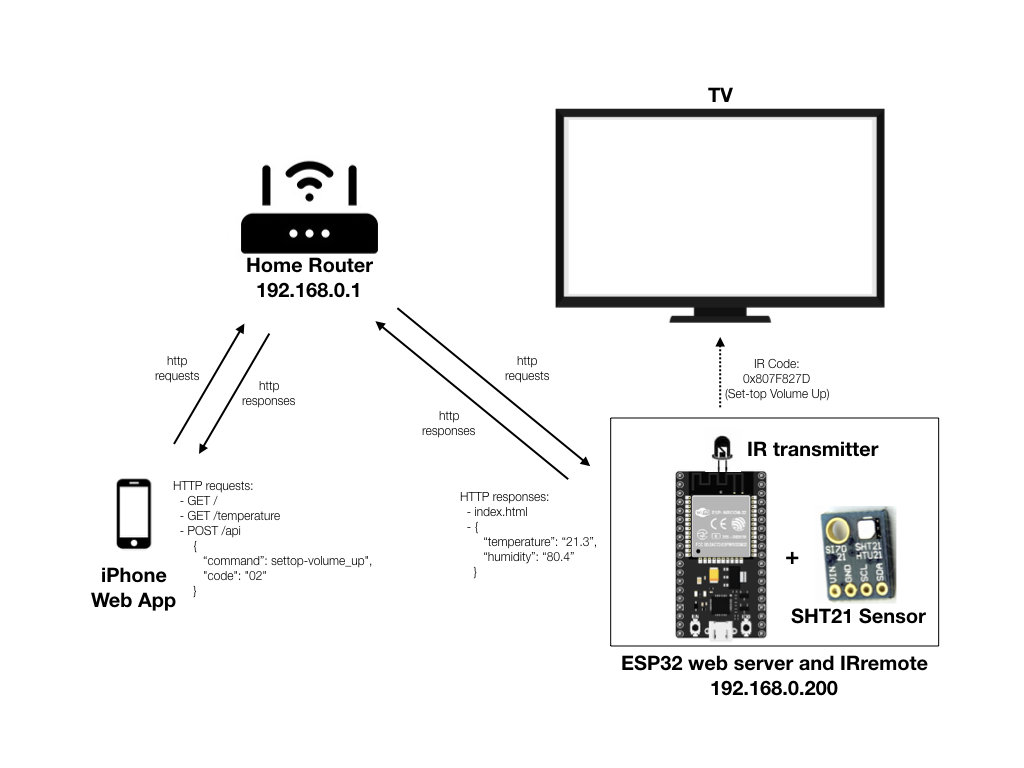
Here is the idea, I want to replace my TV and Set-top box remote controls with my own controller made of an ESP32, which will have an IR transmitter that communicating with the TV (and Set-top box which currently has a separate IR remote), the ESP32 also running as a web server so that a web page can be accessed via an iPhone to control the TV/Set-top box from the on-screen virtual keypads. As I also have a SHT21 temperature/humidity sensor breakout board, I decided to add it to the ESP32, so that when I access the web page, it also display the current temperature and humidity information. Although it has nothing to do with the remote control functionality or infra red communication, but I do it just because I want to use the spare SHT21 sensor, and the ability to know my room temperature and humidity when I using the remote is kind of cool.
I used PlatformIO as IDE for ESP32 programming, There are two good YouTube videos by
Robin Reiter on getting started with PlatformIO and how to using external libraries on PlatformIO for setting up PlatformIO IDE.
Infra Red (IR) Transmitter and Receiver
I get a pair of IR transmitter and receiver (plus a few useful components) from an old Set-top box and remote that was retired from analog TV era a few years ago.
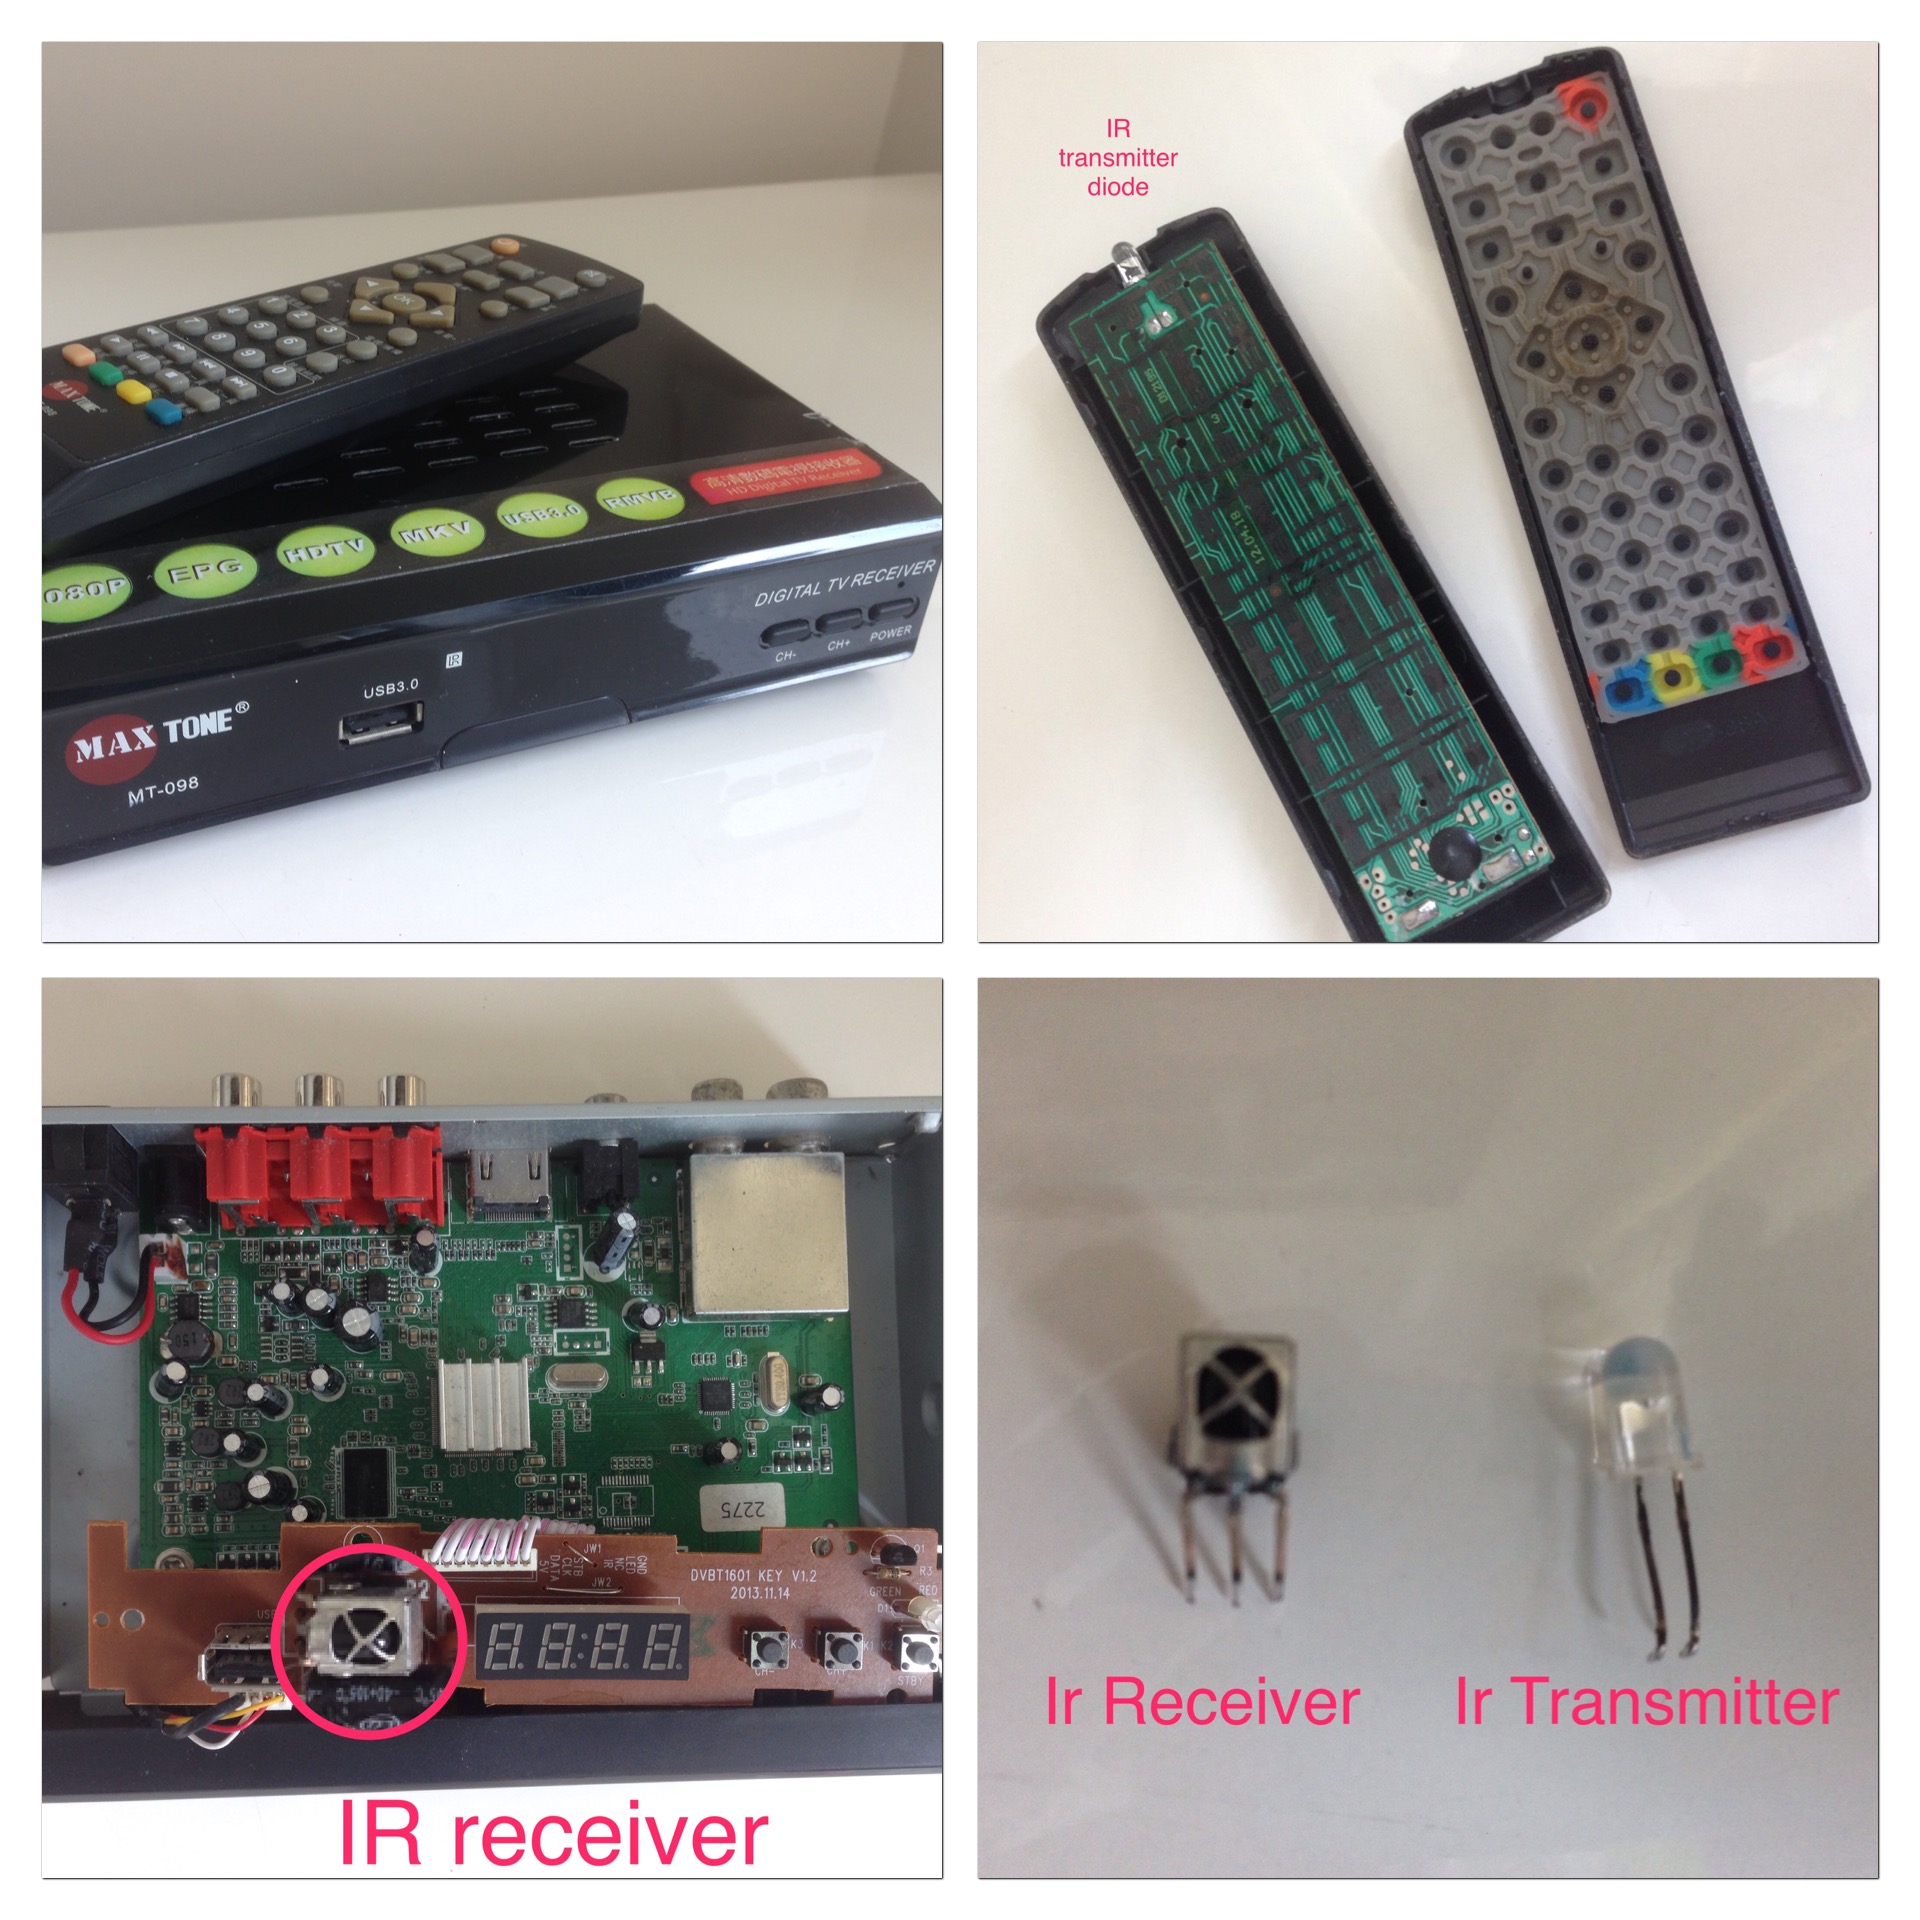
The IR transmitter will be used by the ESP32 to send the signal to control the TV/Set-top box. The IR transmitter is typical a infra red diode capable of emitting a beam of light, typically at 940nm (840nm also available) wavelenth. The infra red code representing each button (such as TV on/off, mute, volume up and down, etc.) is typically modulated using pulse width modulation with a carrier frequency (typically 36, 38, or 40KHz depend on different protocols) before sending through the infra rad transmitter.
The IR receiver is not used in this project but will be needed temporarily for decoding the IR codes of existing TV and Set-top box remote. An IR receiver usually consists of a photo detector and signal demodulator in a single package and the output can be directly used by a microcontroller.
Decoding IR codes of TV/Set-top box remotes
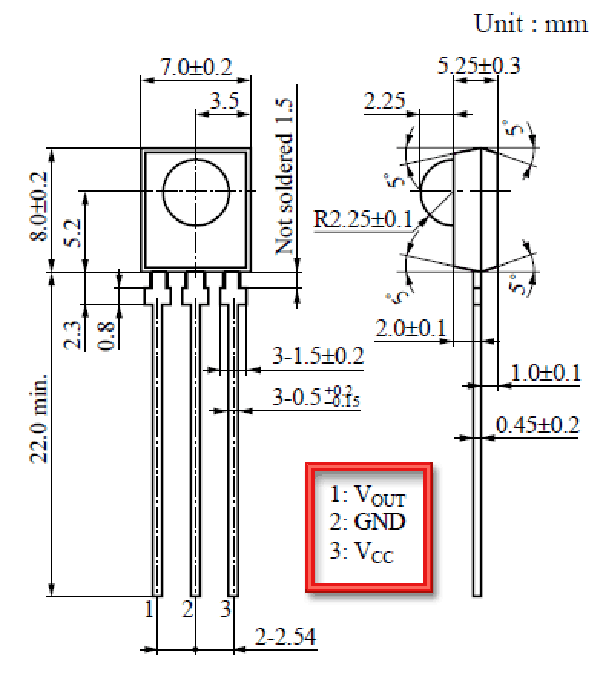
An IR receiver usually has three pinouts as shown in the picture, I connect the Vout to ESP32 GPIO15, Vcc to ESP32 3.3v, and GND to ESP32 GND. ESP32 pin map for Arduino core can be find at Arduino core for the ESP32 github page. The IR receiver that I have matched the PNA4602 pinout shown below.
The following sketch is used to decode the data from each key of a TV remote.
IR_Decode
#include <Arduino.h>
#include <IRremote.h>

int RECV_PIN = 15;

IRrecv irrecv(RECV_PIN);

decode_results results;

void setup() {
  Serial.begin(115200);
  irrecv.enableIRIn();
  Serial.println("IR Receiver ready");
}

void loop() {
  if (irrecv.decode(&results)) {
    Serial.println(results.value, HEX);
    Serial.print(" - ");
    switch (results.decode_type){
        case NEC: Serial.println("NEC"); break ;
        case SONY: Serial.println("SONY"); break ;
        case RC5: Serial.println("RC5"); break ;
        case RC6: Serial.println("RC6"); break ;
        case DISH: Serial.println("DISH"); break ;
        case SHARP: Serial.println("SHARP"); break ;
        case JVC: Serial.println("JVC"); break ;
        case SANYO: Serial.println("SANYO"); break ;
        case MITSUBISHI: Serial.println("MISUBISHI"); break ;
        case SAMSUNG: Serial.println("SAMSUNG"); break ;
        case LG: Serial.println("LG"); break ;
        case WHYNTER: Serial.println("WHYNTER"); break ;
        case AIWA_RC_T501: Serial.println("AIWARC_T501"); break ;
        case PANASONIC: Serial.println("PNASONIC"); break ;
        case DENON: Serial.println("DENON"); break ;
      default:
        case UNKNOWN: Serial.println("UNKNOWN"); break ;
      }
    irrecv.resume(); // Receive the next value
  }
  delay(300);
}
When this sketch is run in ESP32, we can monitor the data on the serial terminal for each key pressed on a remote. The sketch print out the IR code for each key in hexdecimal as well as the protocol used by the different vendor of the IR chip. Obviously my Samsung TV uses the protocol and chip from Samsung, and my Set-top box turn out to be using NEC format. There are many buttons on the two remotes that I have, but I only interested on a few keys that I need for my ESP32 remote. Noticed that all the infra red codes for Samsung protocol have a prefix of 0xE0E0 and all the NEC codes have a prefix of 0x807F. We will use this prefix to determine what protocol we are going to use to encode the IR code.
| Remote | Protocol | Key | IR Code |
|---|---|---|---|
| TV | Samsung | TV on/off | 0xE0E040BF |
| TV Source | 0xE0E0807F | ||
| Set-top Box | NEC | Set-top On/Off | 0x807F807F |
| Volume Up | 0x807F827D | ||
| Volume Down | 0x807F42BD | ||
| Channel Up | 0x807FE817 | ||
| Channel Down | 0x807F58A7 | ||
| Mute | 0x807F48B7 |
ESP32 Web Server
At the core of our IR remote control is the ESP32 web server which provides a web page access (fornt-end) that styled like an TV remote control for user to press the keys to control the TV and Set-top box, the key command is send back from the webpage using http POST request to the ESP32 web server, the web server back-end software will convert the command into IR code and transmit to the TV/Set-top box via infra red.
In additon to the IR control functionality, the front-end is also capable to generate a http GET request when the page is accessed for the first time and every minute afterward to request the web server to provide the temperature and humidity information. The diagram provides a complete illustration of the data flow and all the http requests and routes.
ESP32 front-end web page
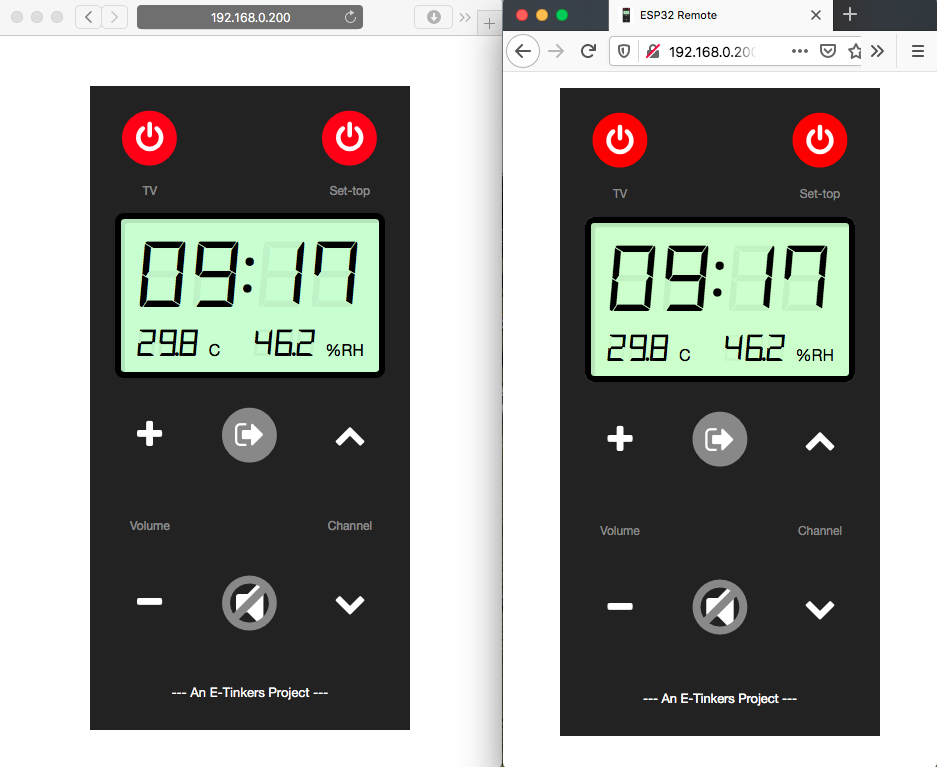
ESP32 web server front-end consists of the html, JavaScript, CSS, etc. that you see from a browser. When accessing ESP32 IP address 192.168.0.200, a static html page index.html is served, with a little bit css styling, it looks like a TV remote controller and it looks great on all three browsers (Sarafi, Firefox and Chrome) and iPhone.
index.html
<!DOCTYPE html>
<html>
  <head>
    <meta charset="utf-8">
    <meta name="viewport" content="width=device-width, initial-scale=1, shrink-to-fit=no">
    <meta name="apple-mobile-web-app-title" content="ESP32 Remote">
    <meta name="apple-mobile-web-app-capable" content="yes">
    <link rel="icon" href="favicon.ico" type="image/x-icon">
    <link rel="apple-touch-icon" sizes="120x120" href="apple-touch-icon-120x120.png">
    <title>ESP32 Remote</title>
    <link rel="stylesheet" href="style.css">
  </head>
  <body>
    <div class="grid-container">
      <div class="grid-item">
        <div class="fa-stack icons">
          <i class="fa fa-circle fa-stack-2x" style="color:red;"></i>
          <i id="tv-on_off 00" class="fa fa-power-off fa-stack-1x fa-inverse"></i>
        </div>
      </div>
      <div class="grid-item">
        <div class="fa-stack icons">
          <i id="indicator" class="fa fa-angle-double-up fa-stack-1x fa-inverse"></i>
        </div>
      </div>
      <div class="grid-item icons">
        <div class="fa-stack">
          <i class="fa fa-circle fa-stack-2x" style="color:red;"></i>
          <i id="settop-on_off 07" class="fa fa-power-off fa-stack-1x fa-inverse"></i>
        </div>
      </div>
      <div class="grid-item-narrow">
          <span class="deco">TV</span>
      </div>
      <div class="grid-item-narrow"></div>
      <div class="grid-item-narrow">
          <span class="deco">Set-top</span>
      </div>
    </div>
    <div class="grid-container" id="temp-display">
      <div class="display-frame backlight">
        <span class="time-reading D7MI mask">88:88</span>
        <div class="second-line">
          <span class="mask D7MI">88.8</span>
          <span class="mask smaller">C</span>
          <span class="humidity mask D7MI">88.8</span>
          <span class="mask smaller">%RH</span>
        </div>
          <span id="time-value" class="time-reading D7MI">00:00</span>
          <div class="second-line-display">
            <span id="temp-value" class="second-reading-mask D7MI">00.0</span>
            <span class="smaller">C</span>
            <span id="humid-value" class="humidity second-reading-mask D7MI">00.0</span>
            <span class="smaller">%RH</span>
          </div>
      </div>
    </div>
    <div class="grid-container">
      <div class="grid-item">
        <div class="fa-stack icons">
          <i id="settop-volume_up 02" class="fa fa-plus fa-stack-1x fa-inverse"></i>
        </div>
      </div>
      <div class="grid-item">
        <div class="fa-stack icons">
          <i class="fa fa-circle fa-stack-2x" style="color:#888888;"></i>
          <i id="tv-source 01" class="fa fa-sign-out fa-stack-1x fa-inverse"></i>
        </div>
      </div>
      <div class="grid-item">
        <div class="fa-stack icons">
          <i id="settop-channel_up 03" class="fa fa-chevron-up fa-stack-1x fa-inverse"></i>
        </div>
      </div>
      <div class="grid-item">
        <div class="fa-stack">
          <span class="deco">Volume</span>
        </div>
      </div>
      <div class="grid-item"></div>
      <div class="grid-item">
        <div class="fa-stack">
          <span class="deco">Channel</span>
        </div>
      </div>
      <div class="grid-item">
        <div class="fa-stack icons">
          <i id="settop-volume_down 05" class="fa fa-minus fa-stack-1x fa-inverse"></i>
        </div>
      </div>
      <div class="grid-item">
        <div class="fa-stack icons">
          <i class="fa fa-volume-off fa-stack-2x fa-inverse"></i>
          <i id="settop-mute 04" class="fa fa-ban fa-stack-2x" style="color: #888888;"></i>
        </div>
      </div>

      <div class="grid-item icons">
        <div class="fa-stack">
          <i id="settop-channel_dn 06" class="fa fa-chevron-down fa-stack-1x fa-inverse"></i>
        </div>
      </div>
    </div>

    <footer class="footer">--- An E-Tinkers Project ---</footer>

    <script src="script.js" type="text/javascript"></script>
  </body>
</html>
A little bit of JavaScript code is used to set up the event listener for each keypad on the UI as well as two major event handlers for triggering Ajax calls:
- The
sendRequestfunction generates a POST request at http endpoint/apito inform the web server which key is pressed. - The
getSensorReadingfunctions generates a GET request at endpoint/temperaturefor getting the temperature and humidity info from the server and inject the received data dynamically to the UI upon receiving the data. ThegetSensorReadingis further called at an interval of every 60 seconds automatically so that temperature and humidity display could be updated in every minute.
The time information is obtained from the OS where the browser is running, i.e. either from iPhone (if you are access the ESP32 server from an iPhone) or from your desktop computer (if you are using a computer).
script.js
'use strict';

document.addEventListener("DOMContentLoaded", function(event) {

    const animateIndicator = function() {
        document.getElementById('indicator').style.display='block';
        setTimeout(function(){
            document.getElementById("indicator").style.display = 'none';
        }, 50);
    }

    const sendRequest = function(command, code) {
        return fetch(
          http://${location.host}/api,
          {
            method: 'POST',
            body: JSON.stringify({
              command: command,
              code: code
            }),
            headers: {
              'Content-Type': 'application/json'
            }
          }
        );
    }

    const getSensorReading = function() {
      fetch(http://${location.host}/temperature)
        .then((resp) => resp.json())
        .then(function(data) {
          document.getElementById('temp-value').innerHTML = data.temperature.toFixed(1);
          document.getElementById('humid-value').innerHTML = data.humidity.toFixed(1);
          document.getElementById('time-value').innerHTML = new Date().toTimeString().substr(0,5);
        });
    }

    getSensorReading();
    setInterval(getSensorReading, 60*1000);

    let promise;
    let targets = document.getElementsByClassName('icons');
    for (let i = 0; i < targets.length; i++) {
      targets[i].addEventListener("click", function(e) {
          const d = e.target.getAttribute('id').split(' ');
          const command = d[0];
          const code = d[1];
          promise = sendRequest(command, code);
          animateIndicator();
      });
    }

});
FontAwesome web font icons are used to style all the key icons. The DSEG segment display font used in the LCD panel for temperature and humidity display is the great work from a very talented Japanese artist/developer keshikan that I downloaded from keshikan's github.
In order to save the memory and bandwidth of ESP32, the fontawesome web font css files is specially trimmed to eliminate the icons that are not used in the application, and incorporated those needed into the style.css file, and only .woff is included to cut down nearly 850kB+ of file size. This is apply to DSEG repository as well, only DSEG7Modern-Italic.woff is used and only css rules related to this font were incorporated in the stylesheet.
For easy access of the ESP32 IR remote, the web page supports the capability of saving the web site as a home icon on iPhone.
ESP32 Web Sever Back-end Codes
The ESP32 back-end rely on a few libraries to be installed:
- ESP32-IRremote - Send and receive infra-red signals.
- ESPAsyncWebServer - Async HTTP and WebSocket Server for ESP8266.
- SPIFFS - Provides the functionalities for supporting SPIFFS file system on embedded targets.
- ArduinoJson - A C++ JSON library for Arduino and IoT (Internet Of Things).
- SHT21 - A library for Sensirion SHT21 temperature and humidity sensor.
The ESP32-IRremote is a modified version of IRremote for sending and receiving using infra-red signals. The irSend.cpp is modified to support ESP32 send functionality as the original library only support receive function for ESP32. This modified library is not officially registered with PlatformIO library manager, and need to download it manually and put into your PlatformIO project /lib directory.
SHT21 is another library that is not officially supported by PlatformIO library manager, so you have to download it manually and put it into your PlatformIO project /lib directory. I choose this library over other libraries for SHT21 for its simple and clean API that hide all the implementation details.
main.cpp
#include <Arduino.h>
#include <WiFi.h>
#include <ESPAsyncWebServer.h>
#include <SPIFFS.h>
#include <ArduinoJson.h>
#include <SHT21.h>
#include <IRremote.h>

// replace the ssid and password
const char* ssid     = "your_WiFi_SSID";
const char* password = "your_WiFi_password";
const int port = 80;

// replace staticIP and gateway address based on your home router settings
IPAddress staticIP(192, 168, 0, 200);
IPAddress gateway(192, 168, 0, 1);
IPAddress subnet(255, 255, 0, 0);

SHT21 SHT21;

String request;
DynamicJsonDocument doc(200);
AsyncWebServer server(port);
static char sensorStatus[50];

byte SEND_PIN = 5;
IRsend irsend(SEND_PIN);
unsigned long infraRedCode[] = {
  0xE0E040BF, //tv on-off
  0xE0E0807f, //tv source
  0x807F827D, //set-top volume up
  0x807FE817, //set-top channel up
  0x807F48B7, //set-top mute
  0x807F42BD, //set-top volume down
  0x807F58A7, //set-top channel down
  0x807F807F  //set-top on-off
};

void connectToWiFi() {
  Serial.begin(115200);
  Serial.printf("Connecting to WiFi %s\n", ssid);
  WiFi.config(staticIP, gateway, subnet);
  WiFi.begin(ssid, password);
  while (WiFi.status() != WL_CONNECTED) {
    delay(500);
  }
  Serial.println(WiFi.localIP());
  Serial.println(WiFi.macAddress());
}

void onTemperature(AsyncWebServerRequest *request) {
  JsonObject object = doc.to();
  object["temperature"] = SHT21.getTemperature();
  object["humidity"] = SHT21.getHumidity();
  serializeJson(doc, sensorStatus);
  Serial.println(sensorStatus);
  request->send(200, "application/json", sensorStatus);
}

void onRequest(AsyncWebServerRequest *request) {
    // dummy callback function for handling params, etc.
}

void onFileUpload(AsyncWebServerRequest *request, const String& filename, size_t index, uint8_t *data, size_t len, bool final) {
    // dummy callback function signature, not in used in our code
}

void onBody(AsyncWebServerRequest *request, uint8_t *data, size_t len, size_t index, size_t total) {
  DeserializationError error = deserializeJson(doc, (char*)data);
  if (!error) {
    const char* command = doc["command"];
    uint8_t code = atoi(doc["code"]);
    int codeType = infraRedCode[code] >> 16;
    Serial.printf("command=%s, code=0x%lx, protocol=", command, infraRedCode[code]);
    switch (codeType) {
      case 0xE0E0:
        irsend.sendSAMSUNG(infraRedCode[code], 32);
        Serial.println("Samsung");
        break;
      case 0x807F:
        irsend.sendNEC(infraRedCode[code], 32);
        Serial.println("NEC");
        break;
    }
    request->send(200, "text/plain", "Ok");
  }
}

void setup() {
  // Connect to WiFi
  connectToWiFi();

  SHT21.begin();

  // Initialize SPIFFS (SPI Flash File System)
  SPIFFS.begin(true);

  // serving static content for GET requests on '/' from SPIFFS directory '/'
  server.serveStatic("/", SPIFFS, "/")
        .setDefaultFile("index.html")
        .setCacheControl("max-age=86400");

  server.on("/temperature", HTTP_GET, onTemperature);

  server.on("/api", HTTP_POST, onRequest, onFileUpload, onBody);

  server.onNotFound([](AsyncWebServerRequest *request){
      request->send(404, "text/plain", "Page Not Found");
  });

  server.begin();

}

void loop(){

}
ESP32 WiFi station mode
In order to be able to access the ESP32 web server, the ESP32 needs to connect to home router in station mode, the connectToWiFi function estatblish a WiFi connection between ESP32 and home router. The ESP32 is setup in the Station mode with a static IP address 192.168.0.200 so that we will always know which the IP address for accessing the ESP32 web page. The code also assumed that the router/gateway address is 192.168.0.1, change it accordingly if your router has a different IP address.
ESP32 SPIFFS Filesystem
The ESP32 contains a Serial Peripheral Interface(SPI) Flash File System (SPIFFS). SPIFFS is a lightweight filesystem created for microcontrollers with a flash chip, which are connected by SPI bus, like the ESP32 flash memory. With SPIFFS, it enables HTML, JavaScript, CSS, fonts and icons to be stored as separated files and to be served as static content by the web server from ESP32 SPIFFS memory.
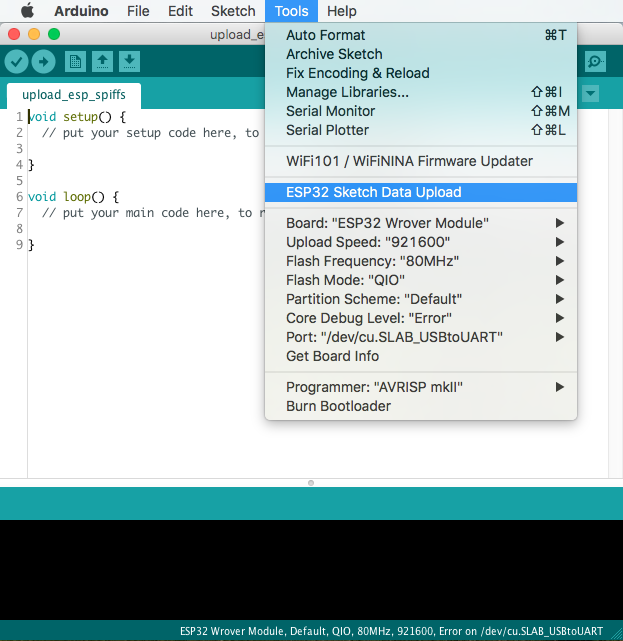
It requires an Arduino IDE plugin to be installed on Arduino IDE to upload all the files stored in a data directory to the ESP32 SPIFFS. The Arduino IDE plugin does not work with PlatformIO IDE, so I have to use Arduino IDE to write the content to the ESP32 SPIFFS.
The plugin add a new tool “ESP32 Sketch Data Upload” on the Arudino IDE tools dropdown menu for uploading SPIFFS files, follow the instruction provided in the link to create the SPIFFS. "ESP32 Sketch Data Upload" does not upload your sketch but only upload the content from a designated data directory to the ESP32 SPIFFS, therefore all you need is an empty sketch with the data directory where you put all ESP32 front-end code (that is, all the html, css, JavaScript, fonts and icons) in the directory for uploading to ESP32 SPIFFS.
When the main.cpp is run, a server instance is instantiated from AsyncWebServer class at port:80. When a browser access 192.168.0.200/, the server instance will serves the static content from the SPIFFS based on index.html.
HTTP GET Request and SHT21 Temerature/Humidity Sensor
The GET request coming through the browser at end-point /temperature will be handled by onTemperature function which read the temperature and humidity sensor and the data is sent back to the browser as a json object:
{
  "temperature": "21.3",
  "humidity": "80.4"
}
HTTP POST Request and IR Transmission
The POST request reached our web server through the end-point of /api, and the data that consists of the command and code pressed by the user coming in as an json object through the body of the HTTP POST request, and handled by onBody function of the async web server instance.
{
  "command": "settop-volume_up",
  "code": "02"
}
The json object received is parsed and the code is converted into an integer and used as the index for accessing the array of infraRedCode to retrieve the corresponding IR code (i.e. infraRedCode[2] = 0x807F827D), this code will be used to send through the IR transmitter to the TV or Set-top box. The prefix of the infraRedCode is used to determine the protocol of the IR transmission should be used for encoding the IR code.
ESP32 Web Server/IR remote Hardware
ESP32 can't drive the IR transmitter diode directly as the current might be too high that will damage the GPIO pin of ESP32. I connect GPIO5 to a transistor which is used to drive the IR diode. The current pass through the IR diode should not exceed 200mA maximum limit or else it could damage the IR diode.
The SHT21 breakout board communicate with ESP32 using I2C protocol. It connects to the ESP32 through SDA and SCL I2C bus.
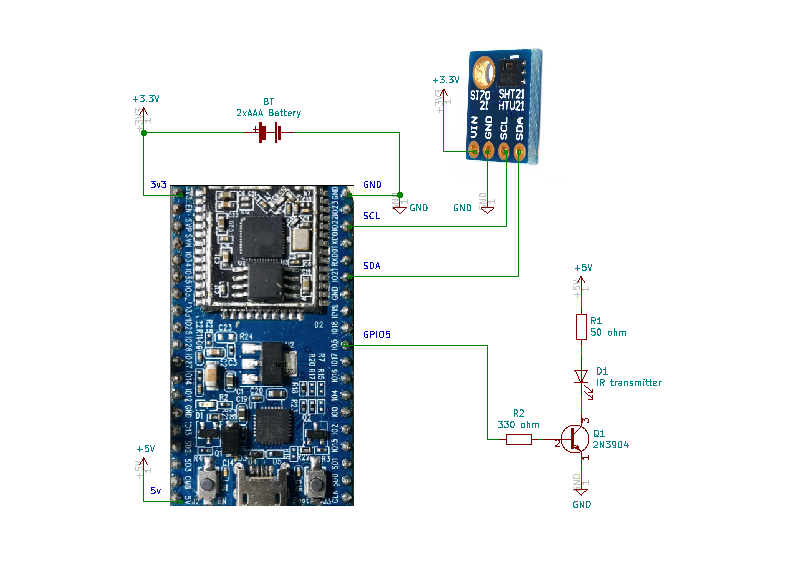
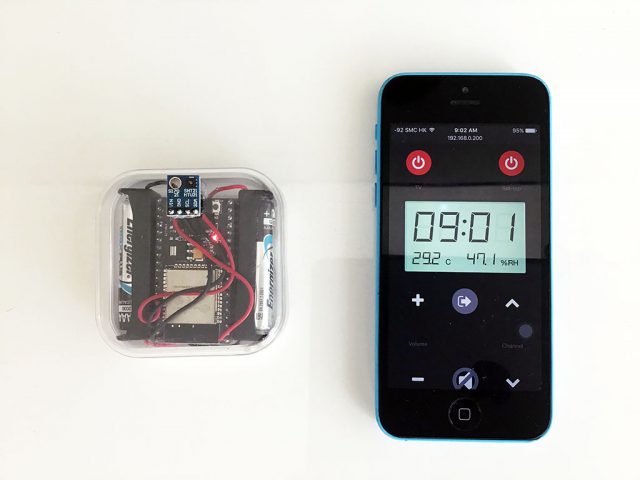
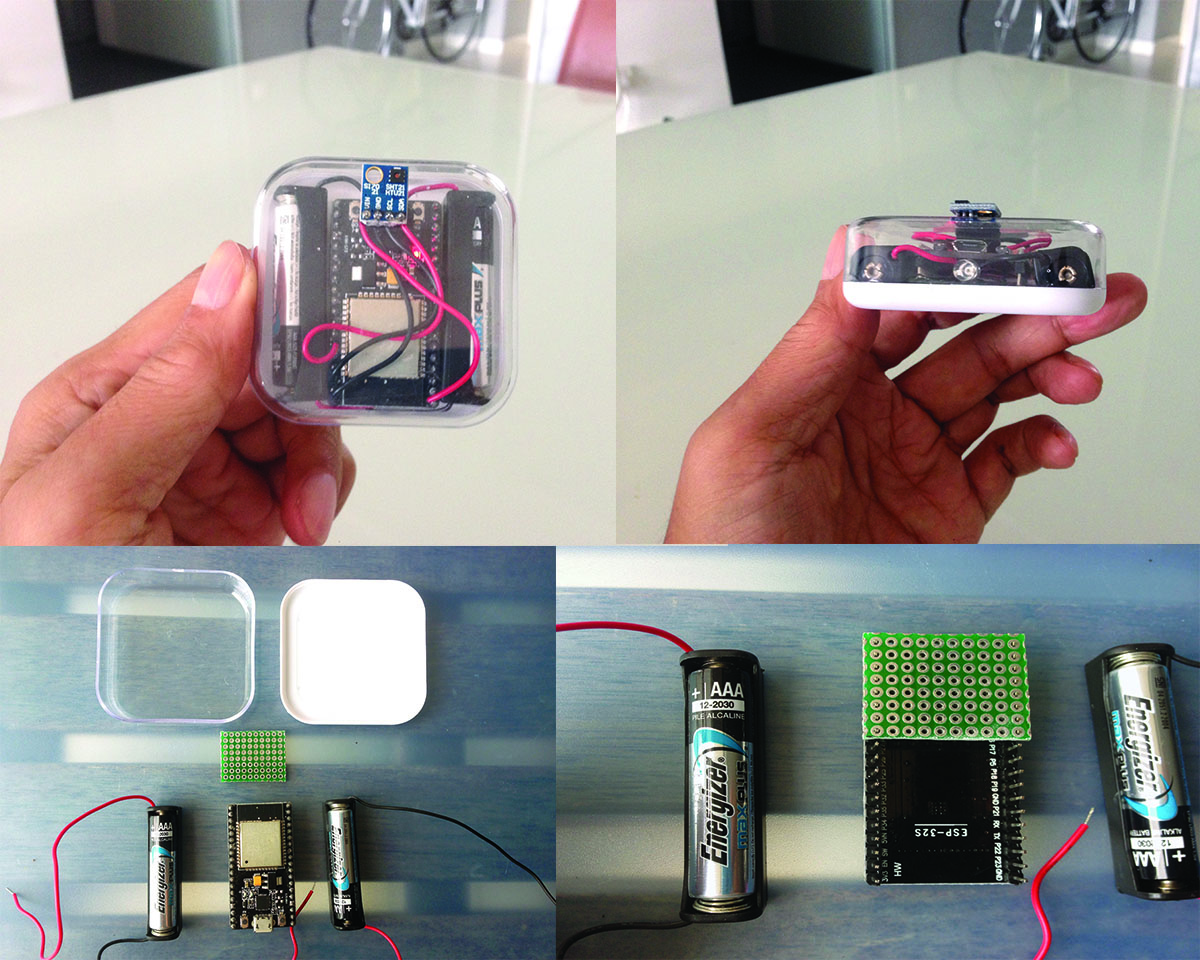
All the components are solder on a small piece of prototype board and mounted under the ESP32. I found an iPhone earphone box which has an acrylic cover that is just right to fit the ESP32 and two AAA batteries.
What's next
Overall, I'm impressive on how well ESP32 as a web server with such a small footprint for this project. I would say that my little project as a prove-of-concept is a success. But the use of AAA is not ideal or practical, the ESP32 consumed about 200mA so the battery can only last for about 24 hours mainly due the the radio chip and WiFi. Although ESP32 do have the deep sleep mode but it does not make sense for web server application. Another thing about the ESP32 is that it generates quite some heat, so in my tropical living room without air-conditioning, the case and the temperature sensor get heat up quickly to 2 to 3 degree Celsius higher than the actual ambience temperature. I will have to think of a better solution for power management as the next step, maybe using ESP8266 or running at lower clock speed, but that will be another project...
Source Code and Demo
The complete code is available at my github. Here is a demo on my YouTube.
Updated (5 Dec, 2019):
There is also a recorded video by Engineers.sg for my 10-min talk about this project at Singapore Hackware 5.8 Meetup event.
I am new to ESP32 and Audrino in general. Referring to you circuit diagram. The 50 ohms resistor for IR transmitter diode is connected to 5v or 3.3v pin?
I corrected my design, it should be on 3v. 5v only works when power is supplied via the USB port.
I am VERY new to this so please forgive me if this is overly ignorant.
The IRremote functions appear to be exactly what I was looking for. I copied the IR_Decode code to the Arduino IDE on a Windows PC, and imported the IRremote library.
When I compile, however, I receive the following error:
============================================================================================
In file included from C:\Users\Ron\Documents\Arduino\sketch_feb29a\sketch_feb29a.ino:2:0:

C:\Users\Ron\Documents\Arduino\libraries\IRremote/IRremote.h:365:23: error: 'SEND_PIN' was not declared in this scope

   const int sendPin = SEND_PIN;

                       ^

exit status 1
Error compiling for board ESP32 Dev Module.
===============================================================================================
Any suggestions? Again, the IR decode/send is just what I need (please help).
I re-compiled my code post on my github and I can’t reproduced what you faced. The SEND_PIN is defined on line 26 as you can see. One thing worth to mentioned again, that do not install IRremote library via Arduino IDE, you need to download the special modified version that supports esp32 send function and add it into your Arduino Libraries directory.
I ran into this too. My workaround was commenting out the line and using pin 4. I think IRremote uses that as the default for the ESP32. (See the hardware section: https://github.com/z3t0/Arduino-IRremote )
Icons are not showing up and may be that is the reason web page is also not completely loading.
But, Even though when i press on those places, remote is working perfectly. this is good because ir is blasting the codes that i am sending.
I tried on Android Chrome, iPad Safari and iPad Chrome browsers. Not seeing those icons.
But only on the PC that i uploaded code, icons are visible. but on every other device, icons are not loading and so web page is also not loading completely quickly.
I do not own any Android phone, therefore the app never tested on Android. I guess what happening is that Android does not support the .woff font, and for saving memory and reduce the loading time, I only included the .woff font in the /data directory. For running on android, you probably need to include or replace .woff with .ttf/.otf font files as it should be widely supported by Android devices, and you also need to change the @font-face in your CSS to reflect the correct file.
As for iPad, I never intend to make it work for iPad, the early version of iPad/iPad2 does not support JavaScript fetch API, so in order to make it works on iPad, it has to replace fetch API with the old XMLhttpRequest API for handling the ajax. The css grid might also not work well for some of the iPad.
ok.
how to send multiple commands of ir in a single request. for example – i want to turn on 2/3 devices at a time. or for pressing a channel on set top box i have to send 4 commands to switch to that channel. how to implement this scenario in your code.
It is trivia to send multiple IR commands based on a particular button pressed, but there is a design consideration that you need to think about. I’ve been to that and thought about it, as you might noticed that I have two Power-On buttons on my implementation, one for TV and another for Set-top box. I could have one Power-On button to switch on/off both appliances, but there could be the situation where for some reason, when you press the button, TV received the signal properly and is on, but not the Set-top box, then you will be in a difficult situation to switch both on or off…
Hi I have one requirement to develop IR repeater for one of my client. Looking for developer. If you can help me with that. I can provide more detail.
Can it be controlled from anywhere in the world, like via the internet?
Hi Henry,
I saw that you used PlatformIO as IDE and you made some modification in order to IRsend to work.
I’m trying to use Arduino IDE and I’m getting the error “no matching function for call to ‘IRsend::IRsend(byte&)’ “.
Do you know how I can fix it in Arduino IDE?
It doesn’t matter much whether you use Arduino IDE or PlatformIO, the important thing is that if you install the IRremote library via Arduino IDE library manager, you need to delete/remove it from the library directory, and download the modified version of the library from https://github.com/SensorsIot/Definitive-Guide-to-IR/tree/master/ESP32-IRremote, as the original library does not support ESP32 IRsend() back to then when I was doing the project(not sure about now).
Hi Henry,
Very nice project !!
I’m using ESP8266 so I had to modify a bit your code to make it work. But it runs smoothly 🙂
One thing. Mute/Unmute icon is not changing acoording to the selected status. It is OK ?
Thank you
Dan
Wound it be possible for you to share your project, code, and detail in github ?
Because my project need only a few buttons. I prefer to use it with esp8266.
Hi henry,
I just read your project and i have a question i hope find answer
0x807F827D this code is written in my stb firmware like this( 0x7F7D ) and another firmware the code written like this ( 0xbfaf ) while the original code is 0x4040 50af !
Why 0x4040 become 0xbf ?
Hex 0x40 is 01000000b in binary, and hex 0xbf is 10111111b in binary. This looks like that every bit are inverted. I guess it has to do with the actual circuit design. When you send through data via a transistor for amplifying the signal, the data at the collector pin of the transistor is actually get inverted from what is presented at the base of the transistor, so 0 became 1, and 1 became 0.
Hi henry,
That Irsend issue is solved after installing leatest liabrary but now it is showing a new error that is no matching function to call arduino json6180_91
can you please help me with this.
How can i solved this error?
This error is getting at line number 56 jsonObject object = doc.to()
You either missing ArduinoJson library or have the wrong version of ArduinoJson, please make sure it is version 6.
This comment section is not for tech support, do some debugging or post your programming question on StackOverflow.
Hi Henry
Can I create same remote using Arduino IDE instead of platform.io?
Hi henry
my tv protocol is RC6 so i tried to replace samsung with RC6 but it is not suporting.
Very good, thank you! I built something like this and now its automating my air conditioner. 🙂 I used the latest version of IRremote – it seems to have gained support for esp32 since this was written (send on p4 by default).
What is the lifespan of batteries for this workload with esp32?
I’d just like to say thank you for sharing this project. I’d been stuck for some time on my ESP IR server project as I needed either multiple html pages or the index.html not to refresh when a button is pushed. I knew I needed to do a HTTP_POST via javascript but have very limited knowledge in this area.
Thanks to your project I have been able to extract what I needed and now have a working multi-page ESP IR Server/IR_Blaster. I used the (https://github.com/crankyoldgit/IRremoteESP8266) library. It has many more protocols than standard IRremote library of which I needed the RC-MM (Philips / Nokia ) protocol for my mySky STB/PVR.
Thanks again
Cheers
macca
NEC protocol works very well, however the JVC protocol esp32 sends the IR signal but the receiver doesn’t recognize it, I used the RAW method and the same happens, can someone help me
If you are running at 3.3v through the IR transmitter, would that be the reason for the 50-ohm and 330-ohmn resistors? Would they be higher for 5vdc?
The 5v connection only works when powering via USB. If using battery, it needs to be connected to 3.3v. The resistor value need to be adjusted. A typical infrared LED has a maximum current allowed of around 200mA. So if powered by 5v, so a 24 ohms will still in the safety range ((5 – 0.6)/24 = 183mA). For 3.3v, 15 ohms is still okay ((3.3 – 0.6)/15 = 180mA). Check your LED spec, I prefer to have larger resistor to reduce the current needed as long as the range can be covered.
This is interesting!
I was wondering, if I wanted to connect it directly to my appliance which has an infrared input connector, can I just simple wire it on the the same pins were your ir transmitter sits directly to the ir connector of my appliance?
I think it will be safer to use an optocoupler such as 4N25 to provide some isolation between the two systems. You will need to adjust the R1 value when using an optocoupler as it usually need much less current than an IR diode.
Great write-up. My suggestion is put a link to this site in your code. I ran across some good code and for the life of me can ‘t find where I got it. lol By putting a link back to here they can find their way back here if they’re just looking at the code in the IDE, etc.