WordPress announced on 1 December 2016 that it will only promote hosting partners that provide a SSL certificate by default in their accounts. In this article I described how to implement SSL on WordPress website.
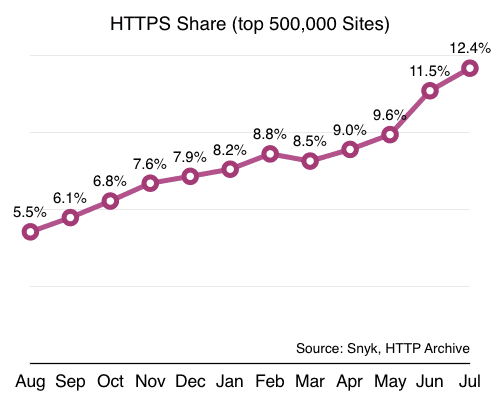
WordPress' announcement moving toward SSL encourages all site owners and partners to implement SSL from 2017 onward. Google has advocated the use of HTTPS and started to add HPPTS as a ranking signal since August, 2014. Data from the HTTP Archive show that the number of HTTPS sites rising by 2.3x, from 5.5% to 12.4% in July 2016 compare with a year ago. It’s important to note that the it took less than a year to secure the same number of sites it previously took 20 years to protect.
Despite HTTPS offers many benefits to both server owners and web users, historically HTTPS was always an expensive initiative. You had to buy certificates, pay extra for hosting, pay extra for your CDN, etc.. Today, you can get a free certificate from Let’s Encrypt. SSL/TLS delivery is included in many CDNs, Cloudflare offer a free shared SSL certificate if you sign up to use their CDN, including the free plan. Many domain registrar resells various SSL certificates. I’m using Namecheap.com as my domain registrar and I’d like to keep everything under one dashboard for easy management, so after some careful evaluation, I’ve decided to purchase Comodo PossitiveSSL certificate via Namecheap.com.
Setting up SSL involved three steps:
- Generate Certificate Signing Request(CSR)
- Purchase and Activate SSL certificate
- SSL Server configuration
Step 1 - Generate CSR using OpenSSL
Login into the Raspberry Pi, and select the directory where we’d want to keep our certificates and using openssl to generate a Certificate Signing Request:
cd /etc/ssl
openssl req -nodes -newkey rsa:2048 -keyout mydomain.key -out mydomain.csr
Both the key file mydomain.key and csr file can be any name we want, it is a good practise to name it based on the domain name so that it will be easy to remember which domain the files belonging to. The process creates two files. The file mydomain.key contains a private key; The private key is then used as input in the command to generate a Certificate Signing Request (CSR).
Important Note: Do not disclose the private key file to anyone. Carefully protect the private key. Backup the private key and store it in a secure storage, as there is no means to recover it should it be lost.
The openssl program will require some information for generating the csr. For some fields it provides a default setting in []. Enter '.', the field will be left blank.
Country Name (2 letter code) [AU]:
State or Province Name (full name) [Some-State]:
Locality Name (eg, city) []:
Organization Name (eg, company) [Internet Widgits Pty Ltd]:
Organizational Unit Name (eg, section) []:
Common Name (e.g. server FQDN or YOUR name) []:mydomain.com
Email Address []:

Please enter the following 'extra' attributes
to be sent with your certificate request
A challenge password []:
An optional company name []:
Use the Full Qualified Domain Name (FQDN) of the web-server as Common Name (CN). For example, if the domain name is www.example.com, enter example.com as the Common Name. The fields email address, optional company name and challenge password can be left blank for a web server certificate.
Output the content of mydomain.csr file to the screen with cat command:
cat mydomain.csr
Select the entire outputted data and copy to the clipboard, we will need it for filling up the CSR form later.
Step 2 - Purchase and Activate SSL certificate
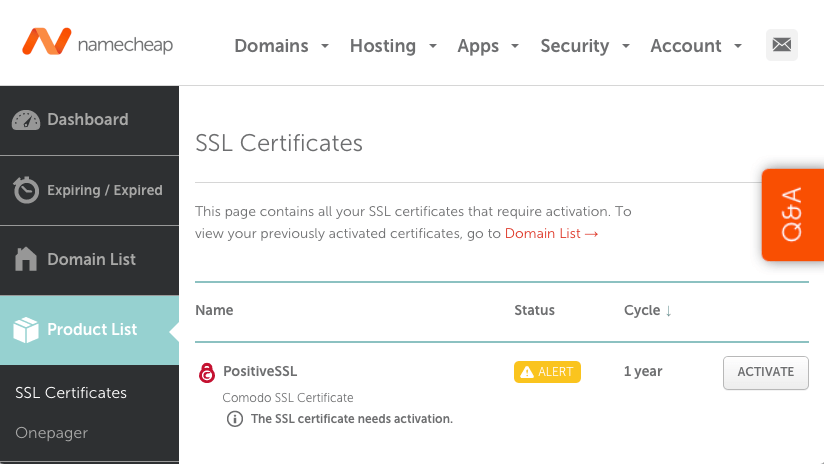
Since I’m using Namecheap, so the example here is based on Namecheap. Login into Namecheap Dashboard to make the purchase of Comodo PositiveSSL certificate. Once you made the purchase of the SSL certificate, you will need to activate the certificate. Go to your Domain List on Namecheap Dashboard, and click on Manage button, and the SSL certificate can be found by clicking on Product tab, then click on Activate
Paste the CSR you generated into Enter CSR text box and press tab, Primary Domain will be automatically populated with your FQDN, select the Apache, Nginx, cPanel or other as the Server Type, and press Submit button to proceed.

When asking for DCV Method, select Email from the dropdown list.
Comodo Security Service will send an email with an Domain Control Validation code, copy the code and click on the link provided in the email to complete the validation process.
The certificate signing request and validation process by now is completed and your SSL certificate is activated, and now it is time to configure the web server for using the SSL communication.
If you are self-hosting on Raspberry Pi like me, you will need to setup port forwarding for HTTPS port 443 on the router. As I’ve explained the setup of port forward on previous article so I won’t repeat it again here. Once it is done, we are ready to make some changes on Nginx configuration for SSL access.
Generate SSL bundle certificate
You will receive another email from Comodo Security Services after the completion of CSR process, the email contains a zip file attachment, download the file. Upload it to Raspberry Pi and upzip it to /etc/ssl/ directory.
The zip file containing:
• Your PositiveSSL Certificate - mydomain.crt
• Your "CA-bundle" file - mydomain.ca-bundle
We will need to concatenate the the PositiveSSL Certificate and CA-bundle file into a single ssl-bundle.crt file. The order matter, the Certificate should be the first, follow by the CA-bundle. We could use editor to copy and paste it together or use the following cat command to concatenate it together.
sudo su
cat mydomain.crt mydomain.ca-bundle > mydomain-ssl-bundle.crt
exit
As an SSL certificate typically would be expired in one year, you will need to renew it annually, and repeat the processes described in step 1 and 2 each year to generate the new CSR and certificates each year prior the expiration date.
Step 3 - SSL server configuration
Mozilla wiki provides many recommendations on how to harden the TSL (SSL) security and is a great resource to understand the subject and even use it to generate the configuration file. Nginx HTTP SSL Module is another resource for getting deeper understanding of each directive setting.
Harden SSL security
The default nginx distribution shipped with 1024-bit Diffie-Hellman (DH) group, which is most of modern browsers, including Google Chrome, Mozilla Firefox, and Microsoft Internet Explorer currently supported as the the minimum group size. Mozilla wiki however suggests to use a stronger, at least 2048-bit Diffie Hellman group.
First we need to generate a new Diffie-Hellman group using openssl command:
sudo openssl dhparam -out dhparams.pem 2048
This will generated a new dhparams.pem file with 2048-bit dhparam.
Please noted that generating 2048-bit dhparem may take as long as 20 to 30 mins on a Raspberry Pi 3.
Nginx SSL directives configuration
Now let’s configure the nginx configuration file for SSL.
First, We’d want to apply certain directives at the http context of the Nginx configuration, so open /etc/nginx/nginx.conf:
sudo nano /etc/nginx/nginx.conf
Find the section related to SSL directives within the http context and add the following directives:
# Based on recommendation from https://wiki.mozilla.org/Security/Server_Side_TLS
ssl_dhparam /etc/ssl/dhparams.pem;      # 2048-bit DH params
add_header Strict-Transport-Security "max-age=15768000;
includeSubdomains";     # 15768000s = 6 months
# intermediate configuration that supports some legacy browsers
ssl_ciphers 'ECDHE-ECDSA-CHACHA20-POLY1305:ECDHE-RSA-CHACHA20-POLY1305:ECDHE-ECDSA-AES128-GCM-SHA256:ECDHE-RSA-AES128-GCM-SHA256:ECDHE-ECDSA-AES256-GCM-SHA384:ECDHE-RSA-AES256-GCM-SHA384:DHE-RSA-AES128-GCM-SHA256:DHE-RSA-AES256-GCM-SHA384:ECDHE-ECDSA-AES128-SHA256:ECDHE-RSA-AES128-SHA256:ECDHE-ECDSA-AES128-SHA:ECDHE-RSA-AES256-SHA384:ECDHE-RSA-AES128-SHA:ECDHE-ECDSA-AES256-SHA384:ECDHE-ECDSA-AES256-SHA:ECDHE-RSA-AES256-SHA:DHE-RSA-AES128-SHA256:DHE-RSA-AES128-SHA:DHE-RSA-AES256-SHA256:DHE-RSA-AES256-SHA:ECDHE-ECDSA-DES-CBC3-SHA:ECDHE-RSA-DES-CBC3-SHA:EDH-RSA-DES-CBC3-SHA:AES128-GCM-SHA256:AES256-GCM-SHA384:AES128-SHA256:AES256-SHA256:AES128-SHA:AES256-SHA:DES-CBC3-SHA:!DSS';
ssl_session_cache shared:SSL:10m;	#SSL session cache
ssl_session_timeout 1h;
For site-specific settings, we will need to add to the virtual server configuration file at sites-available/:
sudo nano /etc/nginx/sites-available/default
Scroll down to the server section and DELETE the two lines related to port 80:
listen 80 default_server;
listen [::]:80 default_server;
Scroll further down a few lines and uncomment out (delete the # in front of each line) the two directives related to port 443:
listen 443 ssl default_server;
listen [::]:443 ssl default_server;
Add the following directives right after the port 443 directives:
ssl on;
ssl_certificate /etc/ssl/mydomain-ssl-bundle.crt;
ssl_certificate_key /etc/ssl/mydomain.key;

# OCSP Stapling
ssl_stapling on;
ssl_stapling_verify on;
resolver 8.8.4.4 8.8.8.8;
Redirect all HTTP traffic to HTTPS
As we just took out the directives related to HTTP (port 80), all the traffic using HTTP will be dropped. But in case someone visits our site using HTTP request (which uses port 80), we’d want to redirect it to use the HTTPS resource (which uses port 443). We need to create another server context block to handle the HTTP redirect, and place it before our existing server context which we just modified for port 443:
server {
	listen 80 default_server;
	listen [::]:80 default_server;
	server_name mydomain.com;
	return 301 https://$host$request_uri;
}
Now all traffic for http://mydomain.com/* will be redirected to https://mydomain.com/*. The redirect response is sent with the HTTP status code 301, which tells the browser and search engines that this a permanent redirect. This makes the browser remember the redirect, so that next time they visit, the browser will do the redirect internally.
Save and quit the editor once it is done. Check the configuration before reload the Nginx configuration with those commands:
sudo nginx -t
sudo service nginx reload
Now if we access our website, we should see a HTTPS padlock sign in front of the URL. The website should now be serving over HTTPS.
Forcing all WordPress pages to HTTPS
After installing a valid SSL certificate onto the server, we need to ensure that WordPress will serve the pages using HTTPS.
Login into WordPress Admin Dashboard, and go to WordPress Settings and change the WordPress Address (URL) and the Site Address (URL) from HTTP to HTTPS, and flush the cache if necessary.
Resolve WordPress HTTPS/HTTP Mixed Content
However, for some of the content created prior the implementation of WordPress HTTPS, we might noticed that the HTTPS padlock icon would be missing, even though the page is served with HTTPS. This is because the page contains some mix content that is served as HTTP, very often related to the images that we added to the page that have hard-coded url. We can leave it as is if there are too many pages to be fixed, or change it one by one.
First, use a testing site called Why No Padlock to check the website, it provides a report of all the insecurely-loaded items.
Use the report as a reference, go to Posts Screen and open the post that has mixed HTTPS/HTTP content for editing, use the browser “Find” function (Command-F on Mac) to look for "http://", and replace it with "https://", pay attention to the url, we should only change those links for internal content, such as image links on our server. Click on Update to save the changes once it is done.
If this still can’t fix all the pages, it likely caused by theme or plugins that using an insured url, this could be javascript file, links to external resources such as google fonts, jQuery, etc. For example, a theme using an insured url like http://fonts.googleapis.com/css?family=Lato:100,400,700 instead of https://fonts.googleapis.com/css?family=Lato:100,400,700. To fixing those, it could be quite technical and more time consuming which is beyond the subject of this article, we should also consider to phase out those theme or plugins that caused the problems. Those are the vendors or partners that WordPress will not promote after 2017.
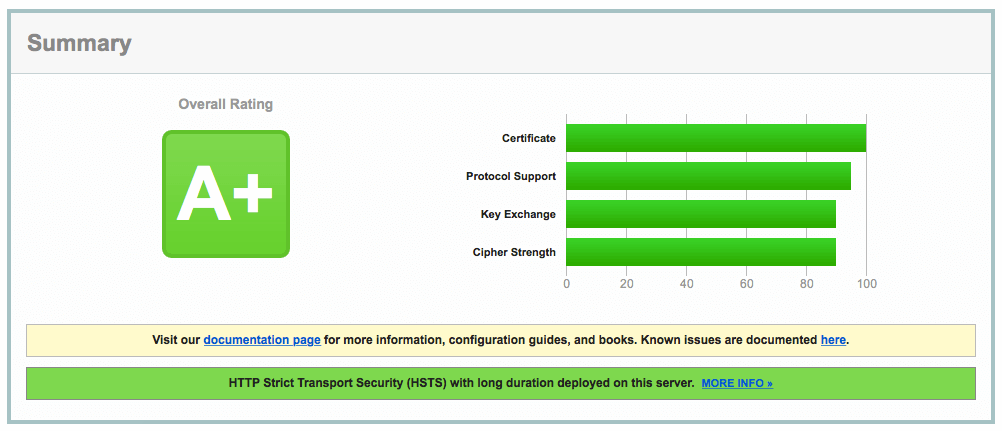
Test SSL site
To test our site on SSL compliance, run the site through Qualy’s SSL Labs.
Hi,
After i have configured SSL settings /etc/nginx/sites-available/default
nginx -t is failing with:
nginx: [emerg] SSL_CTX_set_cipher_list(“‘”) failed (SSL: error:140E6118:SSL routines:ssl_cipher_process_rulestr:invalid command error:140E6118:SSL routines:ssl_cipher_process_rulestr:invalid command)
Any recommendations on this ?
Thanks in advance.
Figure out, did a mistake in the sudo nano /etc/nginx/nginx.conf file.
Thanks.
Just wanted to point out that in the list of ssl ciphers you have ‘ ‘ around the list. In my configuration, I get nginx -t errors when running with ‘ ‘ around this list of ciphers. The correct configuration for me looks more like the following…
ssl_ciphers ECDHE-ECDSA-CHACHA20-POLY1305:ECDHE-RSA-CHACHA20-POLY1305:ECDHE-ECDSA-AES128-GCM-SHA256:ECDHE-RSA-AES128-GCM-SHA256:ECDHE-ECDSA-AES256-GCM-SHA384:ECDHE-RSA-AES256-GCM-SHA384:
DHE-RSA-AES128-GCM-SHA256:DHE-RSA-AES256-GCM-SHA384:ECDHE-ECDSA-AES128-SHA256:ECDHE-RSA-AES128-SHA256:ECDHE-ECDSA-AES128-SHA:ECDHE-RSA-AES256-SHA384:ECDHE-RSA-AES128-SHA:ECDHE-ECDSA-AES256-SHA384:
ECDHE-ECDSA-AES256-SHA:ECDHE-RSA-AES256-SHA:DHE-RSA-AES128-SHA256:DHE-RSA-AES128-SHA:DHE-RSA-AES256-SHA256:DHE-RSA-AES256-SHA:ECDHE-ECDSA-DES-CBC3-SHA:ECDHE-RSA-DES-CBC3-SHA:EDH-RSA-DES-CBC3-SHA:
AES128-GCM-SHA256:AES256-GCM-SHA384:AES128-SHA256:AES256-SHA256:AES128-SHA:AES256-SHA:DES-CBC3-SHA:!DSS;