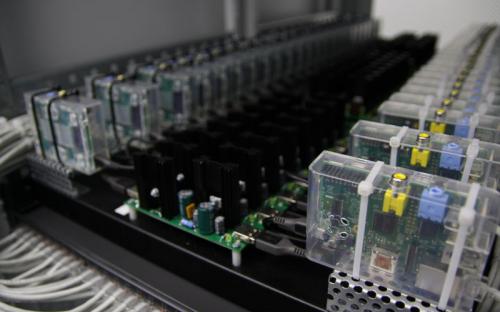
To host WordPress website on Raspberry Pi, the next steps involved of getting a public-facing IP address, register a domain name for our little Raspberry Pi website, setting up port forwarding and dynamic DNS, and we are going to discuss those in details in this article.
Raspberry Pi colocation
There are two ways you could host your Raspberry Pi WordPress server. One of the most basic service that many data centers in the world offers is “colocation” (a.k.a. colo) service. A colocation service is a data center facility in which a business or individual can rent space for servers and other computing hardware. Typically, a colo data center provides the building, cooling, power, bandwidth and physical security while the customer provides servers and storage.
There are apparently many companies offers Raspberry Pi colocation around the world (just google “Raspberry Pi colocation”). In many cases, you can either send them your own Raspberry Pi (pre-configure based on their requirements with pre-assigned IP and DNS settings) or purchase a Raspberry Pi from them (which normally including the casing, power and SD card with Raspbian). Some of those companies provide backup services, others provide redundant power. Most of the monthly charge is very reasonable partially because Raspberry Pi doesn’t take up a lot of rack space, and consumed very limited power.
Raspberry Pi colo offers a good starting point for ‘learning through tinkering’, you gain the experiences of managing a server, running a web server (as long as it is not mission critical) in the real environment before you push the Raspberry Pi to the limit, by then you probably should consider to have a more powerful server colo or subscribe to a Virtual Private Server (VPS) instance.
Host it yourself
When I started building the Raspberry Pi WordPress web server, I want to build it as close to a real colocation deployment environment as possible, and I want to see how far this little server can go in real deployment, but I’m not ready to go for ‘colo’ yet. So we will discuss the option of host it ourself in the rest part of this article.
Hosting Raspberry Pi using your home broadband internet is technically possible, however, there are a few considerations you will need to know in advance. First, many home broadband ISP's terms of service disallow hosting a public web site from computers on their network. Secondly, almost all consumer ISP broadband services offers a dynamic IP which means that the IP address of your website domain will have to change accordingly whenever your public IP issued by your broadband ISP changed. Third, depend on your service subscription, the bandwidth and speed of your broadband connection could be very limited when your website gaining attraction.
Setup Raspberry Pi static IP
If you are accessing the Raspberry Pi via SSH, you probably already know your Raspberry Pi local IP or already setup a static IP for the Raspberry Pi for easy access, but in case you have not, it is time to get it done.
Before setting up a static IP for Raspberry Pi, we will need to find out the router IP and DNS first. First, run the following command line to find out the IP address assigned to the Raspberry Pi:
ip -4 addr show eth0 | grep inet
Which will show an inet address similar to this:
inet 192.168.0.101/24 brd 192.168.0.255 scope global eth0
The IP address 192.168.0.101/24 after inet is the current Raspberry Pi address assigned by the router and the range of IP addresses that router could issue.
Next we will need to find out the router IP address:
ip route | grep default
Which show something like this:
default via 192.168.0.1 dev wlan0 metric 303
The IP address following default is the router/gateway address.
We will then find out the DNS address by check the content of /etc/resolv.conf file:
cat /etc/resolv.conf
It is likely is the same IP address as the router IP.
# Generated by resolvconf
nameserver 192.168.0.1
We now can configure the static IP address on the Raspberry Pi by editing the /etc/dhcpcd.conf file:
sudo nano dhcpcd.conf
Scroll down to the end of the file, and add the following lines:
interface eth0
static ip_address=192.168.0.101/24
static routers=192.168.0.1
static domain_name_servers=192.168.0.1
Press Control-x to save the file.
- ip_address is the static IP we want to assign to the Raspberry Pi. This could be the same as the IP address that currently assigned to the Raspberry Pi by the router, or you could assign a unique IP to the Raspberry Pi as long as it within the range, the /24 means that the first 24-bits of the IP are fixed, which means that you could assign an IP address within any number of the last 8 bits (192.168.0.0-192.168.0.255) except the one used by the router (192.168.0.1) and 192.168.0.255 which usually reserved as broadcast IP.
- routers address should be matching the IP address previous show by
ip routecommand. - domain_name_servers is the DNS address from
/etc/resolv.conf.
Reboot for the changes to take effect and login again using the newly assigned static IP address.
sudo reboot
Port Forward
So far we are using the local or internal IP address assigned by our router for accessing our Raspberry Pi. In order to access our Raspberry Pi globally from anywhere, we will need a public or external IP address which is assigned by our Broadband ISP. The public/external IP is what the rest of internet sees. To find out the public IP address, type the following command from Terminal:
curl https://dynamicdns.park-your-domain.com/getip
The IP address return is your exiting public IP address.
In order for the external traffic be able to access the Raspberry Pi, we will need to setup “port forward” on the router to direct the traffic to the local IP assigned to the Raspberry Pi. Access the login panel of router from browser by typing in the IP address of the router (In our case, the router IP address is 192.168.0.1), login with router’s user name and password (this varies from router to router and in general can be find out from user manual or from the label on the router). The actual process of setup port forward varies from vendor to vendor, if you are not sure on how to set up the port forward for your router, go to portforward.com to search for the step-by-step guide for setting up port forward based on the model of the router you use. In my case, which is a cisco router for Small Business, the setting is simply by adding the Raspberry Pi IP address and click on Enable for port 80 as shown below:
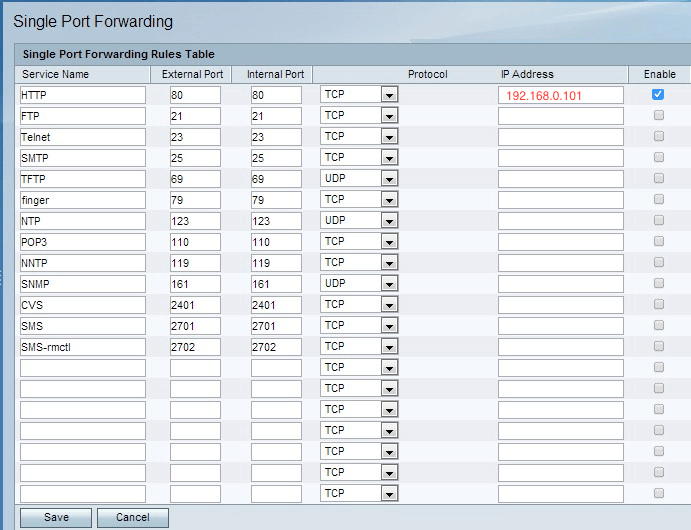
What this means is that any external TCP travel coming to port 80 would get forwarded to the internal IP address at port 80. Once the configuration is save, you should be able to access the Raspberry Pi using your public IP via browser.
Domain name registration
There are many reputable domain name registrar and web hosting companies provide domain name registration service, I use Namecheap.com for its reasonable pricing and simple, easy-to-use UI. For every domain registered with Namecheap.com it comes with free Whois Protection which hide your personal information from “whois” search, while some other domain registrar charged for extra for this privacy protection feature.
Once you register and pay for the domain name registration, next step would be setup the DNS record (A record ) to point the domain to our public IP address. If you are using Namecheap.com like me, Namecheap.com provides a good instruction on how to setup the A record and avoid conflict with other records (CNAME and URL Redirect records), in my case, I delete the default URL Redirect record, add an A-record, and change the value of the CNAME record to our domain name (without www) so that it looks like this:
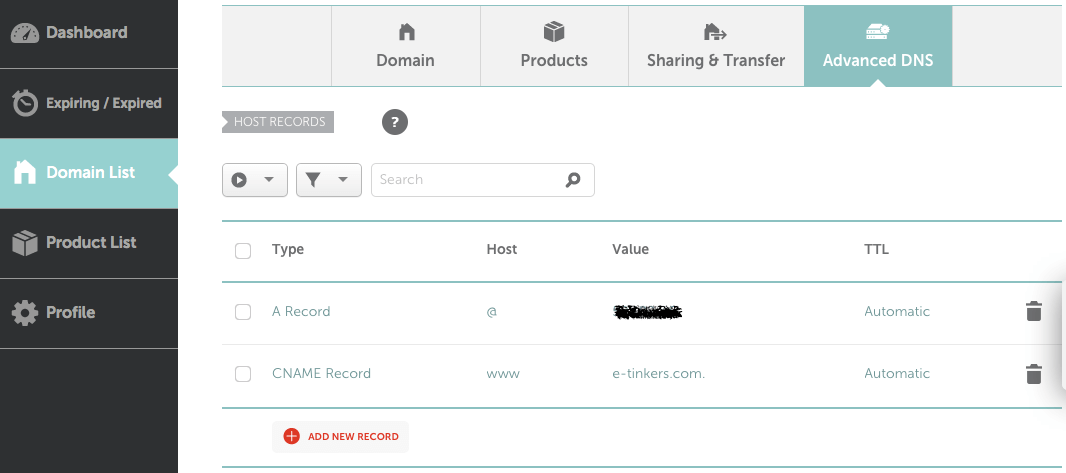
The value of the A record should be the public IP we found out previously. The setting will take effect as soon as a few minutes or up to 48 hours (according to the Namecheap.com website). Launch the browser and type-in the registered domain, we should see our WordPress website serves up from the tiny Raspberry Pi!
Change Hostname
The hostname on the Raspberry Pi should be unique but doesn’t require to have any relationship with the site that will be hosted. we can changed the default hostname of raspberrypi by modifying the /etc/hostname file:
sudo nano /etc/hostname
Replace the default raspberrypi with whatever you want, for example, it might be a good idea to name it as yourdomain.com. Press ‘Control-X’ to save the file.
We have one more change to make at /etc/hosts:
sudo nano /etc/hosts
Replace the default:
127.0.1.1 raspberrypi
To your domain name, in my case, it is e-tinkers.com:
192.168.0.101 e-tinkers.com
Dynamic DNS update
We are now be able to access our Raspberry Pi via domain name, and it seems to work perferctly, except one minor issue. As we mentioned previously that since the Broadband ISP issue an dynamic IP which might change frequently, when that happened, we will have to change the IP address in our DNS records at Namecheap.com. This could be quite a challenge if we need to change it manually.
Most of DNS name servers offer Dynamic DNS service to update the DNS database. The Dynamic DNS service periodically checks for a change to the computer's IP address, and when a new IP address is discovered, it updates the Dynamic DNS database to reflect that change.
First we need to activate Dynamic DNS on Namecheap.com, login to the Namecheap.com dashboard using our user name and password.
- Click on Manage button under the domain list;
- Click on Advanced DNS tab and scroll down until “Dynamic DNS” section;
- Click on the Status toggle switch to turn it on;
- A Dynamic DNS Password will show up, select the password and copy to the clipboard as we will need it later on.
Now we need to install Dynamic DNS client software ddclient on Raspberry Pi, SSH into the Raspberry Pi to install ddclient.
sudo apt-get install ddclient
If this is the first time ddclient is installed, a GUI installation script (debconf) will be launched automatically:
- On Dynamic DNS service provider, select other, and type in dynamicdns.park-your-domain.com;
- On Dynamic DNS update protocol, just press enter, we will manually change this later;
- On Username for dynamic DNS service, input the actual domain name of the website;
- On Password for dynamic DNS service, paste the password we save from namecheap.com here;
- On Network interface used for dynamic DNS service, just type in dynamicdns.park-your-domain.com/getip, we will need to modify the network interface later;
- DyDNS fully qualified domain names, type in @.
The configuration script does not setup the configuration we expected, so we will have to manually make some changes:
sudo nano /etc/ddclient.conf
To setup how often it will update the DNS, we add the line:
daemon=3600
This means that it will check hourly (3600 seconds) for any change in public IP.
Make the changes on protocol=dyndns2 line and use=if, if=… line so that the entire configuration file would looks as this:
# Configuration file for ddclient generated by debconf
#
# /etc/ddclient.conf
daemon=3600
protocol=namecheap
use=web, web=dynamicdns.park-your-domain.com/getip
server=dynamicdns.park-your-domain.com
login=your-actual-domain-name.com
password=dynamic_dns_password_assigned_by_namecheap
@
Press control-x to save the configuration file. Ensure that the configuration is working by running the following command:
sudo ddclient -daemon=0 -debug -verbose -noquiet
Pay attention to see if there is any ‘invalid’ or ‘error’ configuration setting.
We’d want to run ddclient as a daemon so it can check for a change of IP address periodically and notify the dynamic DNS provider (Namecheap.com) if necessary. To ensure that the ddclient is running in the dameon mode, check the run_daemon in /etc/default/ddclient file is set correctly as:
run_daemon="true"
Run the following command to start the daemon:
sudo service ddclient start
and we can use the following command to check the status:
sudo service ddclient status
We are online now!
We are now all set and officially online, serving website content out from a Raspberry Pi 3! I have a fiber optic broadband with 300mbps on the WAN connection, this is good enough for now.
It’s been quite a journey to setup self hosting on Raspberry Pi!
What's next?
If you follow this series of articles to this far, that's means that you do want to setup your WordPress for public access, then Setting up SSL is the natural next step.
If you plan to blog a lot, the SD card will sooner or later fill-up with all the images and blogs, you might want to add a hard disk as the root file system.
You may also want to take a look at how to setup WordPress SMTP email.
Great Tutorial but I have this:
Sorry for my late reply. I’ve edited your post to mask the password and IP info in the error message. The error message shows that the domain has not be activated yet. Do you use namecheap as your hosting service? My ddclient example is based on namecheap configuration which is slightly different from the standard ddclient api, if you are not using namecheap, please consult your hosting company for the DDNS configuration requirements.
Yes i use a namecheap free domain name but he doesn’t work…
Thanks for the response
Okay, I solved my problem. I used a freenom domain that I linked to cloudflare and I used ddclient with the default script and it worked
But I can’t connect to my website from my local network. Is that normal?
No. you should be able to access your website via local network. But personally I don’t have any experience of using cloudflare, so not quite sure what could cause it. Maybe better to read the access.log to find out more.
You can use https://staticIP.io also, if you have a currently have a dynamic IP address and you need something static to remote-access in
thanks for the tutorial.
I successfully followed the tutorial.
The command “sudo ddclient -daemon=0 -debug -verbose -noquiet” resulted in no ‘errors’ or ‘invalid’.
‘sudo service ddclient start’ gave no remarks, but
‘sudo service ddclient status’ gave following output:
* ddclient.service - LSB: Update dynamic domain name service entries
   Loaded: loaded (/etc/init.d/ddclient; generated; vendor preset: enabled)
   Active: active (running) since Wed 2019-04-24 21:30:15 BST; 13min ago
     Docs: man:systemd-sysv-generator(8)
  Process: 420 ExecStart=/etc/init.d/ddclient start (code=exited, status=0/SUCCESS)
   CGroup: /system.slice/ddclient.service
           `-571 ddclient - sleeping for 80 seconds

apr 24 21:30:13 Craeghs systemd[1]: Starting LSB: Update dynamic domain name service entries...
apr 24 21:30:15 Craeghs ddclient[420]: WARNING:  file /etc/ddclient.conf, line 6: Invalid Value
apr 24 21:30:15 Craeghs ddclient[570]: WARNING:  file /etc/ddclient.conf, line 6: Invalid Value
apr 24 21:30:15 Craeghs systemd[1]: Started LSB: Update dynamic domain name service entries.
apr 24 21:30:15 Craeghs ddclient[573]: WARNING:  file /etc/ddclient.conf, line 6: Invalid Value
apr 24 21:30:15 Craeghs ddclient[576]: WARNING:  file /var/cache/ddclient/ddclient.cache, line 3
Any suggestions?
Regards,
Paul
Hi,
I solved my problem:
For some reason I repeated the line 6 in the file /etc/ddclient.conf twice.
After deleting this line and restarting the ddclient service, no remarks were logged anymore.
a minor point of attention in the tutorial:
‘ sudo /etc/ddclient.conf’ should be ‘sudo nano /etc/ddclient.conf’.
Anyway, thanks for the great tutorial!
Thanks for pointing out the missing ‘nano’, I made the change.
Hi,
I have followed your steps and got the WordPress running on my Pi 3. 🙂
Installed a Theme, and trying to import it using a One Click Demo Import plugin,
but when I try to import, I am getting Internal Server Error (500) error.
Tried changing client_max_body_size but didnt help.
Please help~
Error 500 means there are some error on the server side, since this is related to the specific plugin you are using, you should check with the plugin developer for supports. You could also check the server error log (var/log/nginx/error.log) to see more details about the error.
Thanks!
I have checked the error.log and it detailed error occurred as XML Reader was missing.
sudo apt-get update
sudo apt-get install php7.0-xml
solved the issue. Thanks!!
I have followed your tutorial and my server is working perfectly as long as I am connected to the same WiFi but when I try to access my website from a different connection it just times out. Any idea what this could be? My router?
It is too broad to narrow down the cause, but sounds like you can’t access your server outside your internal network. Is your port forward working?
my isp cox was blocking port 80. i switched to at&t and now it is up and running. thank you for the rely and the tutorial
i have gone through the whole tutorial and am getting a could not resolve host name and a line 6 invalid value for keyword if-